
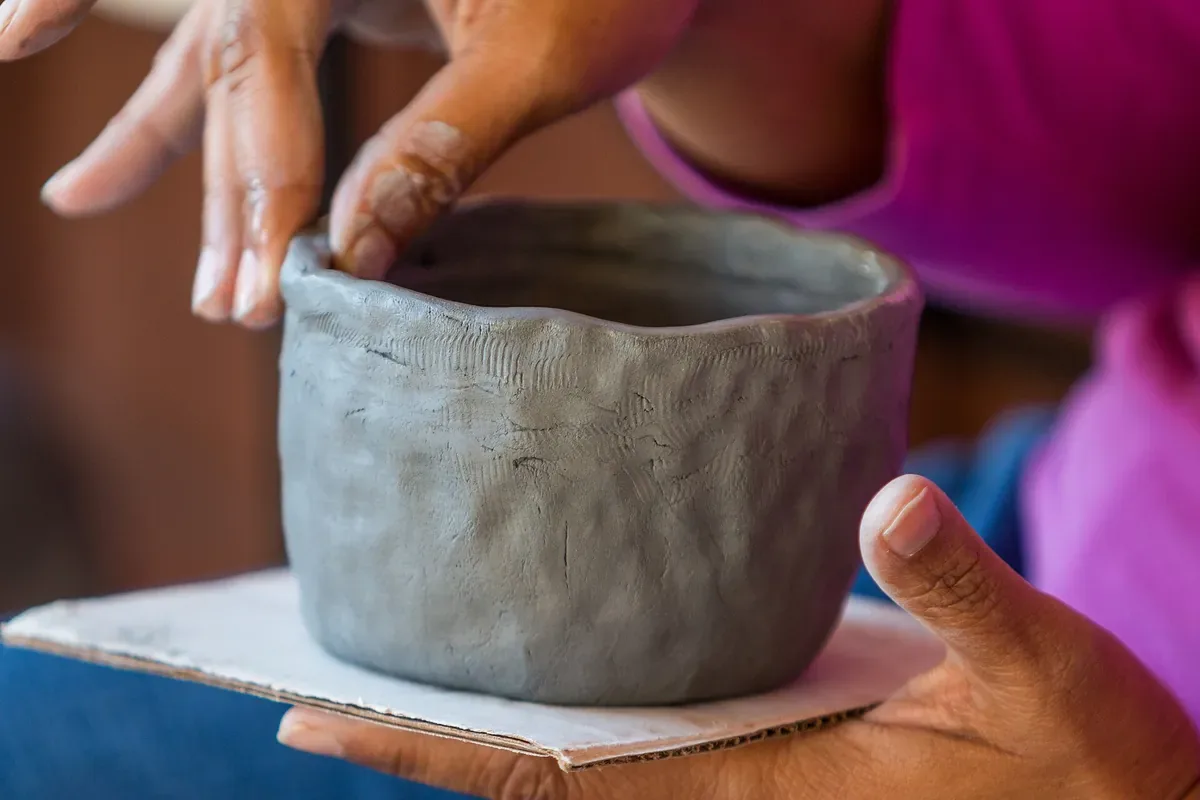
Pinching is the most direct way to make pottery without a wheel: your thumb opens the center of a ball of clay and, by pressing the wall against the fingers outside, you thin the material and make the form rise or flare. It needs no special tools. What it does need is attention to what you cannot see: the bottom, the transition between bottom and wall, and the clay reserve you still have.
This article goes deeper into the pinch technique introduced in our guide to hand-building without a wheel. The focus here is the gesture, a small bowl step by step, checking thickness and the most common problems.
What pinching does to the clay
Pinching compresses a region between two opposing contacts so the clay moves somewhere else. Nothing is added or removed: the material only changes place. So every pass spends part of a limited stock. If you thin only the top, the mouth flares quickly while the lower part stays heavy. If you work the rim to gain height, you concentrate effort where the wall may already be thin.
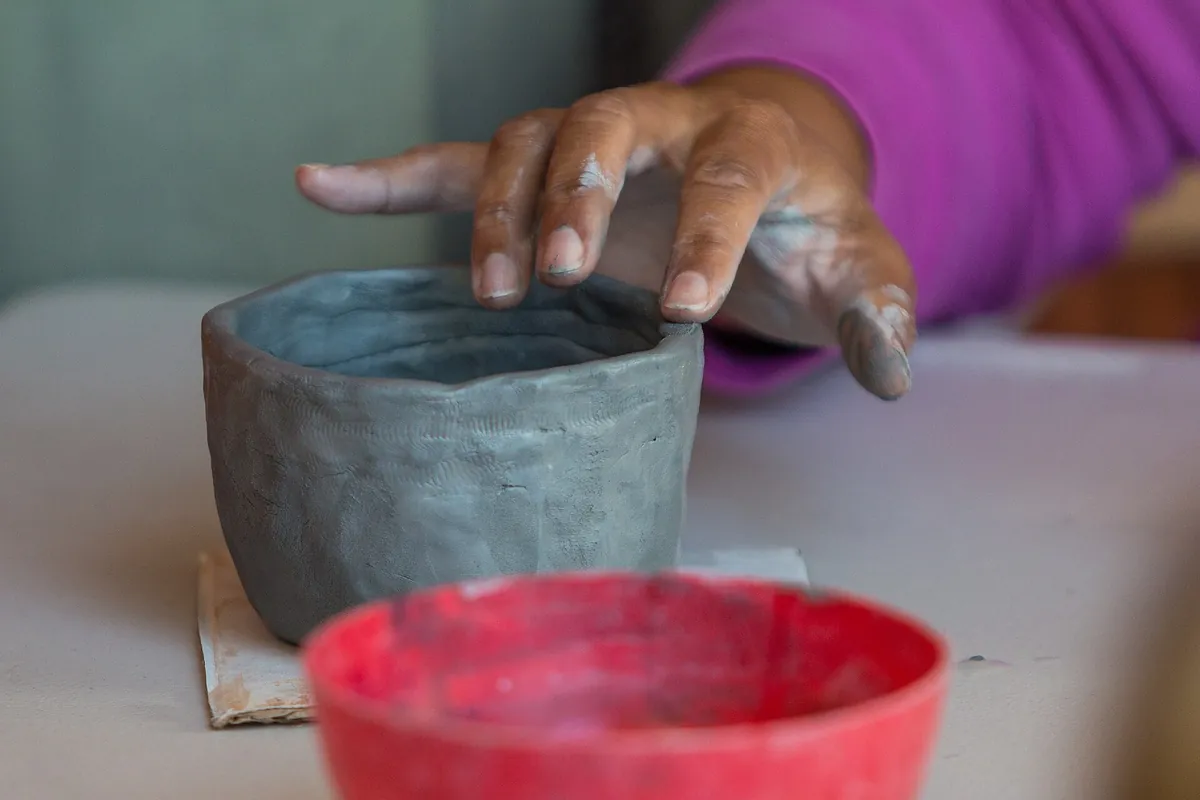
An unfinished pinch pot with visible finger marks on its surface. Photo: Connar L’Ecuyer / Santa Monica Mountains National Recreation Area (US NPS), marked as public domain on Wikimedia Commons.

Before opening, picture the section and name the regions: rim (the band around the opening), wall, transition (the curve between bottom and wall), bottom, interior floor (the inside surface over the bottom) and foot (the outside part that touches the bench). A flat base can hide an uneven floor, and a thick rim can sit on a wall that is already thin.
Before you start: clay, bench and support
Use an identified ceramic clay body suited to hand-building and accepted by the kiln that will fire the piece. Air-dry clay is a different product and does not replace ceramic clay intended for kiln firing.
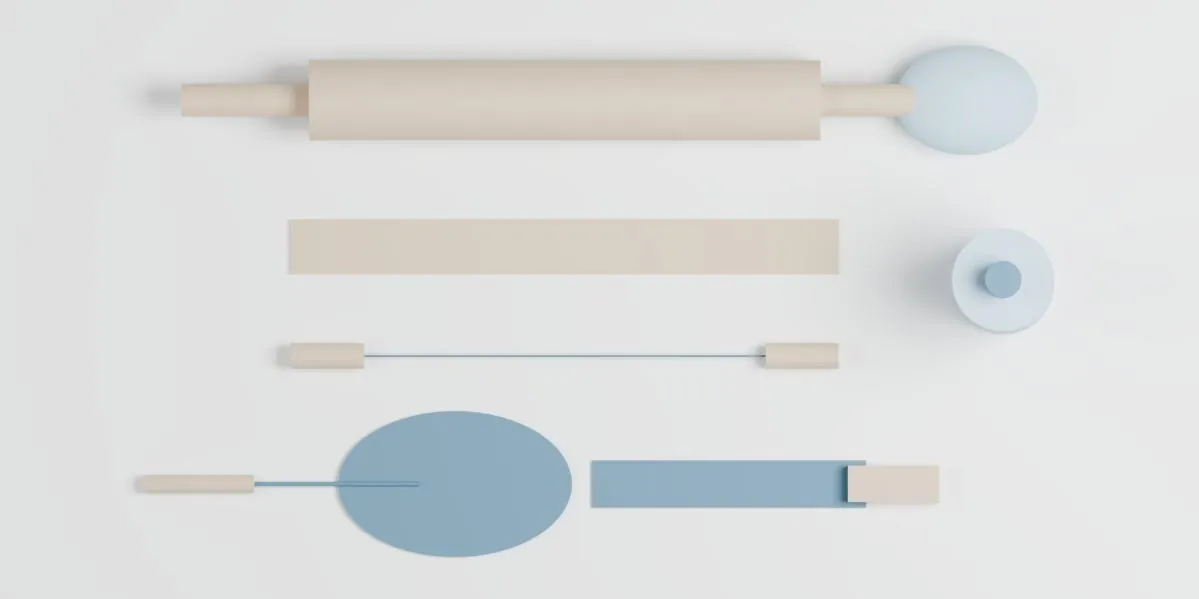
Basic tools at rest. Render from SenseCraft’s Ceramics by Hand (English edition); not to scale.
Essentials: a rigid board you can carry, clean plastic to cover the work, a damp cloth, a little water, a round-tipped modeling tool, a ruler and a container for scraps.
Optional, for checking thickness: a pottery thickness caliper (with rounded tips) and, for the bottom, a rigid bridge (a straight ruler or batten), two spacers of equal height and a round-tipped probe to measure depth. A banding wheel helps but is not needed.
Support matters more than it seems. Your palm can carry the weight of a small portion; if that gets tiring, keep the base on the board and use your other hand to take the pressure next to the wall, turning the board rather than dragging the piece. The idea is never to squeeze the piece just to hold it.
How much clay for a pinch pot?
A ball that fits comfortably in your hand is the usual starting point in teaching. There is no universal weight: if the portion takes effort to hold or keeps you from seeing the floor, make it smaller. Weighing helps you repeat the exercise, but the same starting weight does not give the same dimensions in different clays.
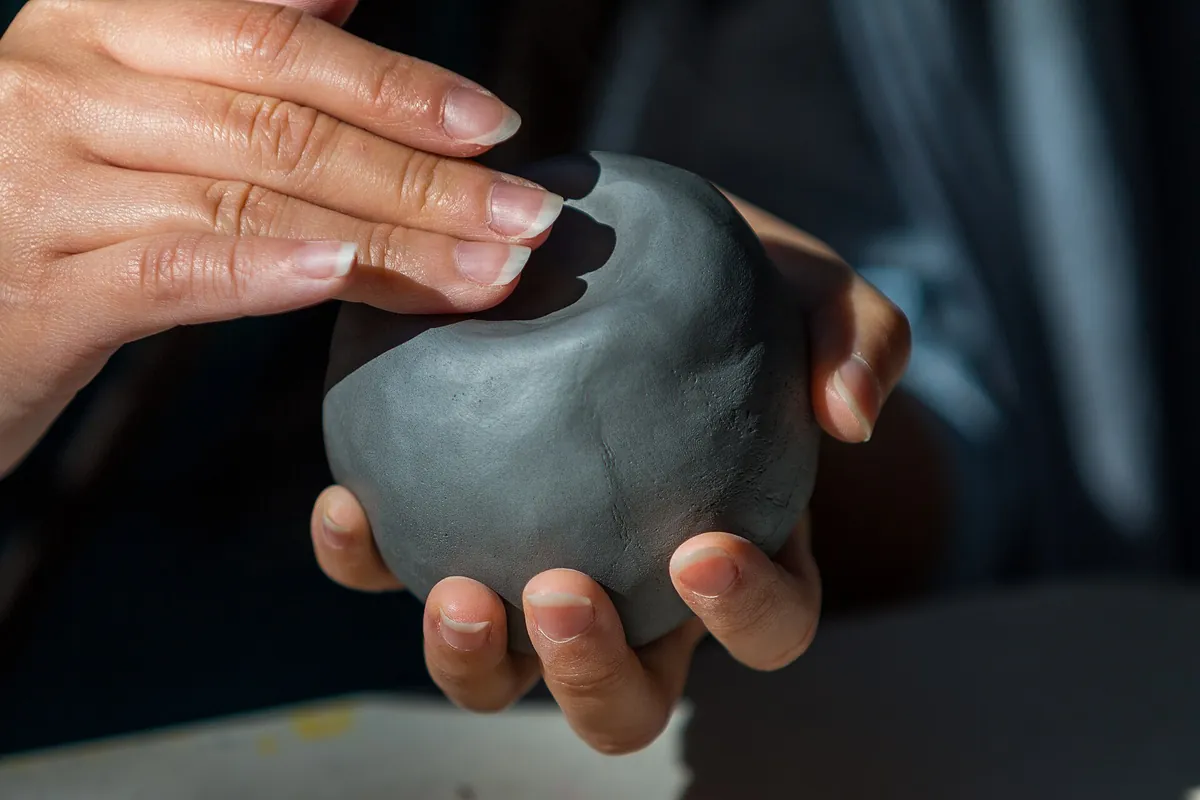
A portion that fits in your hand is the starting point for pinching. Photo: Connar L’Ecuyer / Santa Monica Mountains National Recreation Area (US NPS), marked as public domain on Wikimedia Commons.

The pinching motion: press, release, turn
Before the piece, practice on a scrap. Open a shallow hollow, place the pad of your thumb inside and the pads of your fingers outside, at about the same height. Press lightly and release completely. Turn a little and repeat, overlapping part of the previous contact. The area should change section without becoming an isolated groove.
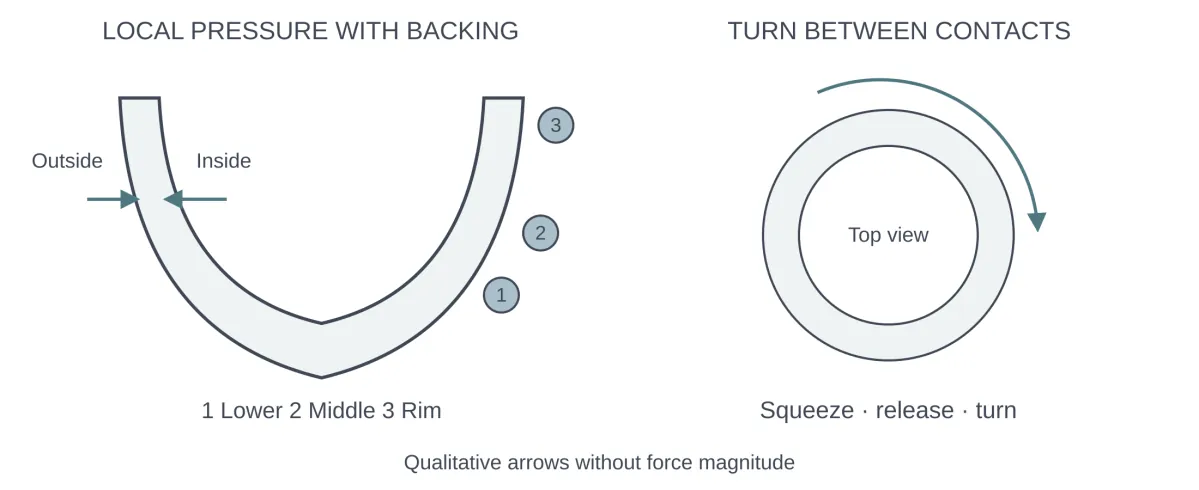
Local pressure with support, from the lower wall to the rim; press, release, turn. Diagram from SenseCraft’s Ceramics by Hand (English edition); not to scale.
A few points make a difference:
- Backing support close to the thumb. The fingers outside support the wall directly opposite the thumb. Support that is too far away lets the wall bend before it thins.
- Pads, not tips. Keep your nails out of the clay and match the contact area to the size of the region.
- Bottom up. Work the lower wall first, next to the transition, and move up. One full round spreads the work but does not correspond to a fixed thickness.
- Do not turn with your fingers closed. That drags the clay. Turn between one press and the next.
Step by step: a small pinch bowl
As a practice target, with the clay still wet: an outside diameter of about 90 mm at the rim, a height of 40 mm, walls 6–8 mm thick and a bottom 8–10 mm thick, with a gradual transition. These are dimensions proposed in the book as a teaching reference for this exercise, not the dimensions of the dry or fired piece. Scale down if your clay or your hand’s reach calls for it.
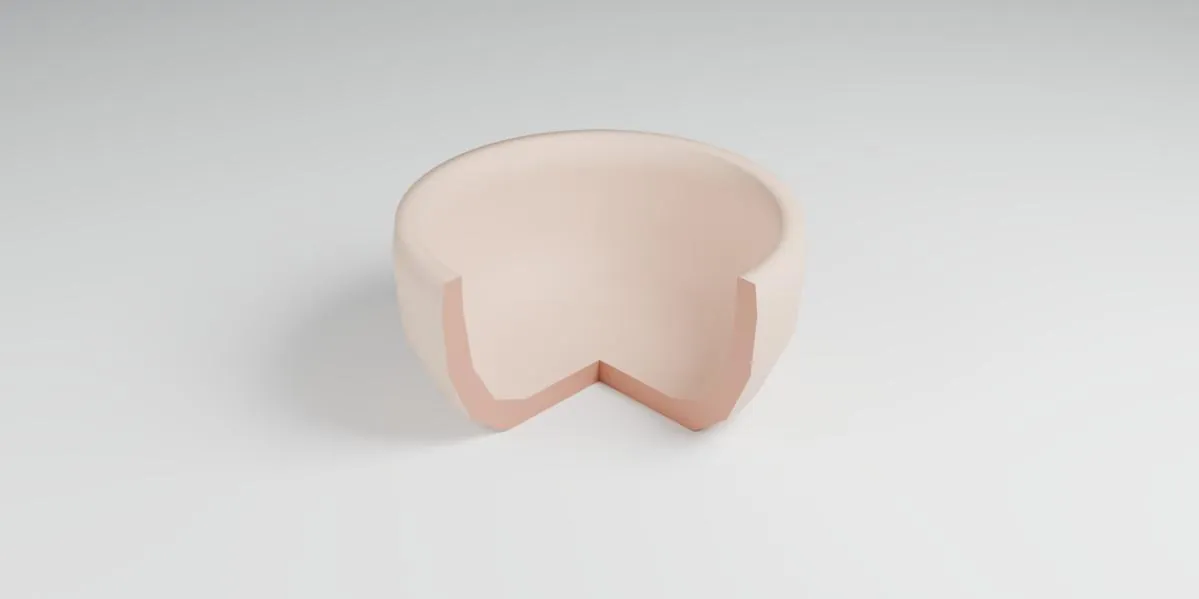
Target bowl form with a quarter removed. Render from SenseCraft’s Ceramics by Hand (English edition); illustrative geometry, not to scale.
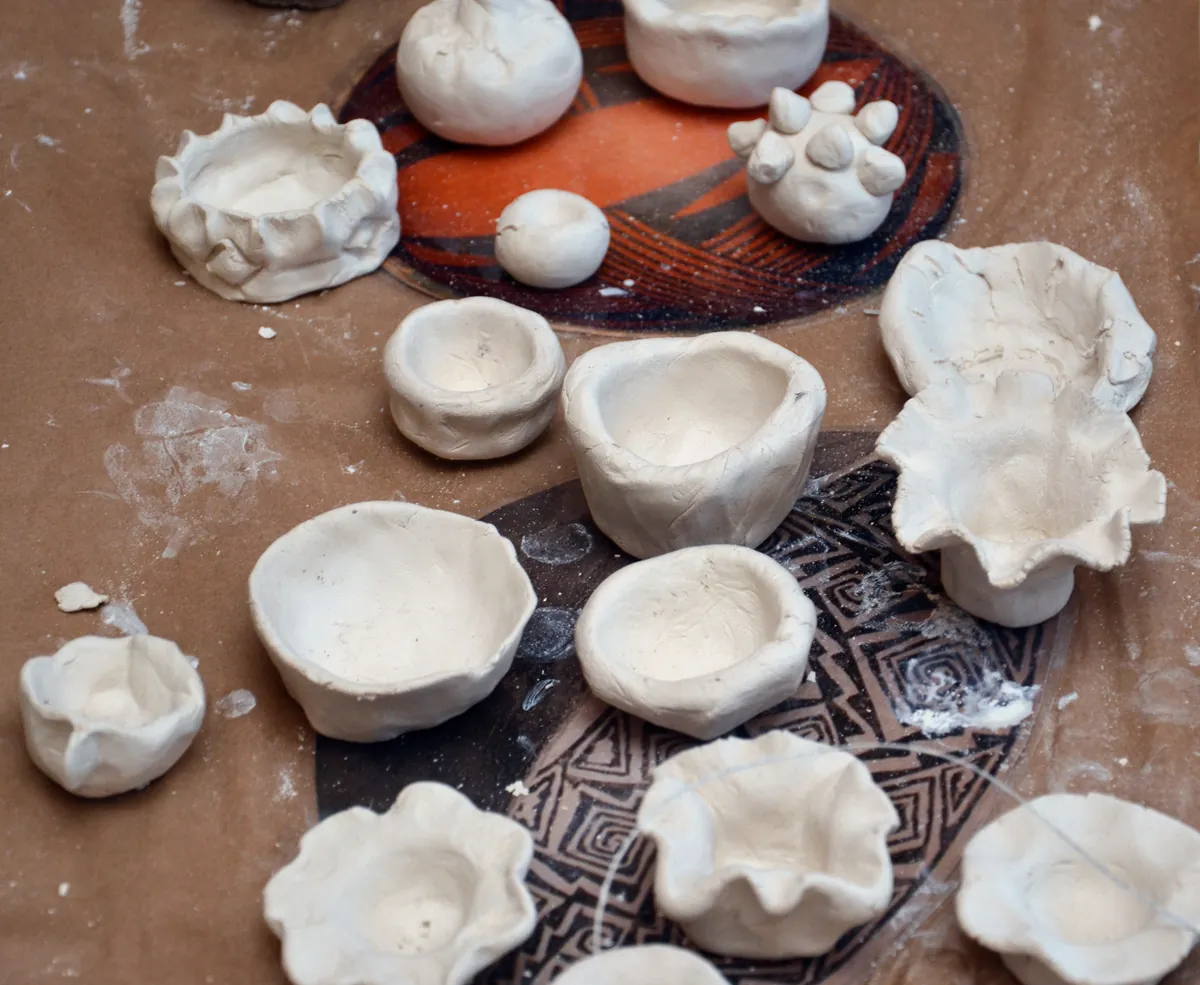
Pinch pots made in a workshop: the same technique gives very different forms and rims. Photo: Michael Quinn / Grand Canyon National Park (US NPS), CC BY 2.0, via Wikimedia Commons; resized.

- Form the ball. Use clay of uniform consistency, without folding it over hollow spaces. Set aside a scrap of the same clay to test the gesture.
- Plan the bottom. Choose the underside and picture the section. How far you insert your thumb does not tell you the bottom thickness.
- Open the center gradually. Press your thumb into the center while supporting the clay from below and at the sides with your other hand. Withdraw without twisting, turn and check. Do not try to reach the bottom in one go.
- Find the transition. Place the first presses on the curve between floor and wall, without digging a circular groove.
- Develop the lower wall. Press, release and turn, comparing opposite sides. Leave alone what has already thinned.
- Move up in short passes. Watch whether the clay is gaining height, width or both. Do not pull the rim upward.
- Correct with the reserve you have. Find thick areas with a light touch. If a section has become too thin, changing the proportions or starting again is usually better than patching.
- Settle and refine. Set the base on the board, even out the floor with broad contact and support from below, and round the rim section by section, with backing support. Do not use the mouth to press the piece against the table.
- Inspect and record. The whole circumference, the bottom and the foot. Note where it is thin, thick, cracked or unchecked. Move the piece on its board.
Keep going while the gesture produces a local change without a growing crack. Stop at a tear, a fold, a sagging bottom or lost access to the opposite side. Clay that is still soft does not mean the next pass will help.
Can you use water to smooth a pinch pot?
It depends on the procedure. Paul Briggs describes moistening the rim at specific points while he pinches. For this first exercise, start without adding water and moisten only when needed, with a sponge or brush and no excess. A slippery film, blurred marks and a softening wall are signs to stop wetting.
How do you get an even rim?
An even rim does not have to be level: its contour and cross-section should be consistent with the design. Refine section by section with the piece upright, and lightly mark only the confirmed high spots while looking at the profile at eye level. Cutting everything down to the lowest point uses up useful wall. Leveling the rim by placing the bowl upside down on the table only works once the clay is firm; for a first bowl, refine it upright.
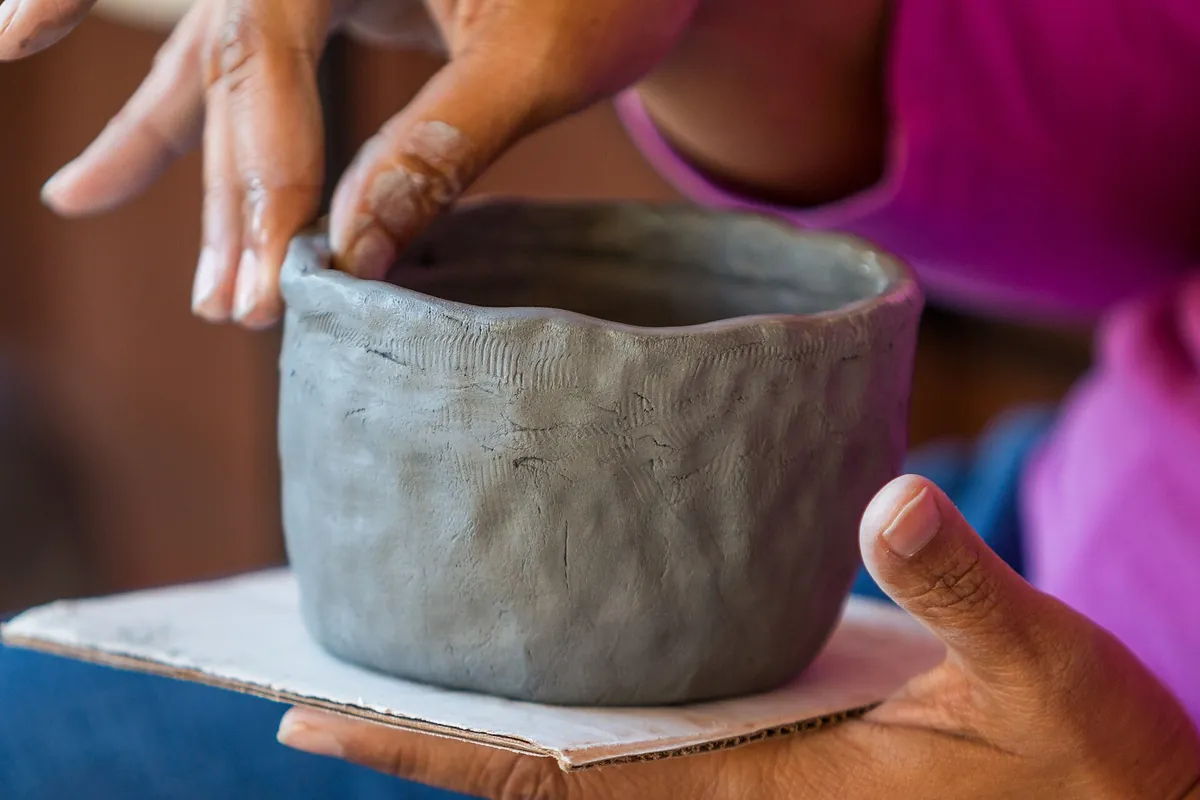
Fingers working near the rim of a pinch pot resting on a board. Photo: Connar L’Ecuyer / Santa Monica Mountains National Recreation Area (US NPS), marked as public domain on Wikimedia Commons.

How to check wall and bottom thickness
Pressing with two opposing fingers lets you compare areas, not read millimeters. To get numbers, there are two routes.
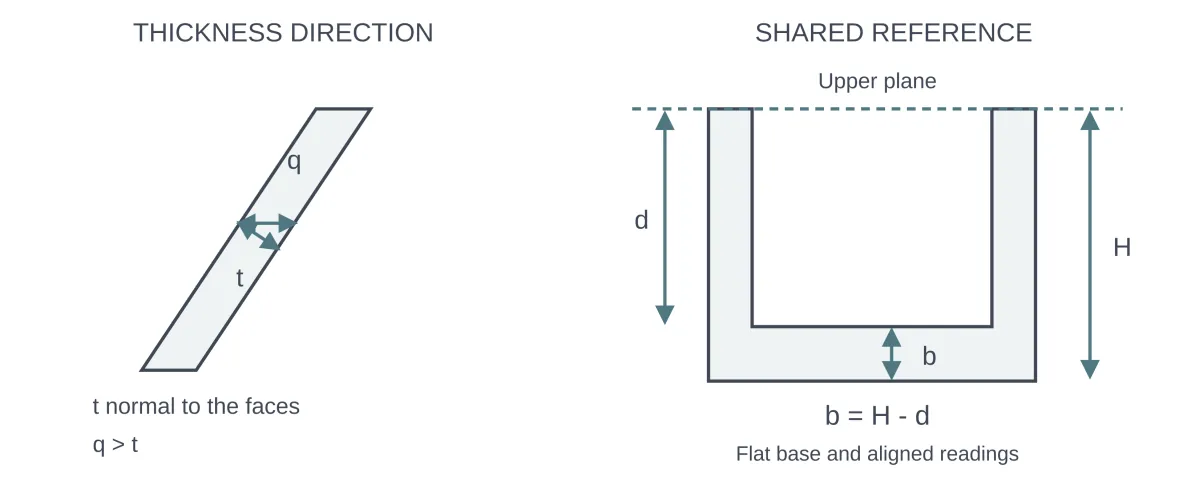
Thickness in the right direction, and the bottom by depth difference (flat base, aligned readings). Diagram from SenseCraft’s Ceramics by Hand (English edition); not to scale.
Thickness caliper. Check that the caliper reads zero with its measuring tips gently touching. Then verify the reading against a rigid reference of known thickness. When measuring the clay, touch it with the rounded tips without squeezing, and distrust the reading if the tips leave a mark. On curves, the caliper can touch points that are not opposite each other; note that instead of making up for it with decimal places.
Bottom by depth difference. With the bowl sitting fully on a flat, rigid board, set the bridge on the spacers, parallel to the board and above the mouth, without touching the rim. Always using the same face of the bridge and holding the probe vertical, measure H to the exposed surface of the board beside the piece. Without moving the bridge, measure d to the interior floor at the point you want to check. When the underside of the bowl is flat and rests on the board, H − d estimates the vertical thickness of the bottom at that point. If the base is concave, has a foot ring or recess, or does not rest fully on the board, the calculation measures the height of the floor above the board, not the thickness: a 3 mm recess under a 9 mm result can hide a 6 mm bottom. If the underside geometry is unknown, do not treat H − d as the bottom thickness or subtract an assumed recess depth.
Hypothetical example, flat base: H = 42 mm and d = 33 mm give 9 mm. If each reading can be off by 1 mm, the bottom may be anywhere from 7 to 11 mm, and it is the 7 mm value that governs whether you remove more. Since 7 mm is already below the 8 mm practice target, do not keep removing clay based on the middle value. A bridge that tilts or shifts between the two readings invalidates the calculation.
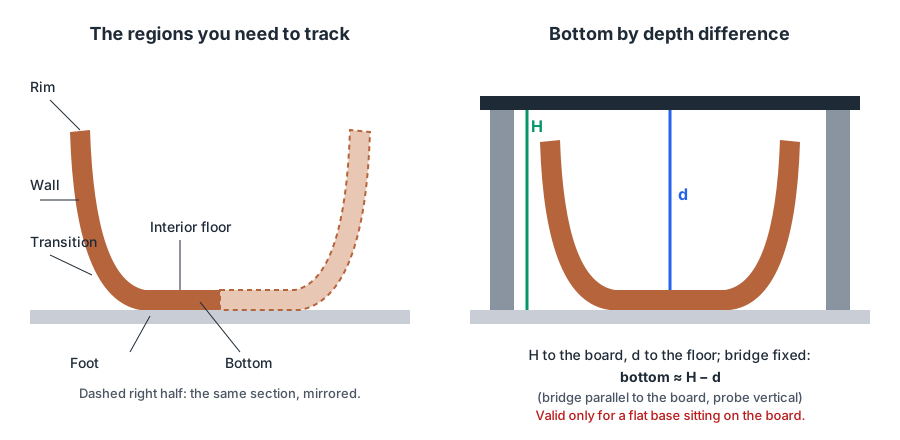
SenseCraft teaching diagram, not to scale. H − d only applies to a flat base sitting on the board.
To calibrate your touch, use a sacrificial sample of the same clay: open a hollow, estimate by feel where it is thinnest and cut it in half with a wire, hands clear of its path. Compare the section with your estimate. This checks the sample, not the thickness of the bowl you are making; it trains your hands to read the clay.
Common problems and what to check
| Sign | What to check first |
|---|---|
| The mouth flared too much and the piece stayed low | Whether the reserve stayed low; work the lower wall and leave the thin top alone |
| Heavy bottom and thin wall | The bottom, with a reliable measurement, before removing anything from inside |
| Deep grooves or creases | Nails, force and overlap; increase the contact area or use smaller, gentler pinches |
| The rim cracks while pinching | Whether only the rim dried ahead of the rest or the whole clay is tearing |
| The base rocks | The board and the underside; correct it only while the clay is in the right window |
Why does a pinch pot crack?
Many cracks come from parts drying at different rates. An exposed rim loses water before a thick transition; once it is rigid and its neighbor still has to shrink, the tension releases as a crack. Tony Hansen, of Digitalfire, sums up the principle: even drying matters more than speed. Drying slowly does not guarantee that every region keeps the same pace.
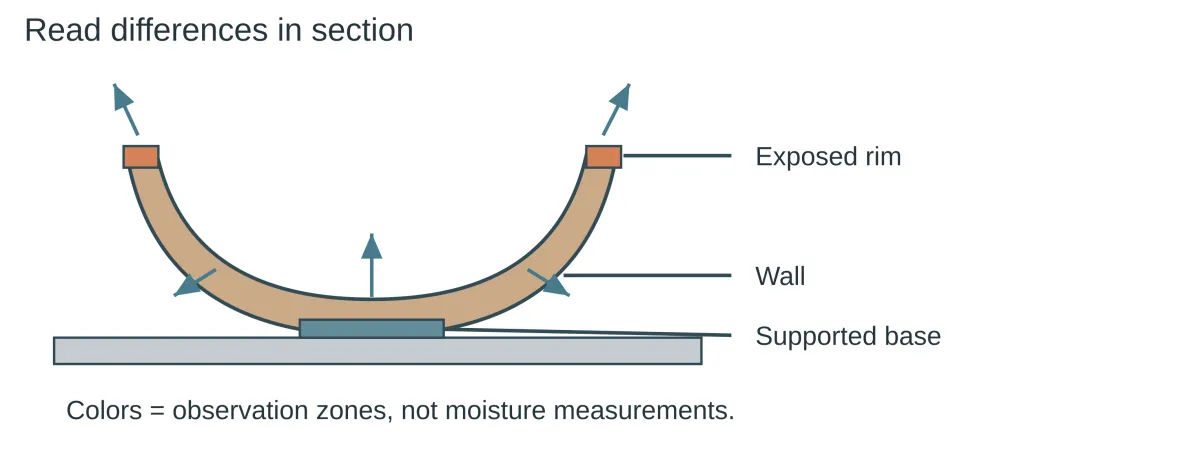
The exposed rim, wall and supported base may dry at different rates. Colors identify areas to monitor, not measured moisture levels. Diagram from SenseCraft’s Ceramics by Hand (English edition); not to scale.
In practice:
- keep the piece stable, away from direct drafts and local heat;
- if the rim is drying ahead, protect just the rim with a light cover that does not touch it;
- check the plastic: moisture can condense and drip onto details and rims;
- a film of slip over a crack is not a repair; if the line comes back, the problem is still there. For a first piece, reclaiming the clay and starting over is a sound technical decision.
How long does a pinch pot take to dry?
There is no time that fits every piece. It depends on the clay, the thickness (especially the bottom, which tends to be the thickest part and sits on the board), the humidity of the room and the covering. Watch the piece rather than the clock: compare rim, lower wall and bottom, and remember that color and how cold it feels show trends but do not prove the inside is dry.
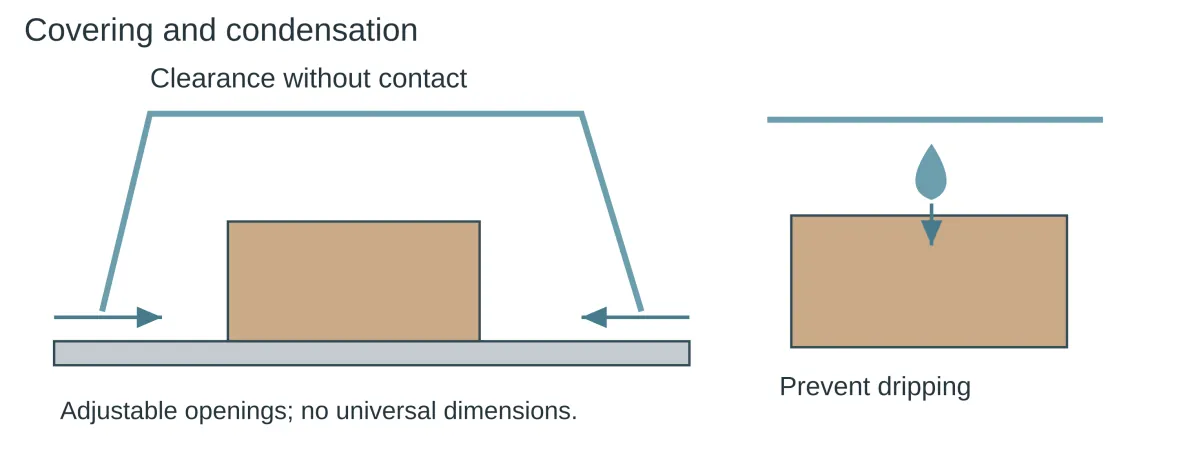
A cover that does not touch the piece, with adjustable openings; keep condensation from dripping onto it. Diagram from SenseCraft’s Ceramics by Hand (English edition); not to scale.
Do you need to poke a hole in a pinch pot before firing?
Not as a rule. Sue McLeod, writing in Ceramics Monthly, explains that kiln explosions come from water still in the clay, not from trapped air itself; closed pockets cause trouble because they can keep the piece from drying completely. Neither a hole nor a fixed waiting time guarantees a safe firing: clay that feels cold to the touch is likely still damp, and an open vessel can keep a wet bottom. Agree with whoever fires your work on the clay, the thickness and the drying conditions before handing the piece over.
Pinching or carving out?
Both techniques make vessels from a block, but in opposite ways. In pinching, your fingers redistribute the clay. In carving out (Japanese kurinuki is one example), a loop tool removes material from inside a volume already defined from outside. Thickness removed by carving does not come back by smoothing.
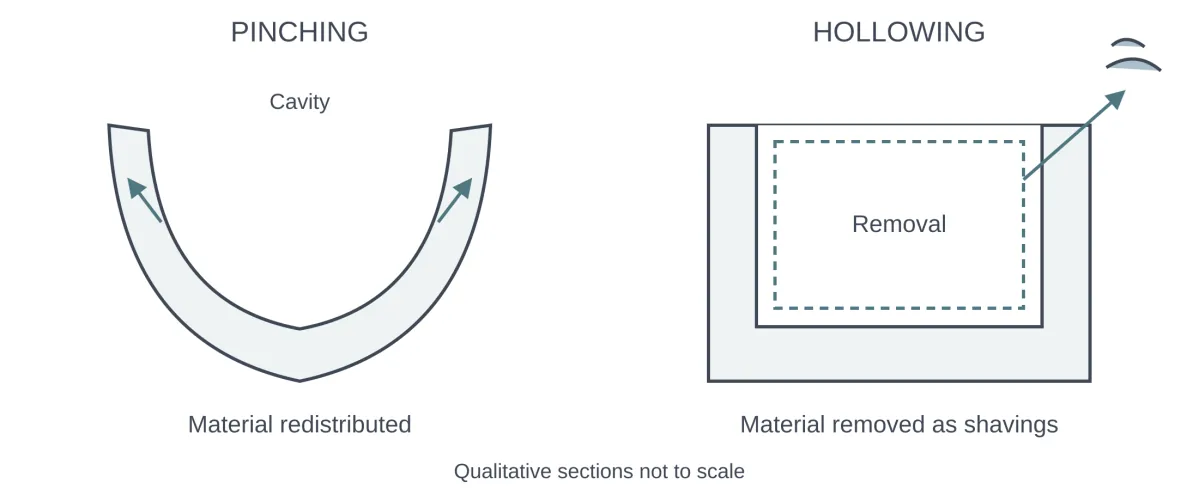
Pinching redistributes clay; hollowing removes material from a solid block. Diagram from SenseCraft’s Ceramics by Hand (English edition); not to scale.
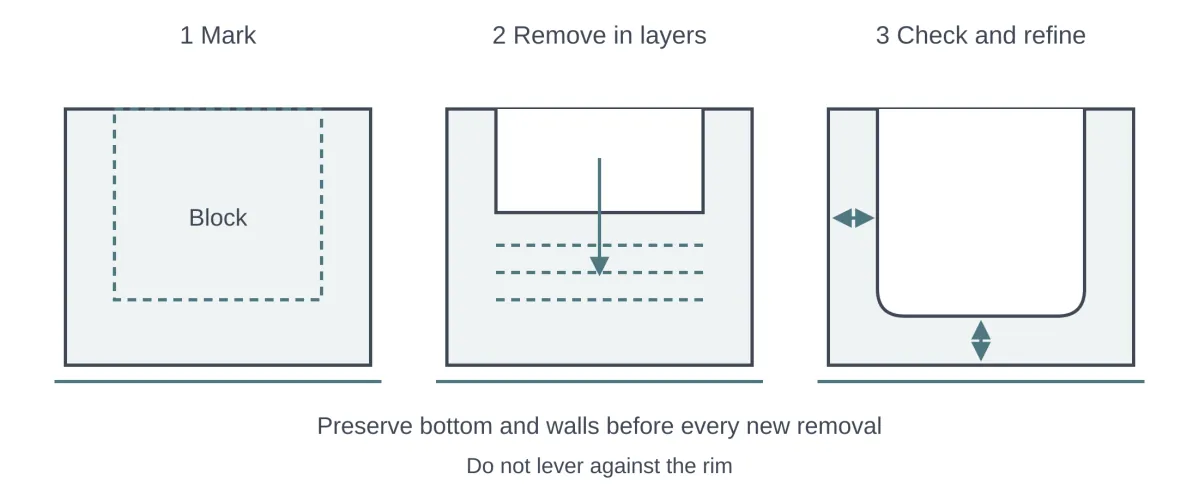
Open hollowing: mark the cavity, remove clay in layers, and check the walls and base before each further removal. Diagram from SenseCraft’s Ceramics by Hand (English edition); not to scale.
| If you want to… | Prefer | Watch out for |
|---|---|---|
| Feel the wall with your hands and reach rounded forms gradually | Pinching | Finger reach and where the reserve goes: height or width |
| Set the exterior first and open the interior afterward | Carving out | Tool access, depth and thickness hidden in the bottom |
| Open by pinching and refine areas by cutting | A combination | Recording where the clay was redistributed and where the wall lost material |
For a first piece, pinching is usually easier to read.
Safety and caring for your hands
Pick up scraps before they dry, clean the bench with a damp cloth and do not sweep, blow or sand dry clay. The University of Utah’s safety guidance treats silica dust as an inhalation hazard and recommends daily wet cleaning and breaks for hands and wrists. Pain, numbness or loss of control are reasons to stop and adjust your support.
Where this content comes from
This article summarizes chapter 6 of Ceramics by Hand — Foundations and Techniques Without a Wheel, a literature-based guide compiled by SenseCraft. It combines practices documented in the sources cited below with teaching structure, tables, a diagram and exercise and checking methods developed by SenseCraft. The writing was assisted by AI tools and edited by SenseCraft. To see pinching alongside the other techniques, go back to the guide to pottery without a wheel.
Sources cited
- AMACO Brent. How to Make a Pinch Pot.
- Paul Briggs. How to Make a Pinched Vase Form from a Solid Lump of Clay, Ceramic Arts Network.
- Eva Champagne. Kurinuki Curious, Pottery Making Illustrated, 2020.
- Tony Hansen. Drying Crack, Digitalfire Reference Library.
- Sue McLeod. Techno File: Air Bubble Myth, Ceramics Monthly, 2021.
- Snail Scott. Protecting Your Pottery and Ceramic Sculpture: Hints for Even Drying, Ceramic Arts Network.
- University of Utah, Environmental Health and Safety. Arts Safety: Ceramics.
Limits
- This article summarizes published sources; it is not the result of SenseCraft testing. The practices cited belong to the authors and institutions named.
- The bowl dimensions are practice targets for wet clay, not minimum thicknesses or fired dimensions; every clay body shrinks and behaves in its own way.
- Appearance, thickness and the absence of visible cracks do not prove strength, watertightness or that a piece is safe for food contact.
Basis: literature review — original article based on the October 2026 Portuguese edition of the SenseCraft handbuilding book, chapter 6. The corresponding material is also available in English in Ceramics by Hand — Foundations and Techniques Without a Wheel (November 2026 edition), with primary sources listed at the end.