
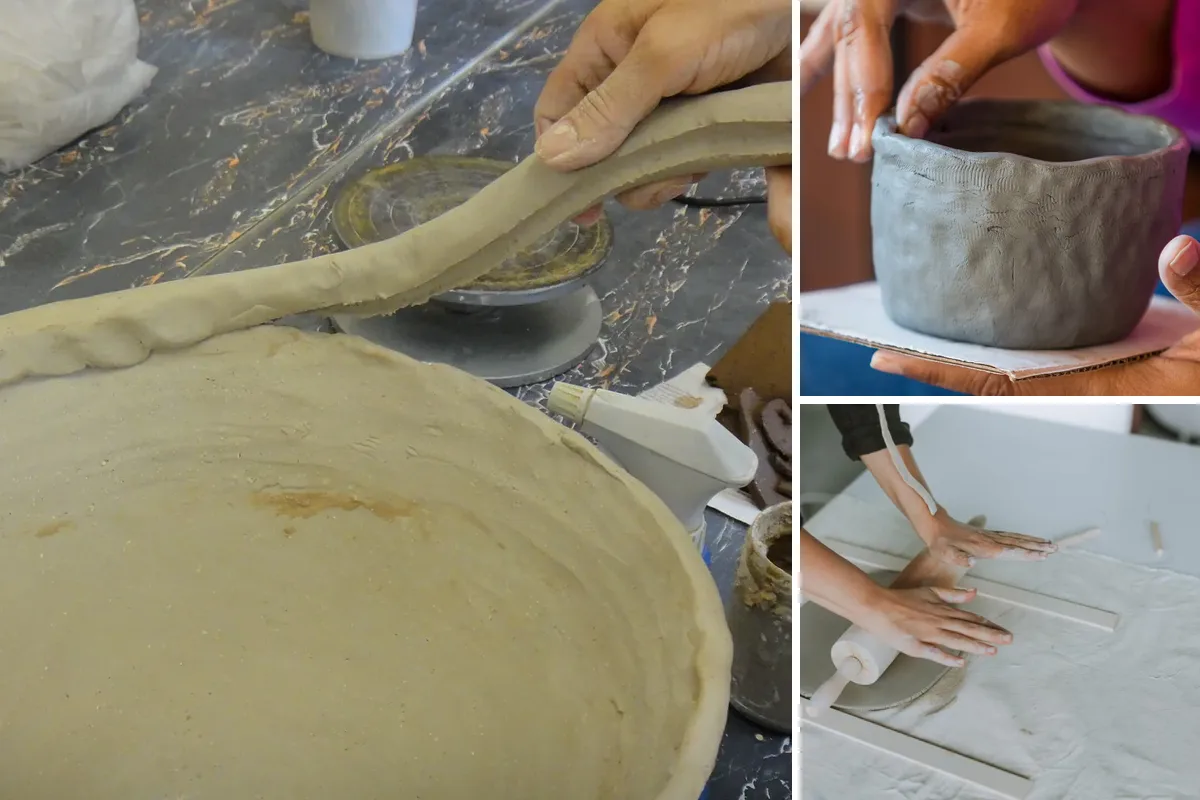
Making pottery without a wheel means building the form with your hands and a few support tools, instead of shaping clay as it spins on the wheel. It is a way in for anyone starting at home or in a small studio, as long as you have a suitable clay body and, when the piece has to become fired ceramic, access to a ceramic kiln. It is also how experienced potters make forms the wheel does not handle well: oval, faceted or flat-walled pieces, or irregular outlines.
The three classic hand-building techniques are pinch, coil and slab. Carving out a solid block (hollowing) is another, subtractive approach. Extruders and molds are aids that extend what those techniques can do. This guide covers what each one solves, when it is the right choice and what to check before you start.
To compare the techniques we use five criteria throughout: what the piece is for, its form (open, closed, flat, bellied), how many joins it needs, the state of the clay at each step, and whether the piece can come off whatever gave it its shape.
Before you choose a technique: clay and firing
The technique comes after two questions: what the piece is for and where it will be fired.
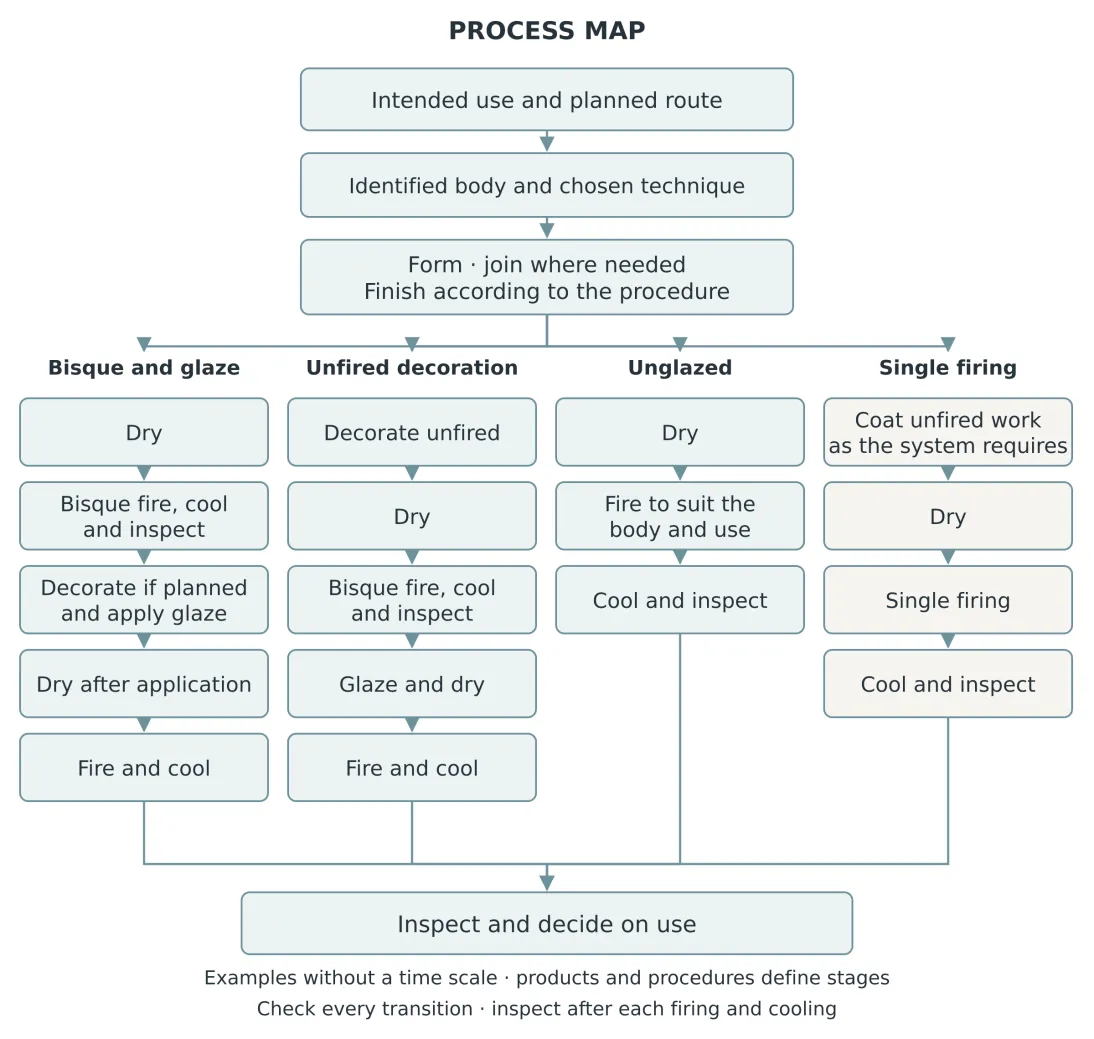
Process map: the forming technique is only one step on the way to a fired piece. Diagram from SenseCraft’s Ceramics by Hand (English edition); not to scale.
- Use an identified clay body. Note the maker, product, batch and recommended firing range, and keep the technical data sheet and safety data sheet. An unidentified clay leaves a doubt no one can settle by its color later.
- If someone else fires your work, check first that their kiln accepts that clay. Finding out after the piece is made is too late.
- Drying is not firing. A dry piece is hard, but it softens again in water. Only firing changes the material irreversibly.
- Air-dry clay does not replace ceramic clay intended for kiln firing. They are different products for different uses.
For a first piece, choose something small and open, with no handle and no lid. That limits how many decisions you make at once; it does not guarantee the result, but it shows clearly where something went wrong.
Can you make pottery without a wheel or a kiln?
You can shape clay without a wheel or a kiln, but it only becomes ceramic once it is fired. There are two honest routes:
- Air-dry clay: it hardens without a ceramic firing and is mostly used for decorative objects. Its resistance to moisture depends on its composition and finish; do not assume it is waterproof or food-safe without specific confirmation from the maker.
- Ceramic clay with outsourced firing: you build at home and take the dry piece to a studio or school that fires for others. Agree beforehand on which clay their kiln accepts.
A household oven does not reach the temperatures of conventional ceramic firing. To fire, you need a suitable ceramic kiln or a firing service.
Materials to get started
The three classic techniques need only a few basic materials and tools:
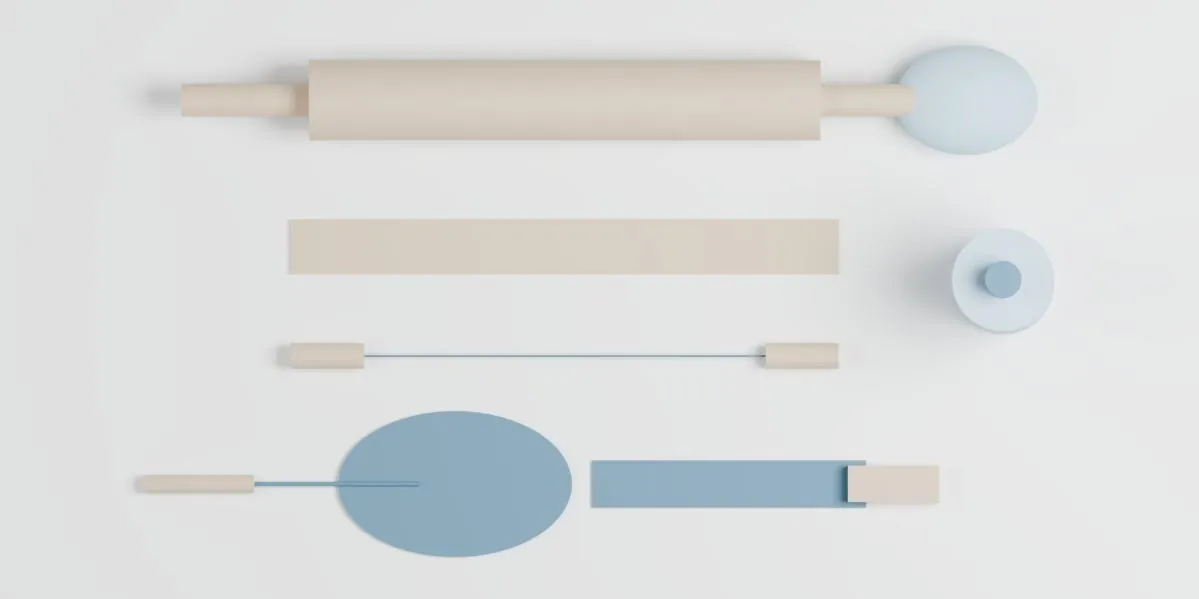
Basic tools at rest. Render from SenseCraft’s Ceramics by Hand (English edition); not to scale.
- an identified ceramic clay body that the kiln firing it will accept;
- a rigid board you can carry (smooth wood or similar), to work on and move the piece without holding it by the wall;
- clean plastic to cover work between sessions;
- a damp cloth, a little water and a container for scraps;
- a round-tipped modeling tool and a smooth-edged rib;
- for slabs, a straight rolling pin and two guide sticks of equal height;
- for joining parts, a tool to score the faces and joining slip made from the same clay.
A banding wheel, slab roller, extruder and thickness caliper help, but they are optional.
Which technique to choose
| What you want to make | Technique to consider | What changes in the work |
|---|---|---|
| A small vessel that can start from a ball of clay | Pinch | Few joins; finger reach limits the size |
| A volume defined from outside, opened from inside | Carving out (hollowing) | Lets you set the exterior first; you must control the thickness left |
| An outline that changes gradually, with pauses | Coil | You decide the profile as you go up; every join has to be integrated |
| Flat panels, strips and faceted forms | Slab | Gives you the material as a sheet; needs care with curves, joins and drying |
| Several parts with the same cross-section (handles, coils, rims) | Extrusion | Repeats the profile; it does not join or support the piece for you |
| Repeating a form or controlling one face precisely | Support molds | The mold sets one face; the piece has to be able to come off it |
| A body wider than its mouth, formed from inside | Collapsible mold | The mold’s segments move inward during removal so they can pass through the opening |
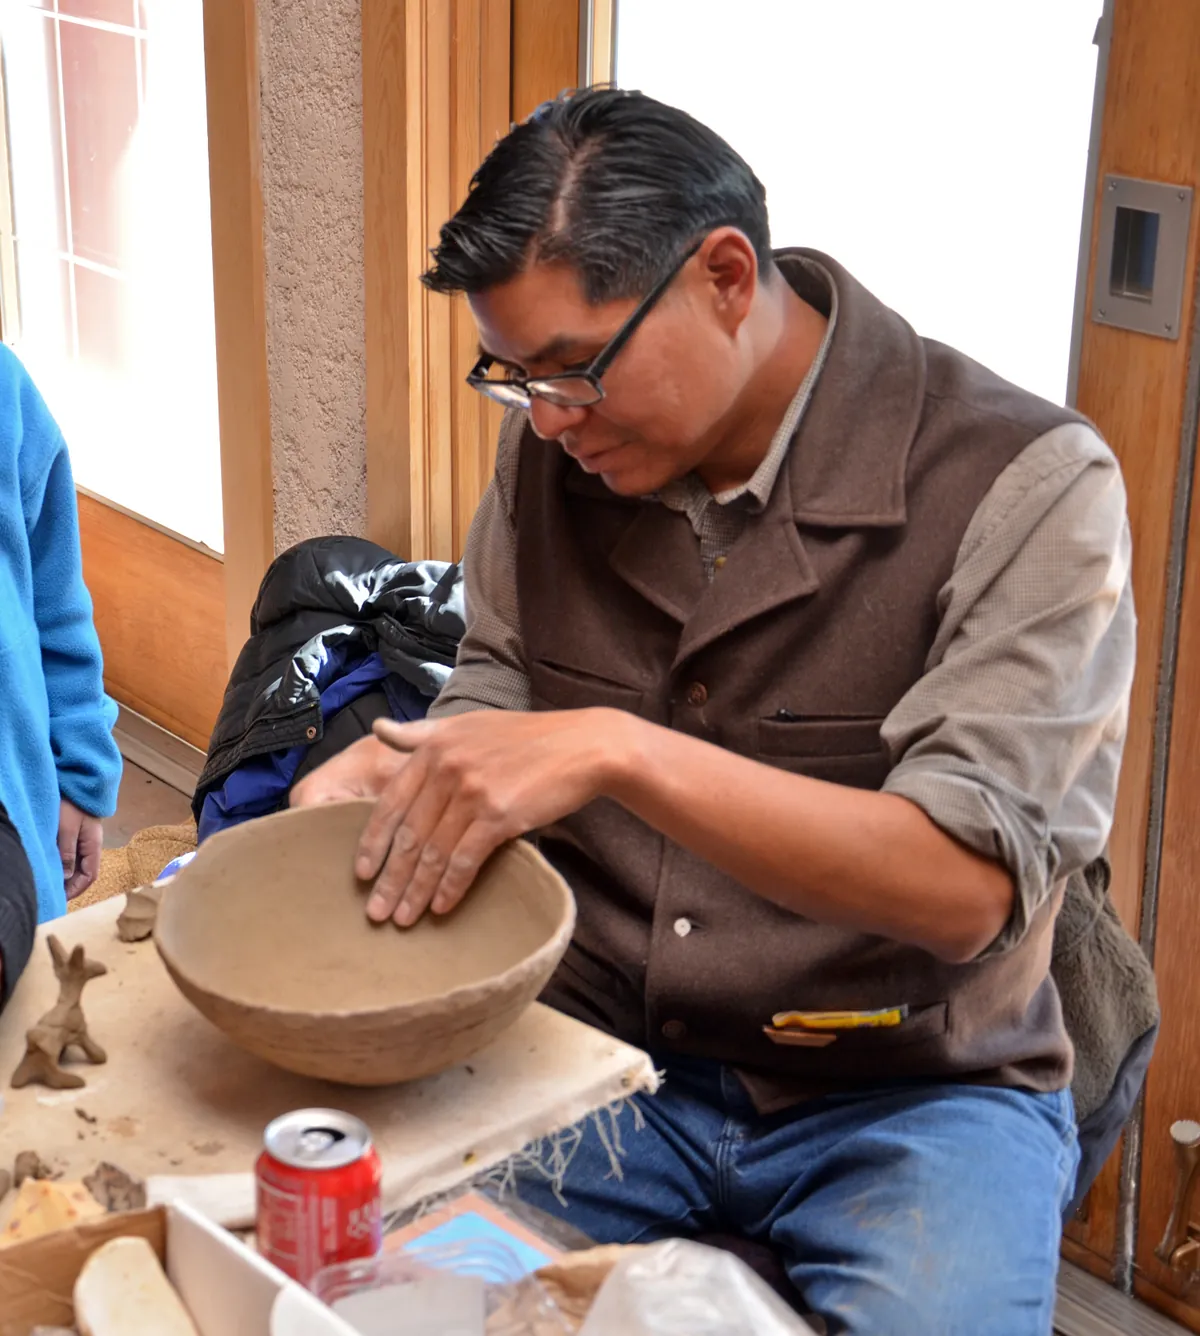
Coil pot demonstration at a Grand Canyon National Park program. Photo: Michael Quinn / Grand Canyon National Park (US NPS), CC BY 2.0, via Wikimedia Commons; resized.

The techniques are not exclusive. A pinched base can continue in coils; a slab wall can take an extruded rim.
Pinch pots: opening the form with your fingers
In pinching, the thumb works inside and the other fingers outside, compressing the clay so it moves somewhere else. The wall thins and, depending on the pressure, rises or flares. It is the most direct technique to read: you feel the thickness with your hands.
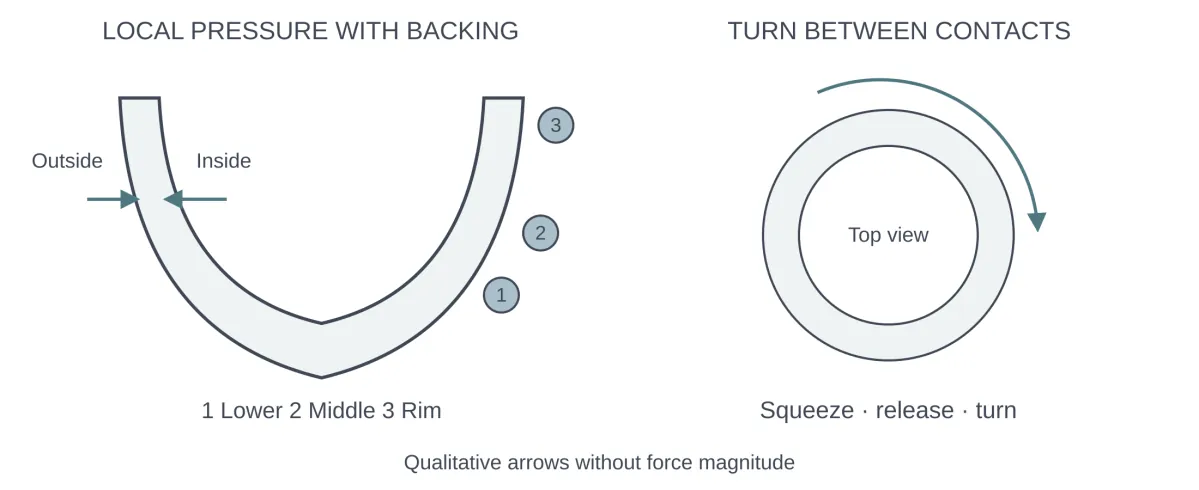
Pinching with local pressure and support: press, release and turn. Diagram from SenseCraft’s Ceramics by Hand (English edition); not to scale.
What needs attention is how the material is distributed. As you thin the wall, the clay reserve goes somewhere — up, out or toward the bottom. So it pays to track the bottom and the transition into the wall, which you cannot see directly. A flat base can hide an uneven interior floor, and a thick rim can sit on a wall that is already too thin. We cover the technique step by step in How to make a pinch pot.
Carving out: removing material from a block
Hollowing is subtractive shaping: you start from a block of clay and remove material with a loop tool (a tool with a metal loop) until the interior takes shape. Japanese kurinuki is one example of this approach. The difference from pinching is that thickness you remove does not come back by smoothing: getting volume back means adding clay and working the join. Pinching and carving can be combined, as long as you know where the wall was redistributed and where it lost material.
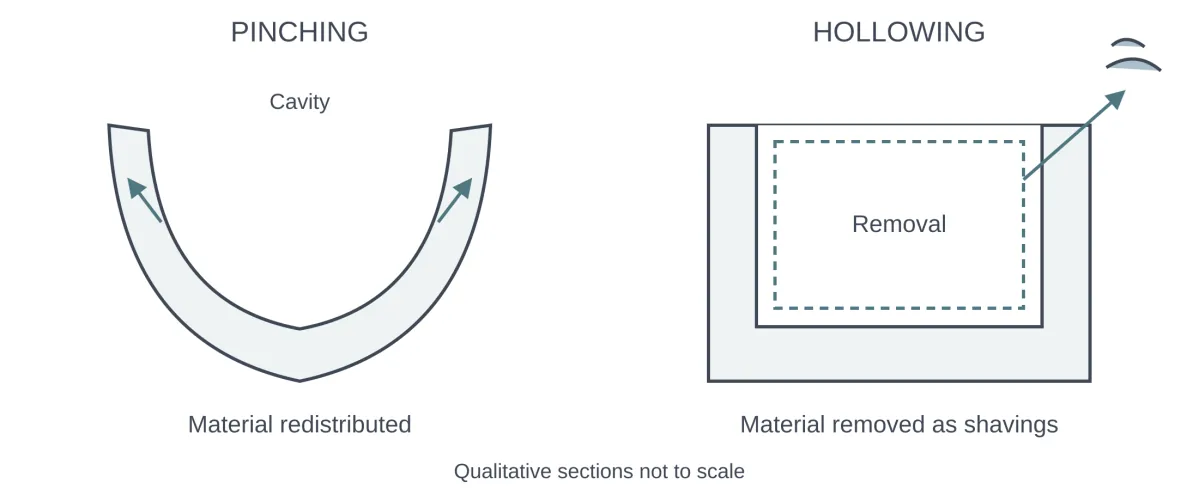
Pinching redistributes clay; hollowing removes material from a solid block. Diagram from SenseCraft’s Ceramics by Hand (English edition); not to scale.
Coil building: raising walls with coils
In coil building, each coil adds material and creates a join that has to be worked. The wall only exists once those joins are integrated; stacking coils does not, by itself, finish the construction. Depending on the clay and the state of the parts, the join may call for scoring the faces, applying joining slip and compressing the seam inside and out. The goal is to integrate the coils, not just hide the line between them. The advantage of the method is that you can change the outline as you build up.
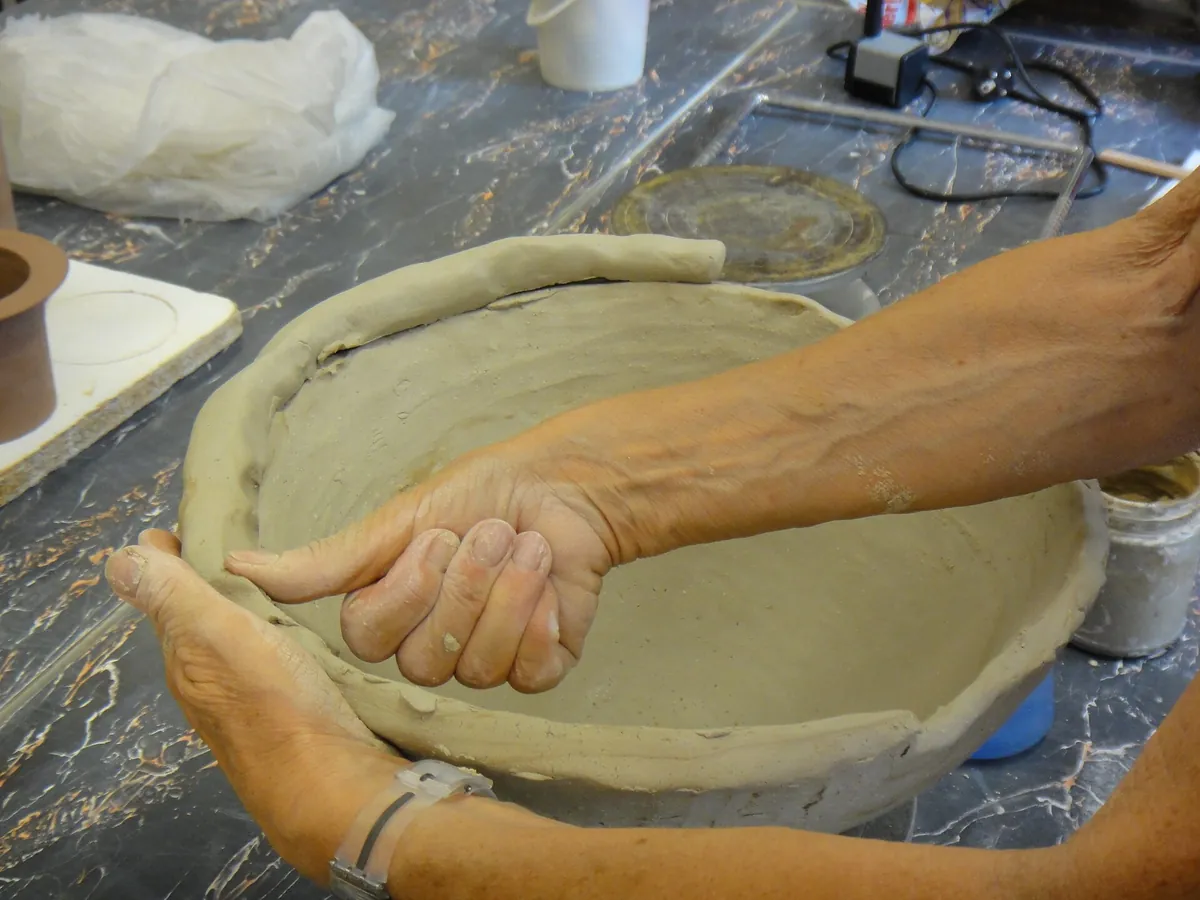
Each course adds material and a new joint to blend. Photo: Poupou l’quourouce, CC BY 3.0, via Wikimedia Commons; resized.

One distinction keeps you from fooling yourself: the coil diameter, the final wall thickness and the height each round adds are different measurements. As you set and pinch a coil, its section changes; as you scrape, some comes off. A 1 cm coil does not make a 1 cm wall.
You can close each round as a ring or keep going in a continuous spiral. Rings can make learning easier: you can stop, check the level and inspect each closure. A spiral means fewer interruptions but requires you to control the step between the start and the section in progress. Neither one eliminates joins.
Slab building: working clay as a sheet
A slab is clay rolled out with a rolling pin (and two guide sticks of equal height) or a slab roller, then cut and assembled. The technique allows flat panels, corners, boxes, cylinders and faceted pieces that would be hard to make other ways.
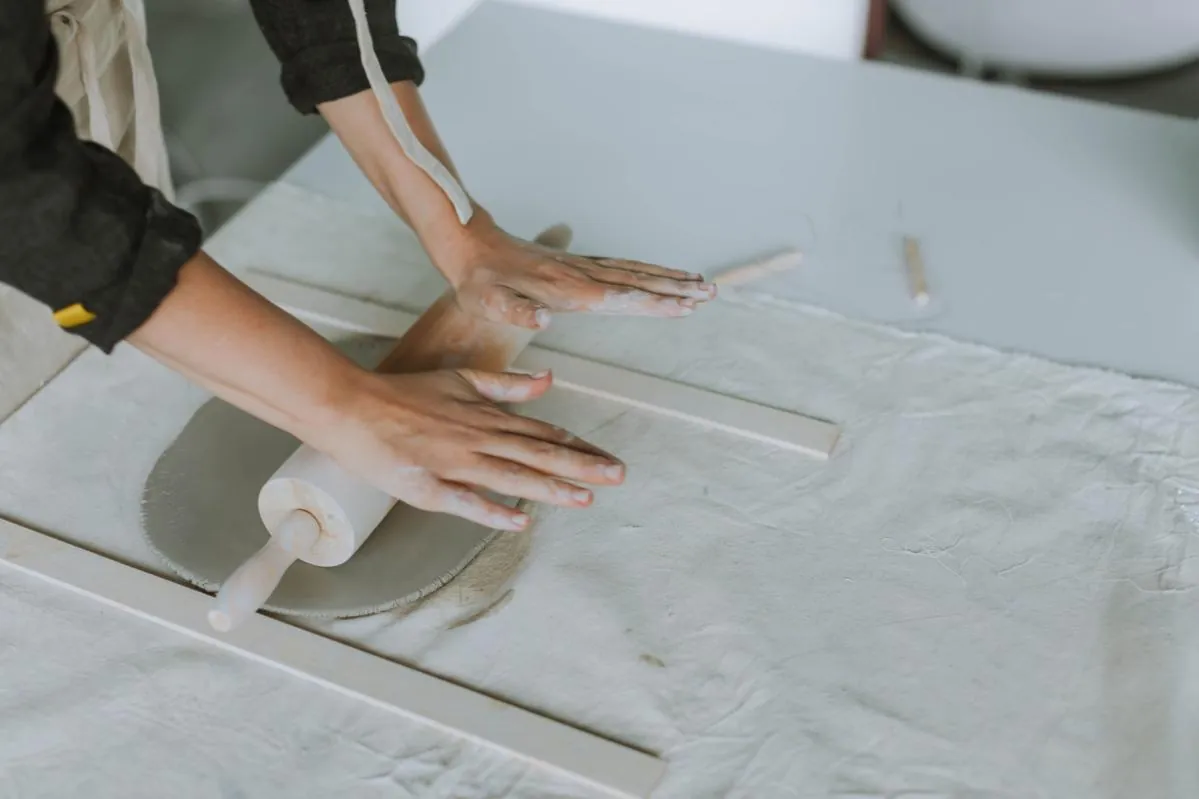
Rolling out a clay slab with guide strips positioned along its sides. Photo: Anastasia Shuraeva, Pexels License, via Pexels.
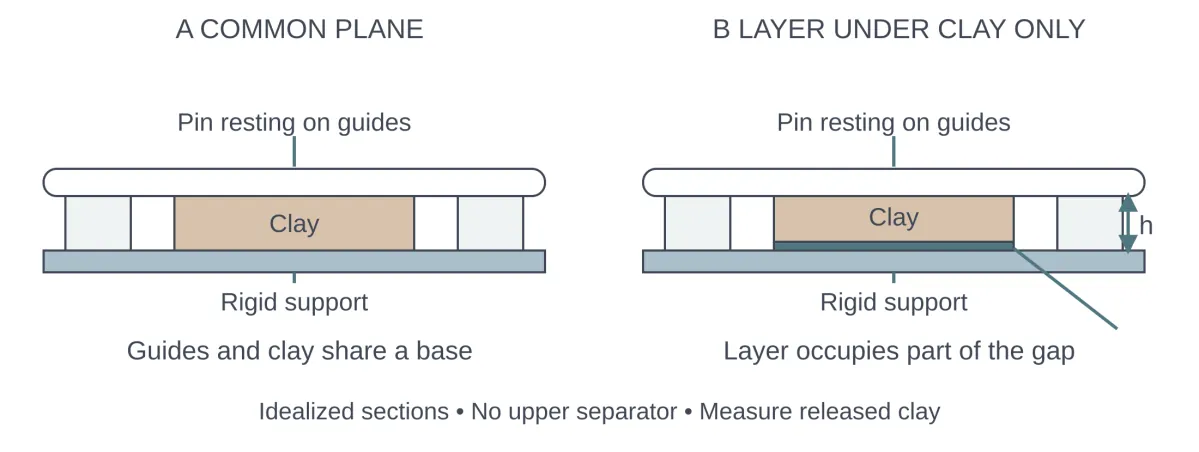
Slab thickness depends on what sits under the clay and under the guides. Diagram from SenseCraft’s Ceramics by Hand (English edition); not to scale.
Two practical checks help prevent problems:
- Choose the clay’s state for the next step. A softer slab takes curves and texture but loses its outline easily. A firmer one holds cuts and edges but can crack when bent. Test on a scrap of the same thickness before handling the slab you will use.
- Do not lift soft clay by its corners. Move the slab on a support that carries all of it. A slab that is even on the bench can arrive stretched if it is carried hanging.
A slab roller helps you repeat a thickness, but you still need to measure. A rolling pin and guide sticks are enough to roll slabs. Working this way also helps you understand how your movements affect the result.
Extrusion: repeating a profile
An extruder pushes clay through a die and produces an elongated part with a constant cross-section: coils, strips for handles, small feet, rims, even tubes. It is useful when several parts need the same section.
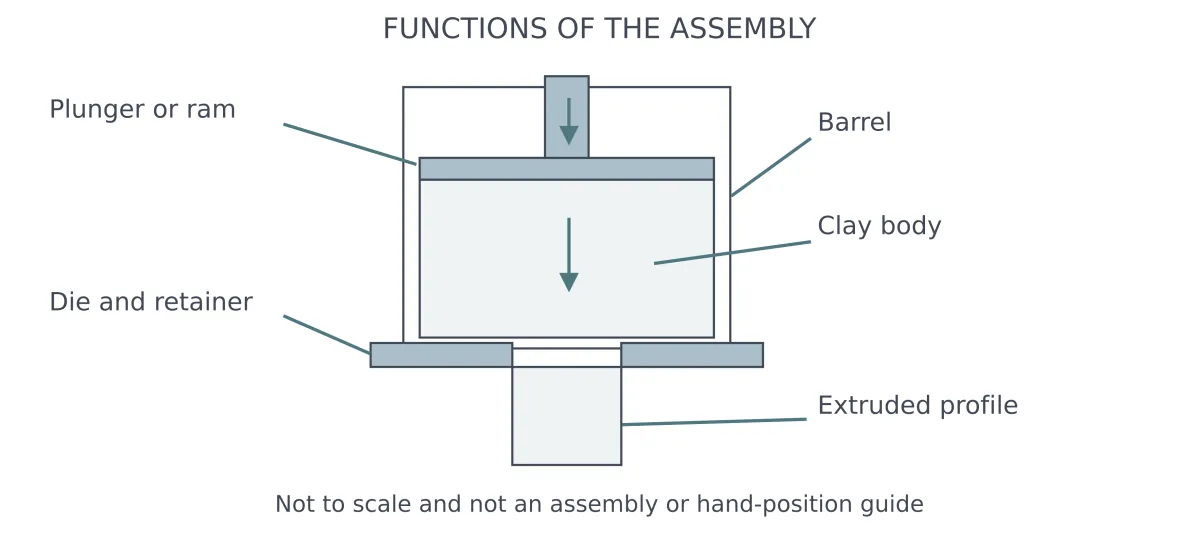
Functions of a hand extruder; not assembly instructions. Diagram from SenseCraft’s Ceramics by Hand (English edition); not to scale.
It is optional. Rolling by hand, cutting strips from a slab and pinching are still complete routes. And a regular output does not solve the rest: much of the skill is in receiving, cutting, bending and joining the profile without spoiling what the die produced.
Support molds: when the form comes from outside
A support mold shapes plastic clay by contact. There are two basic types:
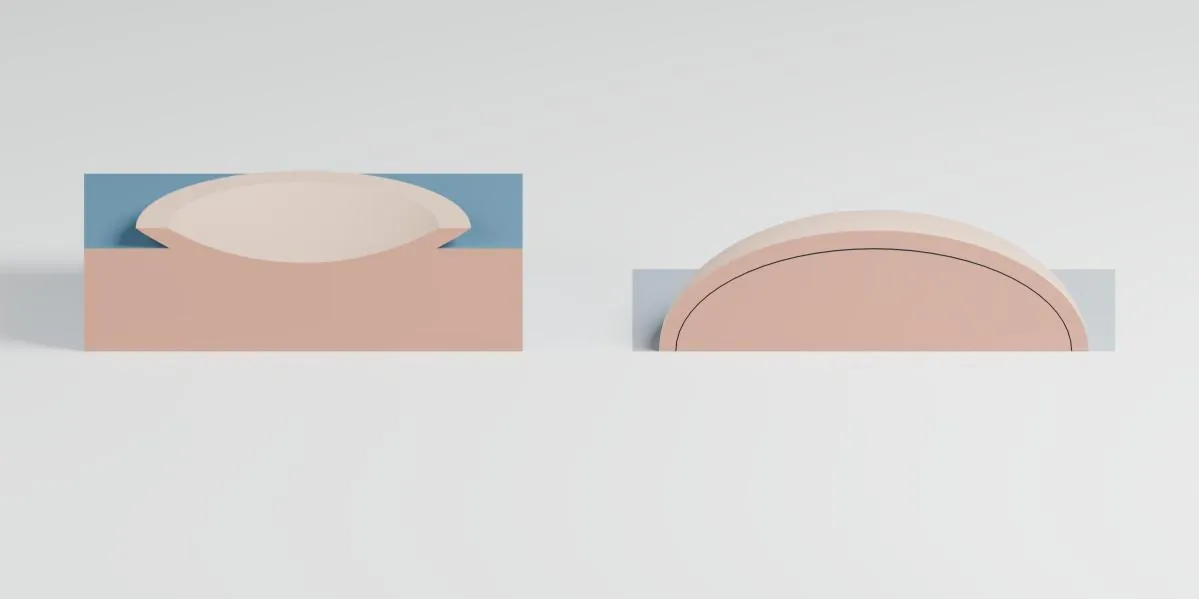
Concave and convex supports in half section. Render from SenseCraft’s Ceramics by Hand (English edition); not to scale.
- Slump mold (concave): the slab goes into a cavity. The mold controls the outer face; you work the inside.
- Hump mold (convex): the slab goes over a form. The mold controls the inner face; you work the outside and can add a foot.
On a hump mold, clay shrinks as it dries and can end up tensioned against the form, which causes cracks. Remove the piece once it holds its shape, before shrinkage presses the clay against the mold.
The most important rule is to design the release first. Before rolling the slab, run your finger over the mold along the path the piece will take as it separates, and ask what would hold it back. A region that blocks that path is an undercut. Release agents and patience do not fix an undercut: a 9 cm mouth will not let a rigid 10 cm section through, with or without powder between the surfaces.
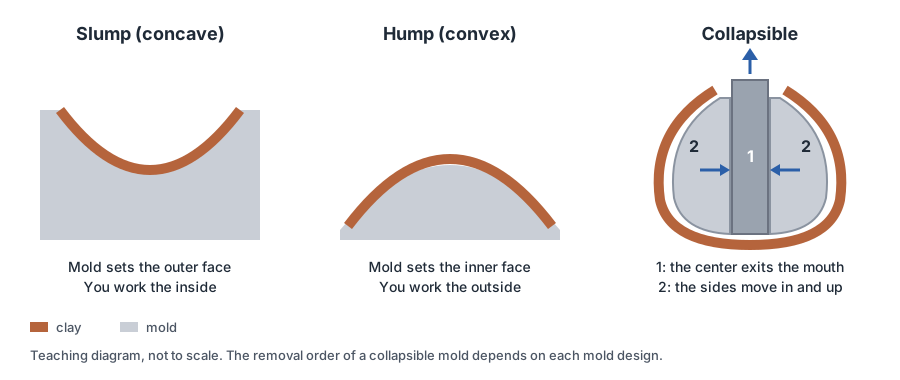
SenseCraft teaching diagram, not to scale.
Shaping plastic clay over a support is also not the same as slip casting. Conventional slip casting uses a ceramic suspension prepared for that process, usually deflocculated; the porous mold, normally plaster, absorbs part of the water and forms the wall of the piece. An ordinary 3D-printed plastic mold has no such absorption and does not replace plaster in that process.
Collapsible molds: when the body is wider than the mouth
When a form’s belly is wider than its mouth — a rounded cup, for example — a rigid one-piece inner mold can get trapped, depending on the geometry and the exit path. One solution is a segmented mold that reduces its own size before passing through the opening. In one possible arrangement, a center piece comes out first and the others move into the space it freed before rising through the mouth. There is no single sequence: each collapsible mold has its own.
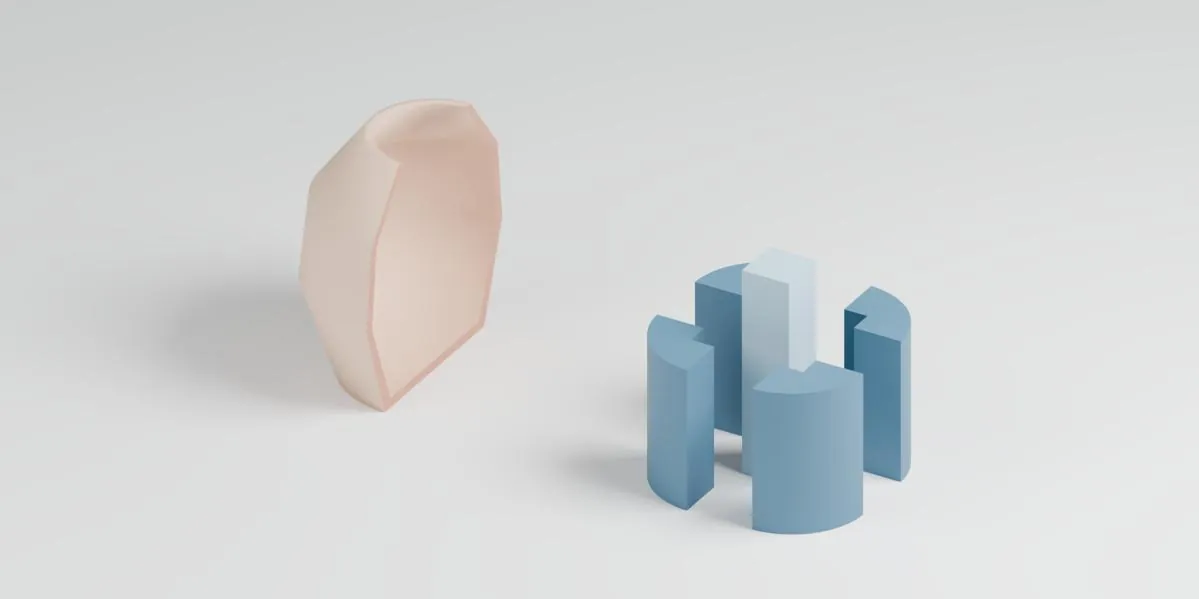
A generic segmented core in exploded view; not a ready-to-make mechanism. Render from SenseCraft’s Ceramics by Hand (English edition).
Two terms are often confused. Separable describes a set whose parts come apart (two halves that open sideways are separable). Collapsible describes a mold that reduces its outer dimensions through inward movement of its parts. To plan the removal order, write down the name of each part and answer, step by step: what supports the clay, what holds each mold component, and where that component moves.
This is the kind of problem SenseCraft works on. The Espresso 80 is a segmented, 3D-printed mold that shapes the inside of a small clay cup and can be disassembled from inside the cup and removed through the opening.
The right moment to work
Almost every hand-building technique depends on the state of the clay at each step: cutting, bending, joining, turning over, demolding. Studio terms — plastic, leather-hard, bone-dry — describe a continuous change. Leather-hard itself is a range of states, not a single instant.
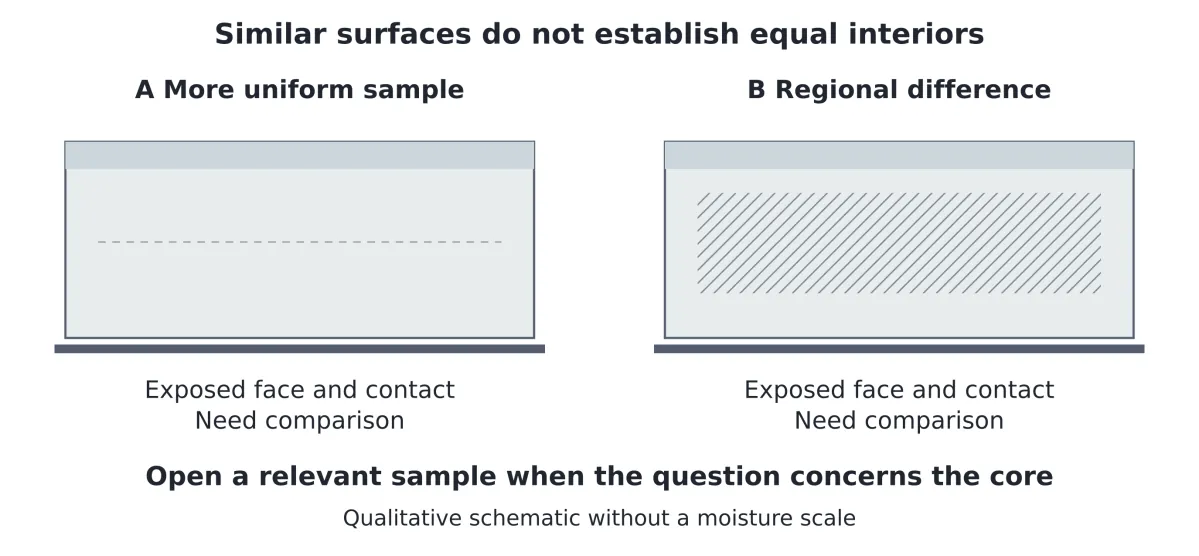
Similar surfaces do not show identical interiors. Diagram from SenseCraft’s Ceramics by Hand (English edition); not to scale.
In practice, name the state by the task: “firm enough to cut while supported” says more than “good”. And compare the clay with itself: the moisture that works for one clay does not transfer to another.
Studio safety
Dry clay dust can contain respirable crystalline silica. Institutional safety guidance agrees on the same precautions:
- clean the bench and floor with a damp cloth or mop, not a broom;
- pick up scraps before they dry and turn to dust;
- finish pieces while they are still damp and avoid dry sanding;
- keep food off the bench, wash your hands and keep studio tools separate from kitchen tools.
Read next
- How to make a pinch pot: the pinch technique step by step
- Coil pottery: how to build and shape a pot by hand
- How to roll out a clay slab: thickness, cutting and handling
- How to dry pottery without cracking: covering, support and checks
- How to join clay: score and slip, backing support and seams
- Leather-hard clay: how to tell the stages and what to do in each
- Types of clay for pottery: how to choose a clay body for your piece
- How to make a mug handle: shaping, fitting and attaching by hand
- How to make a slab mug: building the wall without a wheel
Where this content comes from
This article summarizes chapters of Ceramics by Hand — Foundations and Techniques Without a Wheel, a literature-based guide compiled by SenseCraft: the technical statements come from the sources listed below, and the organization, the selection table and the mold diagram are ours. The writing was assisted by AI tools and edited by SenseCraft. The next articles in this series go deeper into each technique.
Sources cited
- AMACO Brent. How to Make a Pinch Pot.
- AMACO Brent. Amphora Project: Heroes and Handbuilding.
- Eva Champagne. Kurinuki Curious, Pottery Making Illustrated, 2020.
- Tony Hansen. Leather hard, Digitalfire Reference Library.
- Andrade, Al-Qureshi and Hotza. Measuring and Modeling the Plasticity of Clays, Materials Research, 2010.
- PhotoPottery. Hump and Slump Molds for Pottery.
- University of Utah, Environmental Health and Safety. Arts Safety: Ceramics.
- Princeton University, Environmental Health and Safety. Ceramics.
Limits
- This article summarizes published sources; it is not the result of SenseCraft testing. The practices cited belong to the authors and institutions named.
- No thickness, waiting time or water percentage works for every clay body. Follow the technical data sheet and safety data sheet of the clay you use.
- Appearance, color and the absence of visible cracks do not prove strength, watertightness or that a piece is safe for food contact.
- A 3D-printed tool never goes into the ceramic kiln; only the clay does.
Basis: literature review — original article based on the October 2026 Portuguese edition of the SenseCraft handbuilding book, chapters 1, 3, 5, 6, 7, 8, 9, 16, 18 and 19. The corresponding material is also available in English in Ceramics by Hand — Foundations and Techniques Without a Wheel (November 2026 edition), with primary sources listed at the end.