
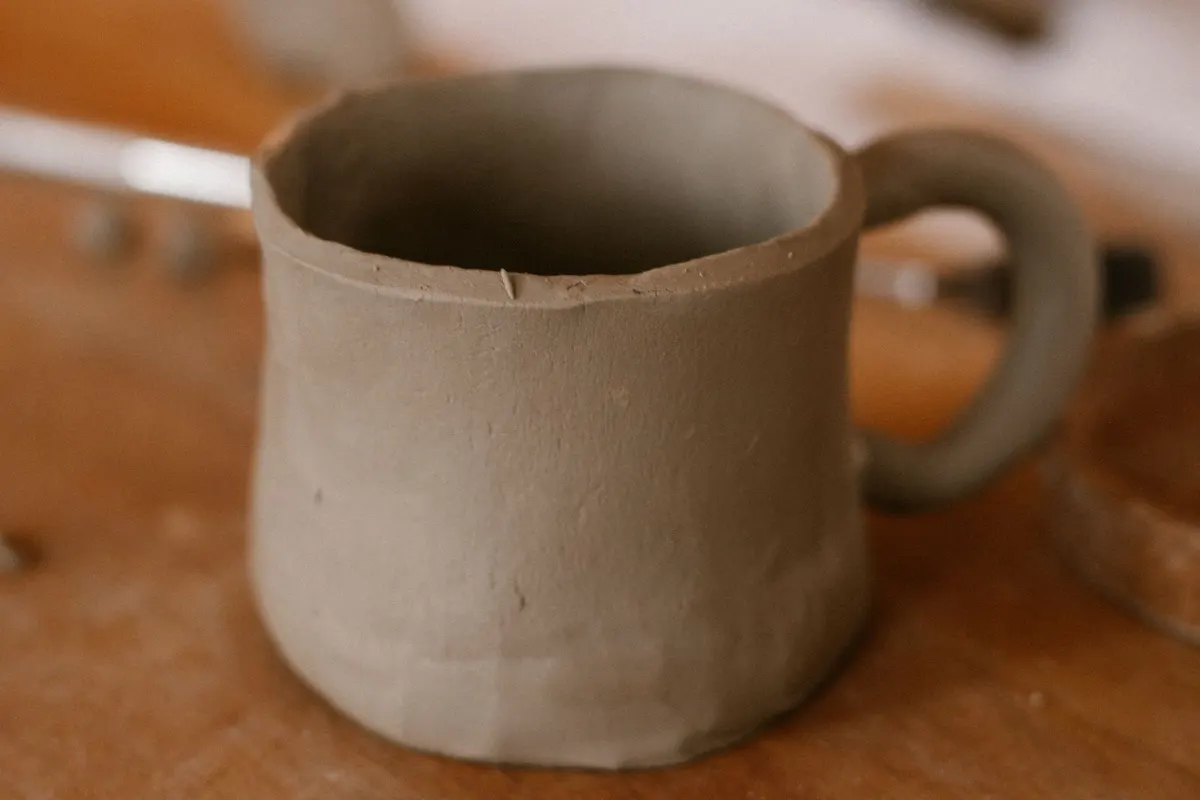
To make a mug handle without a wheel, you prepare the handle separately (from a coil, a slab strip or by pulling), let the arch firm up on a support, fit both ends to the curve of the wall and attach one end at a time, while supporting the wall from inside with your other hand. The handle and the body need to be in states that are compatible with joining and firm enough to hold their shape; outside that window, the risks of distortion, poor fit and joint problems go up.
This article is part of the series built around the guide to pottery without a wheel. Joining itself (scoring, slip and support from inside) is covered in how to join clay; here the subject is the handle: form, measurements, making, fitting, sequence and drying.
Start with the use, not the drawing
Before you draw an outline, describe the action: lifting a full mug with one hand, steering a small jug, moving a dish with both hands. A handle with room for the fingers, a pinch grip and a lid knob are different components. A knob lifts the lid, not the closed pot; two side handles need to be reachable at the same time, without forcing the hands to touch a hot wall.
The ergonomics evidence cited here is limited and does not allow universal handle dimensions. The study by Yoxall and colleagues on cups used in care homes brought together nine people aged 65 or over in discussion groups; the cups they preferred shared lightness and a large handle. In the ergonomic and computational analysis, the authors relate cup mass, diameter, handle length and handle opening area to the moment on the wrist and to finger support. It is a starting point for investigation, not a table of openings for everyone.
The measurements of a handle
Three decisions tend to get mixed up and are worth separating. The handle path is the course the handle follows in side view (a D shape, a loop, or a more angular curve). The cross-section is the outline of a cut perpendicular to that path: round, oval or strap. The method (coil, slab, pulled, extruder) is a third choice: different methods can produce similar paths.
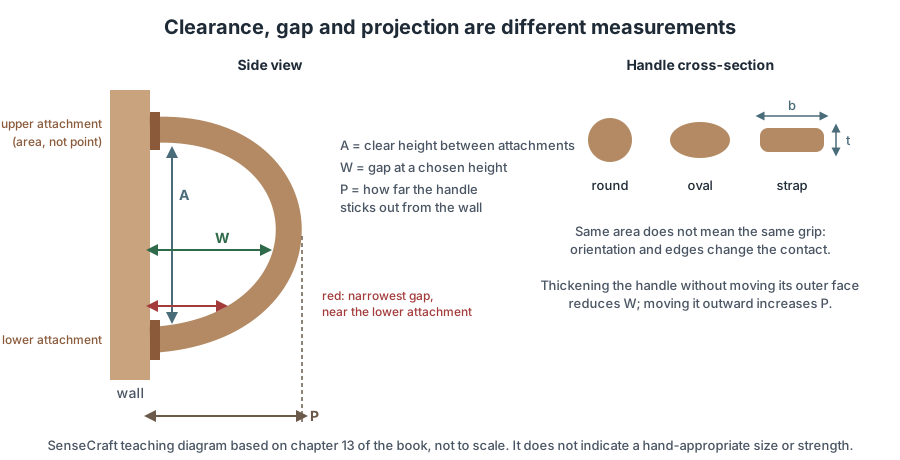
SenseCraft teaching diagram based on chapter 13 of the book Ceramics by Hand, not to scale. The drawing does not indicate a hand-appropriate size or strength.
What matters to the fingers is the usable clearance, the free space between handle and wall, including the narrow spots near the attachments. Record the gap at an identified height and, separately, the narrowest gap along the path the fingers take in and out: the width at the center does not describe a tight return at the bottom. The projection is how far the handle sticks out. Thickening the handle without moving its outer face reduces the gap; moving it away from the wall widens the gap and also lengthens the lever arm of the full mug in your hand.
What is the best cross-section for a handle?
The shape of the cross-section changes the area and shape of contact with the hand. Sections with pronounced edges can create uncomfortable spots; Vince Pitelka, a ceramics teacher, recommends avoiding edges and describes the flattened oval section as a comfortable solution. That does not make any one shape universally better. Two strap sections with the same cross-sectional area can also behave differently when rotated 90°. Check the underside, where the weight rests on the fingers, the thumb rest and the return near the lower attachment.
How big should a mug handle be?
There is no universal size. What decides it is the task and the hand of the user: how many fingers need to pass through, the narrowest gap near the attachments, the projection and the weight of the full mug. Make a full-size paper sketch to check proportions and clearances, watch the spontaneous grip on the finished piece and remember that the opening will shrink with the clay.
Does the handle shrink in drying and firing?
Yes, along with the piece, and not perfectly evenly. In a calculated example in the book, a measurement of 100 mm wet becomes 94 mm dry and 87.42 mm fired: 12.58% total shrinkage, not 13%, because firing shrinkage is calculated on the dry length. The percentage is illustrative. The handle can also sag, twist and change cross-section, and glaze takes up space. Measure the shrinkage of your clay body in your process and check the gap on the finished piece, especially near the attachments.
Three ways to make the handle
| Method | How it is formed | What to watch |
|---|---|---|
| Coil handle | Roll a cylinder of evenly prepared clay and bend it into a wide arch | Uneven diameter, a localized kink, cracks on the outer face of the curve |
| Slab-strip handle | Cut a strap from an even slab and round over the edges | A strip that stretches when lifted, deep texture that eats into the section |
| Pulled handle | Lengthen the clay with a wet hand while controlling the section | A neck from pressing in one spot, too much water, a surface that breaks down |
SenseCraft table based on chapter 13 of the book.
Coil. Roll on a clean surface with your palms, moving the pressure toward the thicker stretches, and check the section from several sides. Keep extra clay at the ends. Bend it at several points, starting with a wide arch, and lay the handle on an open support that keeps the arch flat in its plane. The book suggests making three comparable arches and choosing the one that best fits the design. A coil handle is a complete method in its own right, not an inferior version of a pulled handle.
Slab strip. Roll out the slab as in how to roll out a clay slab, mark the width and thickness and cut with a clean blade, without dragging sideways. Marion Angelica, a potter who works with slab-built pieces, cuts a slab triangle and rolls it with increasing pressure toward the tip, leaving the handle thinner at one end and thicker at the other. The same action also changes length and width, so check the outline again.
Pulled. Pulling lengthens the clay while the hand controls the section; water reduces friction but does not make any clay body suitable. To learn the motion, pull away from the mug, starting from a short cone with a thick end to hold. Stroke in continuous passes, without squeezing one spot, and stop when you see growing ripples or localized thinning. Mike Jabbur, in Ceramics Monthly, describes his own handles with thicker attachment ends and a thinner middle arc; in his method, the blank is attached at the top of the mug and pulled on the piece, which requires more control over the wall and the first attachment.
Can you make a handle without knowing how to pull one?
Yes. The book treats coil and slab handles as complete methods in their own right, addressing the same design questions with less equipment. An extruder repeats the profile, but it does not control distortion during transfer or the fit at the attachment points.
When to attach the handle to the mug
Using the same clay body for the mug and the handle removes one compatibility variable, but it does not make their moisture state equal; you still need to watch how both parts behave. A thin, exposed handle can stiffen well before a protected wall. Test bending and cutting on scraps from the same batch: the handle should bend without cracks running through the section, and the body should take the pressure without going oval. The window is usually around leather-hard, but behavior decides, not the clock.
| Sign at the bench | Decision before assembly |
|---|---|
| The arch drops when lifted on a distributed support | Wait for it to firm up or change the support, keeping the ends workable |
| The curve cracks or the end chips when cut | Review state and geometry; remake it if the window has passed |
| The wall caves in under the pressure needed | Change the inside support, sequence or state; do not press harder |
| The end floats on the slip and slides | Review the amount of slip and the interface |
| The ends only reach their marks if the handle is stretched | Correct the length, position or curve before joining |
SenseCraft table based on chapter 13 of the book.
While the handle firms up, do not leave it hanging. Liz Vicena, in the tips section of Ceramics Monthly, rests freshly pulled or extruded handles on wedge-shaped cosmetic sponges: the support keeps the curve, and the air around them makes drying more even. A dry piece does not return to an attachable state just because its surface gets wet.
Fit the ends before you add slip
Hold the handle against the wall without slip, supporting the arch. Both ends should reach their intended areas without forcing the arch open or closed. A straight end touches a curved wall along a narrow strip; a concave end, matching the curve of the body, widens the contact. Marion Angelica, in another article, cuts the end into a U-shaped arc complementary to the body and, for a series, marks the handle length on a fixed line before cutting.
Trim a little at a time, press lightly and check where the surfaces make contact. Contact only at the center or only at the edges means the shapes differ: correct the cut, do not fill the gap with paste. If the handle came out short, make another with extra length at the ends and trim it on the piece, instead of stretching the arch or patching pieces together.
How do you make handles consistent across several mugs?
Repeating the strip length and the cut of the ends helps. Mallie Testerman, a potter who makes mugs in series, uses plaster forms for the mug body and for the handle: she attaches the top of the handle to the mug, drapes the handle over the form placed between the two and then joins the lower end. The book points out that the form reproduces the curve, but it does not determine placement or ensure a sound join; the wall still needs support from inside while the handle is attached.
Attach one end at a time
The ordering rule is simple: attach first the end you can support most effectively from inside the mug, and only then the other, so the second never has to pull on the first. Preparing the interface (scoring and compatible slip, when the clay body calls for it) follows how to join clay.
- Set the body on a stable board and place your hand or a smooth tool inside, behind the attachment that will take the pressure.
- Prepare both interfaces within the outlines marked during fitting, without deep cuts in a thin wall.
- Seat the first end, supporting the arch and pressing toward your support inside, in short sections.
- Recheck the second end. If it cannot reach its place without pulling the arch, stop and correct it while it can still be undone.
- Blend the perimeter of both attachments with a finger or a rounded tool, without twisting the handle, and look at the inside wall.
- Check the mug from the side, the front and above and leave it supported. Always move it by the board, never by the handle.
How do you keep a mug handle from cracking?
Factors to investigate include poor fit, different moisture states in the handle and body, an inadequately integrated join, and uneven drying. Tony Hansen, of Digitalfire, notes that drying cracks tend to start in sharp inside angles and shows the handle-to-wall junction being compressed and rounded before the piece stiffens; he stresses that the handle should not dry ahead of the body. Pitelka advises against forming the joint radius with slip; for a rounded transition, he recommends adding clay. Slip squeezing out at the edge does not prove that the whole interface was worked.
Drying, firing and inspection
During drying, protect the handle, body and joins from localized drafts. A thin handle can dry before the body, while a thick attachment area stays wetter; see how to dry pottery without cracking. If the arch sags, use a light support only where needed, with a clear way out to the side: a rigid core inside the gap can trap the handle as it shrinks. Remove foam, plastic and paper before firing.
After the bisque, check the joins, inner curve and clearance before glazing, and control glaze build-up under the handle. On the finished piece, look for cracks at the join, chips and sharp edges. Glaze is not a structural repair: a cracked handle join is not repaired simply by glazing over it.
How do you know if the handle will hold?
A simple home test cannot establish a reliable strength limit, and breaking a handle by hand does not produce a reliable limit. What the book proposes is a limited observation: with the finished piece and no suspected defect, over a low tray, hold it empty, then with room-temperature water up to the level of use, lifting it just a few centimeters. Stop at pain, instability or a new line. “A comfortable grip for this person, at this load” is the conclusion you can draw. Do not use a hot drink as the first test of a new handle.
| Symptom | Hypotheses to tell apart |
|---|---|
| A line at the join | Fit, blending, different states, drying or handling |
| A sagging arch | State, section, support, covering or transfer |
| A twisted handle | Strip orientation, cut of the ends or a tilted support |
| A dent inside the wall | Inside support too small, too much pressure or a soft wall |
| A small opening after firing | Shrinkage, distortion, a filled-in attachment or glaze |
SenseCraft table based on chapter 13 of the book.
Where this content comes from
This article summarizes chapter 13 of Ceramics by Hand — Foundations and Techniques Without a Wheel, a literature-based guide compiled by SenseCraft. It combines potters’ practices, an ergonomics study and technical guidance cited in the sources below with teaching organization, decision tables, a diagram and studio routines developed by SenseCraft. The writing was assisted by AI tools and edited by SenseCraft. To see handles in the context of the other techniques, go back to the guide to pottery without a wheel.
Sources cited
- Alaster Yoxall et al. “Fancy a Brew?”: Understanding factors influencing ease of use of cups used in care homes, Clinical Nutrition Open Science, vol. 50, 2023.
- Marion Angelica. Making Pottery Handles That Suit Handbuilt Pots, Ceramic Arts Network.
- Marion Angelica. Get a Handle On It, Pottery Making Illustrated, 2018.
- Mike Jabbur. Pulling Dynamic Handles, Ceramics Monthly, October 2015.
- Liz Vicena. Quick Tip: Cosmetic Sponge for Handle Support, Ceramics Monthly, January 2023.
- Mallie Testerman. Quick Tip: Consistent and Efficient Handles, Ceramics Monthly, December 2019.
- Tony Hansen, Digitalfire. A step to prevent cracking at handle-joins on thrown mugs.
- Vince Pitelka. Making Better Handles, teaching handout (PDF), 2016.
Limits
- This article summarizes published sources; it is not the result of SenseCraft testing. The measurements quoted are calculation examples or authors' own figures, not recommended sizes.
- There is no universal handle thickness, length, waiting time or opening: the clay body, the piece and the hand of the user change the answer.
- A handle with no visible crack does not demonstrate strength, and a comfortable grip does not prove that the piece is suitable for food, the microwave, the dishwasher or hot drinks.
- Handles for teapots, cooking pots, oven dishes and heavy pieces need their own development and checks.
Basis: literature review — original article based on the October 2026 Portuguese edition of the SenseCraft handbuilding book, chapter 13. The corresponding material is also available in English in Ceramics by Hand — Foundations and Techniques Without a Wheel (November 2026 edition), with primary sources listed at the end.