
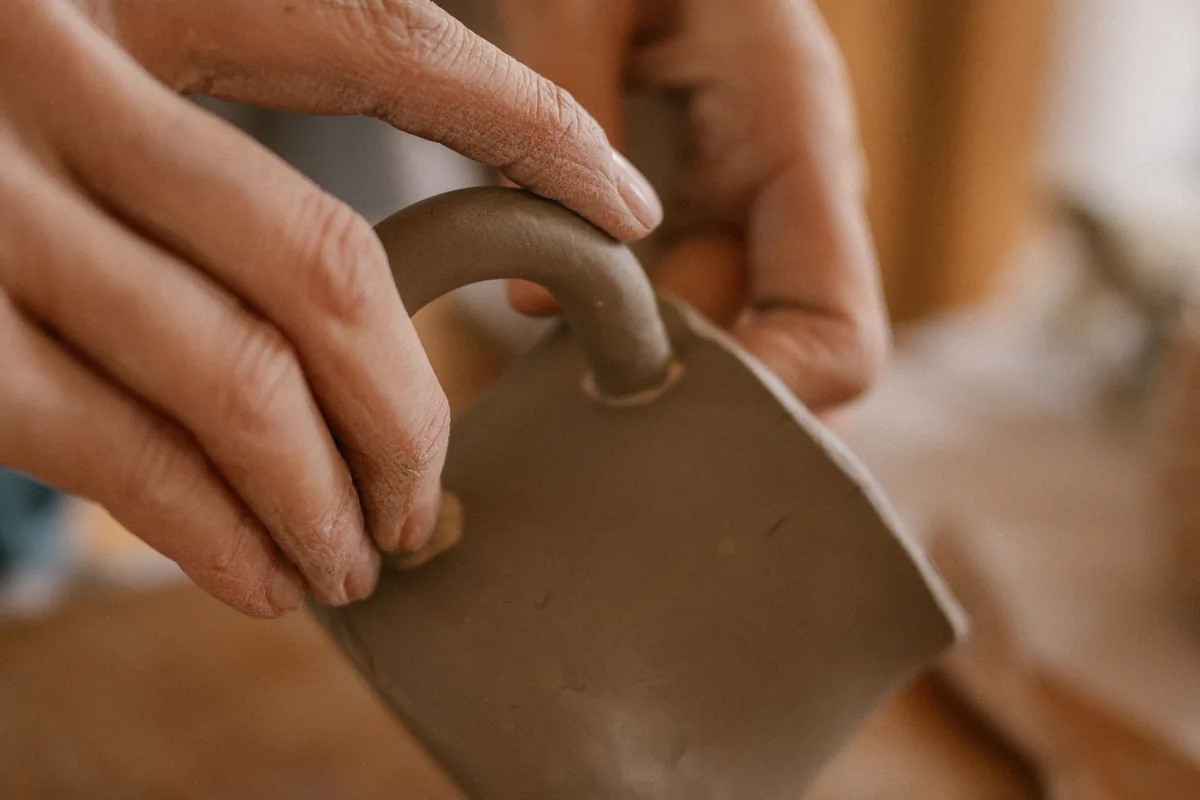
To join raw clay that is still workable, the two parts need to be in a similar condition and fit together without forcing; then you prepare only the contact area (scoring and adding joining slip when the clay body and its state call for it) and compress the seam with something taking the pressure on the other side. Slip helps integrate the joint; it does not fix a poor fit or a large difference in moisture between the parts.
This article covers the join itself, which shows up in every technique in the guide to pottery without a wheel: the seam in a clay slab, the meeting between coils in coil building, the handle attached to a mug body.
What a joint is (and why the line is misleading)
A joint is the region where two parts meet. The contact surface between them is the interface; the line you see on the face of the piece only shows where that interface reaches the outside. So making the line disappear does not prove contact through the whole thickness. You can drag a skin of clay over the top and leave a hidden gap underneath.
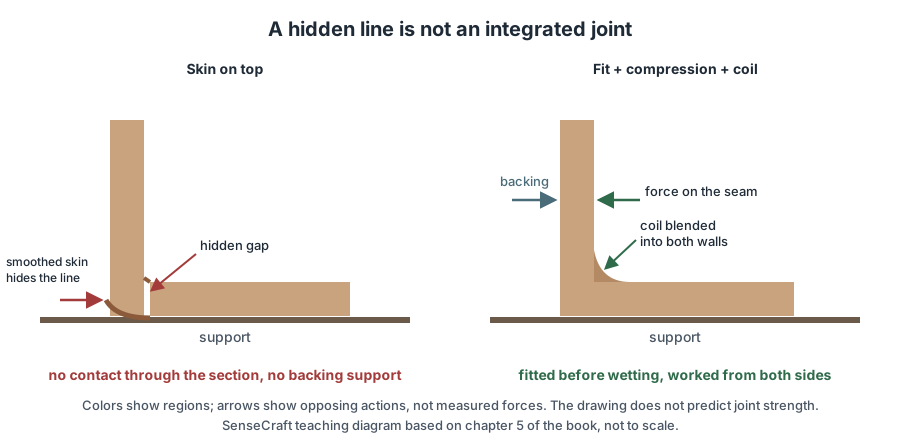
SenseCraft teaching diagram based on chapter 5 of the book Ceramics by Hand, not to scale. Arrows show actions, not measured forces.
A joint can be a butt joint (edge to edge), a beveled joint (angled faces) or an overlapping joint. Each one changes the area you can reach, the final thickness and the direction you press in. An overlap increases the contact area and can thicken the joint; adjust or thin the edges when you want to keep the planned thickness.
Before wetting: fit and condition of the parts
Check the fit without slip
Bring the parts together without slip and without forcing. If they only meet when one wall bows, the problem is geometric: correct the cut or remake the part before preparing the joint. Joining parts that have to be forced into shape locks that stress into the piece and makes it harder to see what happened later.
Vince Pitelka, in his hand-building guidelines, warns against using slip to fill a gap, corner or exposed joint: slip shrinks much more than the surrounding clay as it dries and can crack later. The joint has to close through the fit, not through a filler hiding the distance.
Can you join soft clay to stiffer clay?
A large difference in moisture between the parts can lead to problems in the join. Margaret Bohls, documenting a porcelain teapot made from slabs, brings the parts to the same state before assembly and warns, especially with porcelain, against joining soft clay to stiff clay. That is a condition of her process, not a universal scale, but the logic holds at the bench: if working one part forces you to crush the other, stop and bring both to a compatible state, or remake the one that differs most.
Same clay body and same day of preparation help, but they do not guarantee the same condition: an exposed edge may be firmer than the center. Similar color and the same consistency name are not enough. Compare the regions that will meet with a light touch and, if in doubt, try the move on a scrap.
| What you see in the two parts | The main problem | Likely decision |
|---|---|---|
| They respond to touch in a similar way, the joint closes without forcing and scoring does not chip | None evident | Follow the joining sequence with backing support |
| One gives under touch and the other resists scoring | Difference in condition | Bring the separate parts to a compatible state or remake the most mismatched one; slip does not fix it |
| Similar condition, but they only meet by bowing a wall | Geometry | Correct the cut or remake before wetting |
SenseCraft decision table based on chapter 5 of the book. It organizes the reasoning; it does not measure the strength of any joint.
Joining slip: what it is and how to make it
Joining slip is a clay suspension used for assembly. It is not casting slip for plaster molds, decorative slip or the reclaim bucket. Start with clean trimmings from the same known clay body as the piece, mixed with water in a clean container until no hard lumps remain. You do not need to make dust to do this.
How thick should slip be?
There is no universal water-to-clay ratio and no single consistency. Watch what the application does: it should let you work the joint without turning into a thick slippery layer and without vanishing before you bring the parts together. A puddle separating the surfaces calls for less slip or a different state. If the liquid is absorbed at once and the surface does not let you work the join, review the state of both surfaces and how the slip was prepared before adding water.
Do you always have to score?
Not necessarily. Dan Ingersoll, in Pottery Making Illustrated, writes that with very soft clay it is not necessary to score and slip to join the seams; with leather-hard clay, he scores the edges and adds slip before joining. Bohls scores and slips every slab joint in the teapot. These accounts show that the sequence depends on the clay body, the state, the geometry and the move; they do not justify skipping preparation with any soft clay.
Scoring means making controlled marks on the contact surface without cutting through the section or raising loose chips. Moistening with water alone is another possible preparation, depending on the clay body and state, but it does not make up for a difference in condition between the parts. If you do not know how your clay responds, compare two small samples, changing one thing at a time.
Step by step: a basic join
- Set up support and access to the joint. Clean bench, support and tools; identify the parts to be joined; the piece positioned so you can bring the parts together without holding it by a fragile end.
- Check the fit without slip. Look along the joint from every side you can reach. Correct the outline, angle or support if there is rocking or a local gap.
- Prepare only the area you need. Depending on what you have already verified for the clay’s condition, score and apply slip to both contact surfaces, moisten them lightly with water, or join the parts directly. Remove loose particles. Do not turn the whole piece into mud.
- Bring the parts together in the planned direction. Seat them gradually. Avoid twisting or dragging that misaligns the parts, wipes the preparation off the contact area or distorts the walls; if you lose the fit, stop and reopen while you still can.
- Compress with backing support. Work in short sections, with the opposite side taking the pressure. Use a finger, a rounded modeling tool or a rib to move clay across the joint without thinning the wall.
- Inspect before hiding the line. Remove excess that keeps you from seeing the joint. Look for steps, gaps, slipping, thinning and changes in outline.
- Leave the piece supported and take notes. Protect the piece from uneven drying (see how to dry pottery without cracking) and record the preparation used and what was worked. Write “joint worked inside and outside, no visible gap in the accessible sections”, not “strong joint”.
Slip squeezing out at the edge shows that material moved, but it does not prove contact across the whole interface. No visible excess does not prove failure either.
Backing support: what takes the pressure on the other side
Support carries the weight of the piece. Backing support takes the force during an operation: one hand behind the wall while the other compresses the seam. “Support it well” hides the practical question: where will the pressure land, and what stops it from distorting the opposite side?
Rehearse the move in the air before assembling and check that you can still reach the joint after adding the next wall. A rigid point behind a soft wall leaves a mark; a support too far away lets the wall flex. If the wall changes profile while you press, change the contact, tool or sequence: pressing harder does not replace missing backing support.
Documented examples show the function, not a required tool. Célia Zveibil Brandão uses a paddle on the outside to support the corners while adding reinforcing pieces on the inside. Sarah Dunstan holds a wooden dowel inside the cylinder against the seam and secures the join with light hand pressure from outside.
The coil in an inside seam
A coil is an elongated piece of clay that, in an inside seam, creates a transition and lets you work continuously between the parts. Ingersoll smooths the interior seams by adding slip, scoring and blending in a coil; Brandão adds small coils to the joints and smooths the inside corners.
The coil goes in after the main joint has already been fitted and worked. Blend one edge into one wall, the other edge into the other wall, and only then refine the transition. It must not sit there as a rope merely resting on top: if there is a gap underneath, the coil hides the flaw and adds a third poorly worked interface. A bigger coil is not better reinforcement; a buildup changes the thickness abruptly and alters how that section dries.
Seams behind a narrow opening
In a bellied form, or after taking a piece off a mold, the inside seam may sit behind the rim, and the rim should not take the force of the tool handle. Map the joints first: in a cup made of a base and two bands, they are the base with the lower band, the bands with each other and the vertical seams.
When building over a form, the inside only becomes accessible after removal, when the piece already holds itself up and the surface still accepts work. Clare Unger, in Ceramics Monthly, lets the cup firm up slightly, removes it from the form and pushes the clay outward from the inside with her fingertip, which also smooths the joins inside. If the tool has to lean on the rim to reach the joint, change tools or change the assembly order.
After joining: moving without opening the joint
A freshly made joint can open or distort during handling. To move the piece, carry the board it sits on, with the destination already prepared, and set the whole board down before changing your grip. Never lift the piece by the handle or the rim to “test” the join. After moving it, check the outline and the joints again.
When a joint goes wrong
| Sign | Hypotheses to tell apart | Next step, with the piece supported |
|---|---|---|
| The line disappears and comes back | Skin on top, incomplete contact, distortion or uneven drying | Record it and inspect the accessible sides before smoothing again |
| One part slides | Too much liquid, clay too soft, not enough support | Stop, restore the position and review the preparation on a sample |
| The wall caves in when you compress | Backing support missing or badly placed | Support it and change contact or sequence before trying again |
| Scoring chips or cuts through | Tool, move or state not compatible | Adjust on a scrap; do not score deeper to compensate |
| The coil stays a loose rope | Edges not blended or different state | Review the contact; redo it while it is still controllable |
| The joint opens when moved | Unsupported span, sticking to the support, different states | Set it down supported, note where it opened and review how it was moved |
SenseCraft table based on chapter 5 of the book: a starting point for investigation, not a diagnosis. Several causes can coexist.
How do you attach a handle to a clay mug?
A handle follows the same logic: handle and body in a compatible state, fit checked before wetting, score and slip on both surfaces when the clay calls for it, and one hand supporting the wall from inside while the other seats the root of the handle. Unger, for example, scores and slips the matching spots on the cup and attaches the handle while supporting the wall from the inside. A handle thinner than the body can dry before it; protect it during drying.
Why does a joint crack while drying?
Not always because of the slip. Tony Hansen, of Digitalfire, links drying cracks to uneven shrinkage and lists big differences in wall thickness among the factors that encourage them; in one example, he describes mugs stiffened in a hurry in front of a fan so the handles could go on. The position of the crack helps locate the problem but does not identify the cause on its own: compare the fit, thickness, state of the parts and drying conditions. For that stage, see how to dry pottery without cracking.
Can you join clay that has already dried?
That case falls outside the basic join, which deals with parts that are still workable. Simply wetting the surface of a dry piece does not restore workability throughout the clay or show that a repair has succeeded; if the working window has passed, remaking the part usually gives more control. Glaze or decorative slip over a crack is not proof of a fix.
A practice piece: the L corner
To learn fit, scoring, backing support and coils without risking a piece, build a corner sample. As a purely teaching starting point, use two panels that are still moist and pliable (WET state), about 80 mm long, 30 mm high and 6 mm thick, from the same clay body and the same session. These numbers frame the exercise; they are not a recommended thickness.
Form an L on a board, with a removable outside support that does not squeeze the corner. Follow the steps above: fit without slip, scoring, slip from the same clay body, compression in short sections with your hand taking the pressure on the outside, and a coil in the inside corner. Remove the support while it still comes away freely, watch the drying and take notes. If nothing opens, the conclusion is “procedure carried out without that observable defect”, not “strong joint”.
Cleaning up the workspace
Collect slip and trimmings before they dry on the bench and clean with a damp cloth; do not sweep or blow the dust. Princeton University’s safety guidance notes that clay contains crystalline silica and that dry dust is the inhalation hazard.
Where this content comes from
This article summarizes chapter 5 of Ceramics by Hand — Foundations and Techniques Without a Wheel, a literature-based guide compiled by SenseCraft. It combines practices documented in the sources cited below with teaching structure, tables, a diagram and the L-corner exercise developed by SenseCraft. The writing was assisted by AI tools and edited by SenseCraft. To see joining alongside the other techniques, go back to the guide to pottery without a wheel.
Sources cited
- Vince Pitelka. Handbuilding: General Guidelines and Suggestions, 2021, Joining section (PDF).
- Dan Ingersoll. Maintaining Integrity, Pottery Making Illustrated, May/June 2019.
- Margaret Bohls. Drawing in Space: How to Handbuild an Expressive Teapot Set Using Soft Slabs, Ceramic Arts Network.
- Célia Zveibil Brandão. Creating a Tiny Treasure, Pottery Making Illustrated, January/February 2022.
- Sarah Dunstan. The Inspired Vessel, Pottery Making Illustrated, September/October 2015.
- Clare Unger. Stitched Mug, Ceramics Monthly, October 2025.
- Tony Hansen, Digitalfire. Drying Crack, glossary.
- Princeton University, Environmental Health and Safety. Ceramics, safety guidance.
Limits
- This article summarizes published sources; it is not the result of SenseCraft testing. The practices cited belong to the authors and institutions named.
- There is no universal water-to-clay ratio for slip, scoring depth or number of passes; what works for one clay body and one state does not automatically carry over to another.
- The measurements in the L-corner practice are a teaching example, not a recommended thickness or size.
- A smooth seam with no visible line does not prove strength, watertightness or that the piece is safe for food contact.
Basis: literature review — original article based on the October 2026 Portuguese edition of the SenseCraft handbuilding book, chapter 5. The corresponding material is also available in English in Ceramics by Hand — Foundations and Techniques Without a Wheel (November 2026 edition), with primary sources listed at the end.