
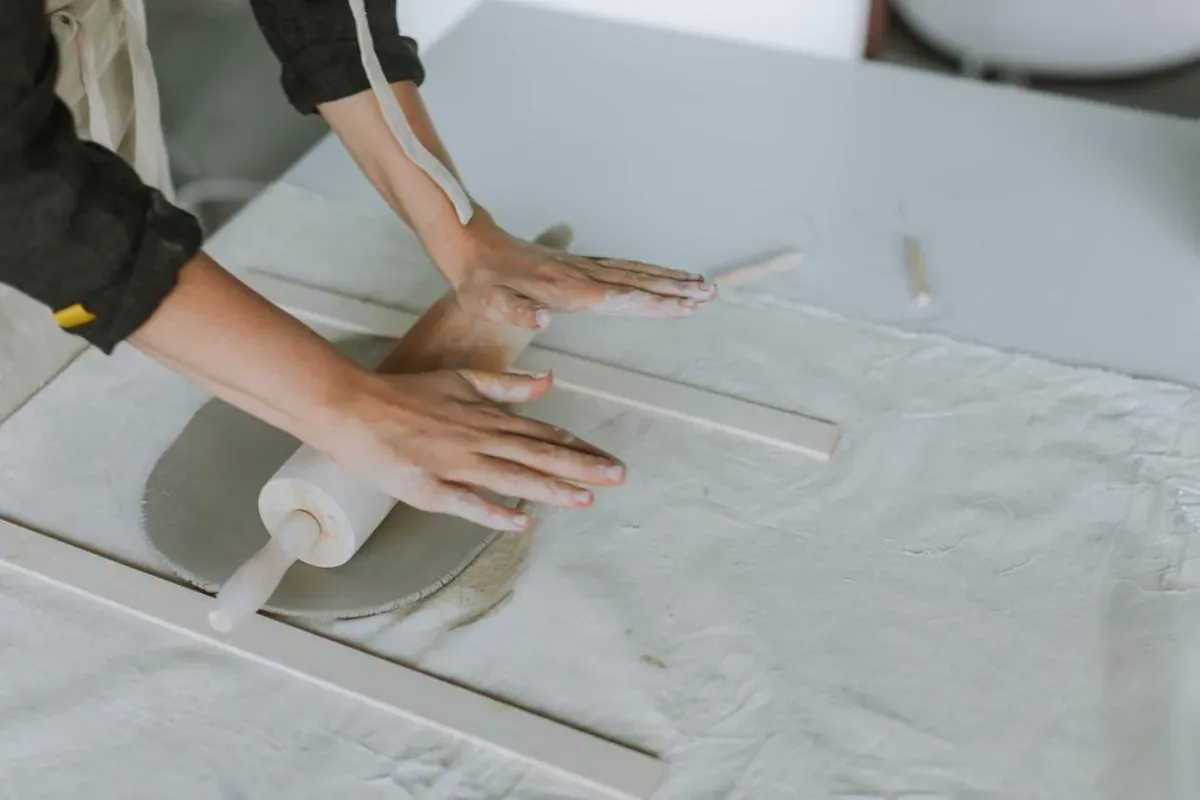
To make a clay slab, roll out a portion of well-prepared clay with a rolling pin that rests on two guides of the same height, on a cloth that releases well. Then release the slab from the cloth, measure its thickness at points you chose beforehand, cut it with a template and move it only while it is fully supported. The rule that sums it all up: soft clay is never lifted by its edges.
This article goes deeper into the slab technique from the guide to pottery without a wheel. It ends with a finished, labelled slab; building walls, corners and bottoms comes next. For continuous curved forms, pinching and coil building are alternatives to assembling slab panels; in coil building, the coils still have to be joined properly.
Before you roll: what is this slab for?
A flat panel and a slab you intend to curve may need different levels of firmness. Before you start, note its purpose (flat panel, strip to curve, base, slab for texture), which face will show, how you will cut it and where it will rest afterwards. Leave a margin for trimming and a small offcut for tests: that offcut, not the slab you intend to use, is where you check whether the clay already cuts cleanly or still bends without cracking.
| Next operation | What to look for in an offcut | If it doesn’t work |
|---|---|---|
| Rolling and evening out | The clay gives way evenly; the pin doesn’t tear a skin or hit a hard core | Rethink how the clay was prepared before rolling harder |
| Curving or draping over a form | The strip takes a curve like the planned one with no crack on the outside | Work earlier or rethink the curve; don’t force a stiff slab |
| Cutting a straight panel | The tool leaves a clean edge and the template lifts off without dragging the outline | Improve release or wait for firmness, under cover |
| Preparing a join | The edges accept the treatment and meet without slumping or breaking | Bring the parts to a similar state or remake the mismatched one |
SenseCraft decision table based on chapter 9 of the book. These observations do not measure water content or strength.
“Soft” and “firm” are working responses, not hours since the bag was opened. One slab can have a firm edge and a soft centre. The Digitalfire glossary also describes leather hard as a range (soft, medium, stiff), not a single moment.
What you need to make clay slabs at home
Without a slab roller, you need: a straight, clean rolling pin, two guides of the same height, a flat surface, smooth cloth (or another tested contact layer), two flat boards you can carry, plastic to cover, a ruler, a paper template, a suitable knife or craft blade and a rib with an undamaged edge. Check that the guides really are the same height: improvised or warped wood is not a reliable reference.
Use a clearly labelled clay body suitable for the planned firing. If someone else will fire your work, confirm that they accept that clay body. Before rolling, cut a portion and look for a dry skin, a soft core, lumps or folds: the pin spreads the difference instead of fixing it. Digitalfire links laminations, poorly bonded internal layers, to how the clay was processed; a smooth surface does not prove they are absent.
Cloth, paper or wood: what should you roll on?
The contact layer is whatever sits between the clay and its support. It can release well, print a texture, absorb water or stick, and it changes when wet, folded or dirty. Test the real combination on an offcut: roll, stop and try to release it the way you will on the piece.
| Contact layer | May help | Watch for |
|---|---|---|
| Evenly woven cloth or canvas | Flexible release when clean and stretched flat | Weave printed into the clay, creases, saturation, dry dust |
| Suitable absorbent support | Firms the face in contact | One face drying before the other, residue from the support |
| Film or low-absorbency surface | Draws little water from the underside | Trapped water, creases, sticking |
| Suitable paper | Disposable separator for some steps | Tears, sheds fibres and changes when wet |
SenseCraft table based on chapter 9 of the book. Check how the clay behaves on whichever surface you use.
Cloth follows the slab but is not rigid: lift only its corners and the middle sags. To carry a slab, use a board.
How to roll a slab with a rolling pin and guides
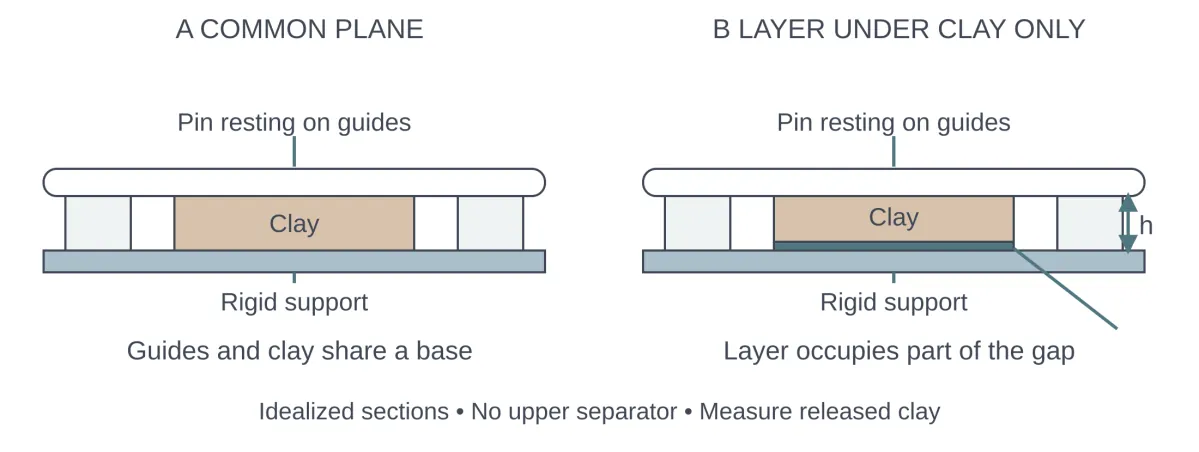
What sits under the clay and under the guides changes the final thickness. Diagram from SenseCraft’s Ceramics by Hand (English edition); not to scale.
- Prepare the portion. Flatten the clay gradually on the contact layer, without folding the clay over onto itself, into a shape close to the useful area. Don’t try to gain length by pulling an edge.
- Check the support. Clean table, contact layer and guides. If the reduction is large, work in stages before reaching the guides; don’t force the pin up onto a tall block.
- Roll evenly. Use overlapping passes across the area you need, without repeatedly thinning one end. Working from the centre outwards helps you follow the spread.
- Release before you turn. Stop rolling, release the slab from the cloth and only then change its orientation, with support; to release the cloth underneath, turn the slab over between two boards (below). Never turn the slab by dragging it by an edge.
- Reach the guides. The pin should touch both guides at once, without rocking or flexing. Pressing harder after that does not improve the thickness; if you are short of area, start again with a larger portion instead of thinning the slab.
- Check both faces. To remove the cloth texture, smooth the clay surface with a rib while keeping the slab fully supported. Avoid gouging the clay, and measure again afterwards.
- Label and cover. Note face A (the top), face B, the main rolling direction and the thicknesses. Cover and keep it supported.
A stretched skin, a fold, a lifting edge or a crack means stop. Wetting the whole surface does not guarantee that folds or cracks are corrected, nor does it make the slab’s moisture even straight away.
Do 6 mm guides give a 6 mm slab?
Not necessarily. A guide tells you its own height. The pin can flex, the cloth can compress, the clay can spring back slightly when released and the table may not be flat. If one cloth runs under both the clay and the guides, the reference moves with it; if it lies only under the clay, it takes up part of the gap. Treat the guide as a process reference and the measurement of the released slab as the data.
How thick should a clay slab be?
It depends on what the slab has to do, its size, the planned curve and the clay body. There is no universal thickness: the 6 mm used in this article is an illustrative example. Decide by the next operation and test an offcut of the same thickness: does it cut cleanly, curve without cracking and hold up on the support you have?
Do one slab roller’s settings work on another?
No. Some adjust the gap; others use shims under the bed. The scale on North Star’s Standard slab roller is calibrated with the supplied canvas, and the manual warns not to pull the canvas from the other side; Bailey asks for plastic, easily wedged clay in the SRT-18. Follow your own model’s manual, keep hands, hair and clothing away from the rollers and stop the machine before adjusting it.
Faces and direction: why mark A, B, X and Y
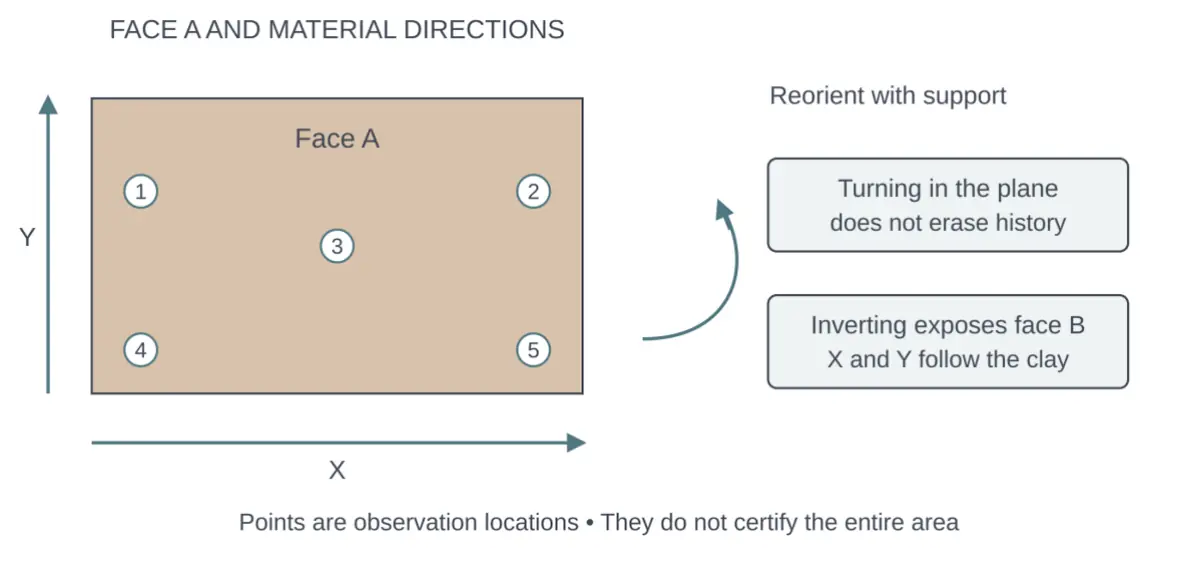
Face A, X and Y directions and observation points. Turning or inverting does not erase the slab’s history. Diagram from SenseCraft’s Ceramics by Hand (English edition); not to scale.
Call the top face A and the bottom face B, and call X the main direction you rolled in. These names stay with the clay even after you turn or invert it. Digitalfire explains that flat clay particles tend to align during mixing and forming, which can affect shrinkage. Alternating direction and working both faces helps spread the work and remove marks; Nancy Gallagher, in Pottery Making Illustrated, compresses both faces with a rib before making her tiles. That does not prove the slab won’t warp: thickness, release, support and drying count too.
Does compressing with a rib prevent cracks?
There is no guarantee. A rib evens out the surface; smoothness does not prove that stresses are gone or that folded layers have bonded properly. Differences in drying rate between parts of the piece also favour cracking.
How to measure slab thickness
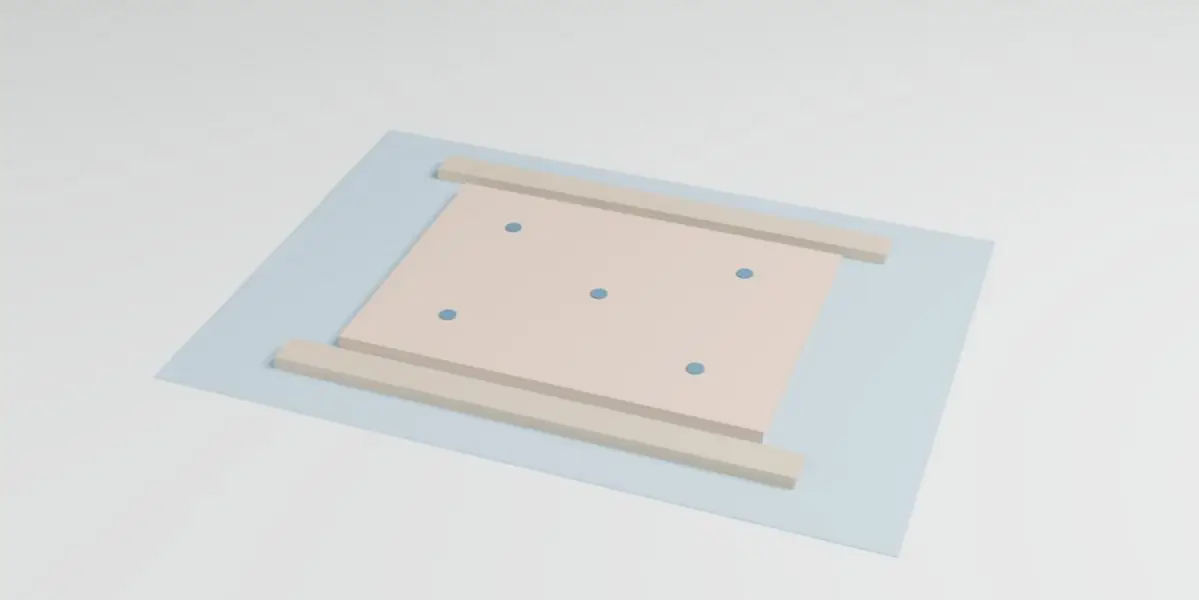
Slab between guide strips with five observation points; each only counts as a measurement if the method reaches it. Render from SenseCraft’s Ceramics by Hand (English edition), illustrative geometry; colour and texture do not indicate the state of the clay.
Choose the points first: opposite edges, the centre and areas that will have joins or cut-outs. Keep the slab supported and use light contact; squeezing the instrument on soft clay changes the reading. A caliper only checks points its jaws can reach on both faces without deforming the slab; don’t assume it reaches the centre. For an area out of reach, use a method that can measure it without deforming the slab and state which one you used. A separate sacrificial sample, even one prepared the same way, gives measurements of that sample; it does not replace a reading at the centre of the slab you intend to use. If that centre was not measured, record it as not measured. Do not routinely puncture the slab you intend to use.
A fictional example of five wet (WET) measurements, at the points the method reached: 5.8; 6.0; 6.1; 6.0; 5.9 mm. Mean 5.96 mm, range 0.3 mm. The decision does not come from the mean alone: if you agreed to accept 5.5 to 6.5 mm at those points, all of them pass, but that does not prove the whole slab is uniform.
For rectangles, compare sides, parallelism and diagonals: equal diagonals alone do not prove four square corners. Note when you measured: after rolling, after cutting or after moving.
Shrinkage: how to work out the cutting size
If the piece has to end at a given size after firing, start from the end. With a drying shrinkage sd (of the wet length) and a firing shrinkage sf (of the dry length), the retained factor is q = (1 − sd) × (1 − sf). The wet length for a fired target is L wet = L fired ÷ q. Use data for your clay body and the planned firing, and check whether a given percentage refers to drying, to firing shrinkage measured from the dry length, or to total shrinkage from wet to fired.
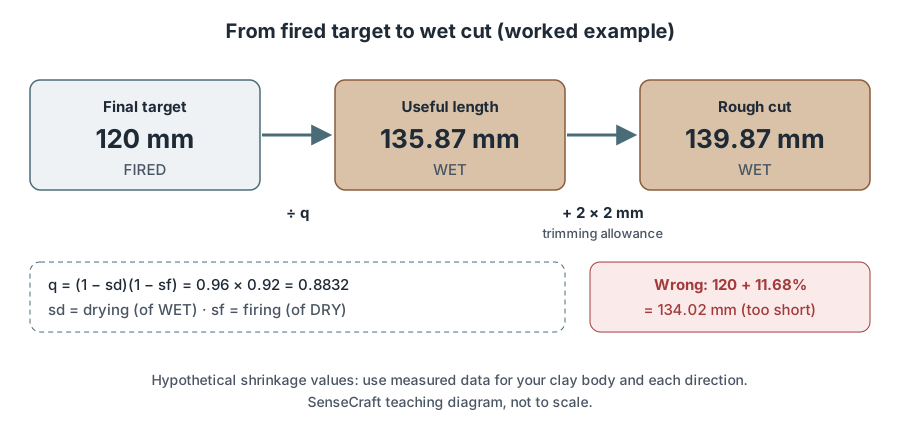
SenseCraft teaching diagram, not to scale. The shrinkage values are hypothetical.
With sd = 4% and sf = 8%, q = 0.96 × 0.92 = 0.8832: total shrinkage is 11.68%, not 12%. For 120 mm after firing (FIRED), the wet cut is about 135.87 mm. Adding 11.68% to 120 would give 134.02 mm and the piece would come out short, because the percentage refers to the starting length, not the final one. The trimming allowance (here, 2 mm at each end, measured in wet clay) is added to that value and removed in the planned step; it is not shrinkage.
Don’t apply the same q to X, Y and thickness without data for it. Without measurements by direction, treat equal shrinkage as an assumption.
The template is right, but the piece came out wrong. Why?
The CAD dimension is intent; the manufactured tool has its own; cutting and moving add deviations before any drying.
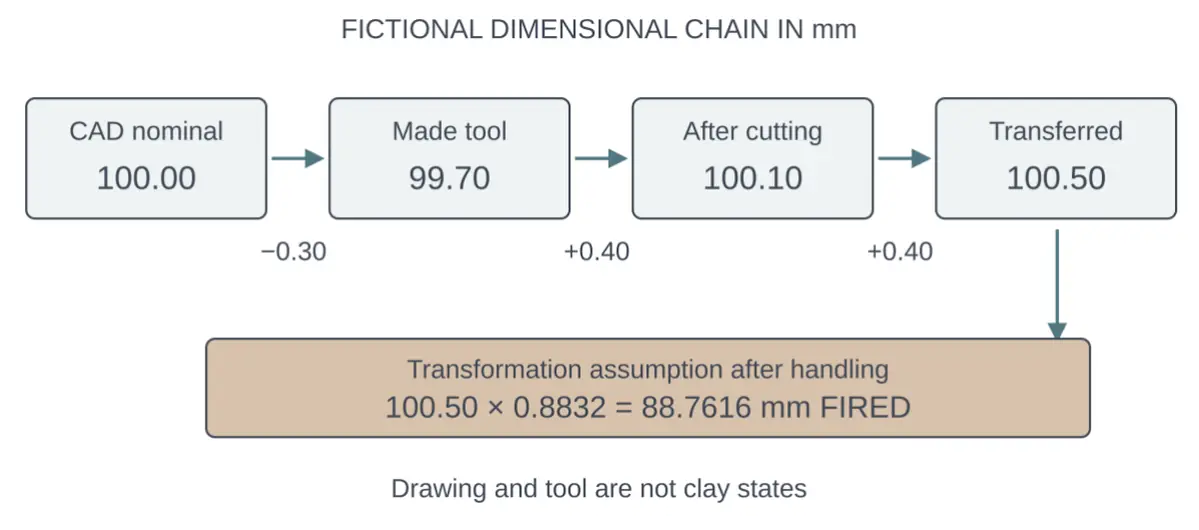
Fictional dimensional chain in mm: the deviations teach you to trace each step; they are not measurements or tolerances. Diagram from SenseCraft’s Ceramics by Hand (English edition).
On a 3D-printed tool, check the edge that actually guides the cut, not the overall size of the printed part. Measure each step against the same references; fixing only the CAD does not fix a handling error.
How to cut a slab without shifting the outline
Check the template’s scale: a print set to “fit to page” changes it. Leave room for the tool between outlines. Lay the template down without pressing; if it sticks, mark the outline lightly, lift it off and cut along the line. Gallagher also measures and marks her tiles before cutting.
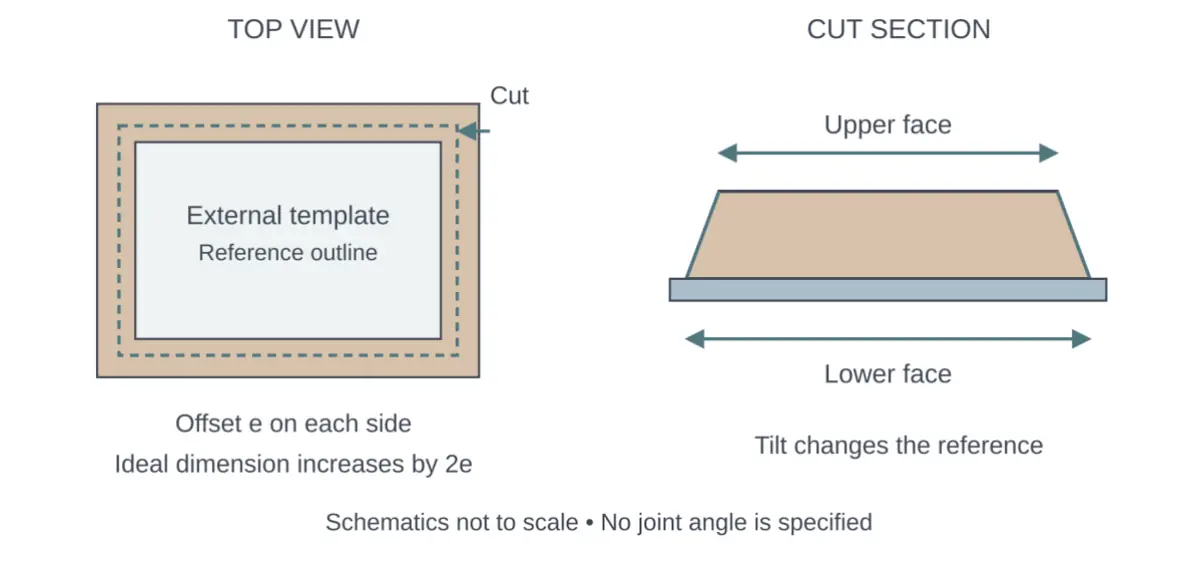
With an external template, an offset e on each side increases the dimension by 2e; a tilted blade leaves faces of different widths. Diagram from SenseCraft’s Ceramics by Hand (English edition); not to scale.
Cut with the slab supported and your other hand out of the blade’s path. If clay builds up in front of the tool or the edge tears, stop and compare state, tool and direction on an offcut. With a closed cutter, lift the tool straight up without rocking; if the clay comes up with it, stop. After rounding edges, measure again.
Before cutting, know which edges will show and which will be joins: rounding a future joining face out of habit reduces contact. To plan the panels of a box or small house, AMACO first builds a paper model and uses its parts as cutting patterns; the real thickness of the join still has to be worked out in clay.
How to release, flip and move a slab without stretching it
Releasing and moving are two operations. Never pull the clay up to reach the cloth. When the cloth is under the slab, turn the slab over between two boards as described below: once the lower board is resting flat on the work surface, remove the top board and peel back the now exposed cloth over itself, little by little, keeping the clay supported. Watch whether the clay follows the cloth, stretches or folds. The top face can be free while the bottom is still stuck.
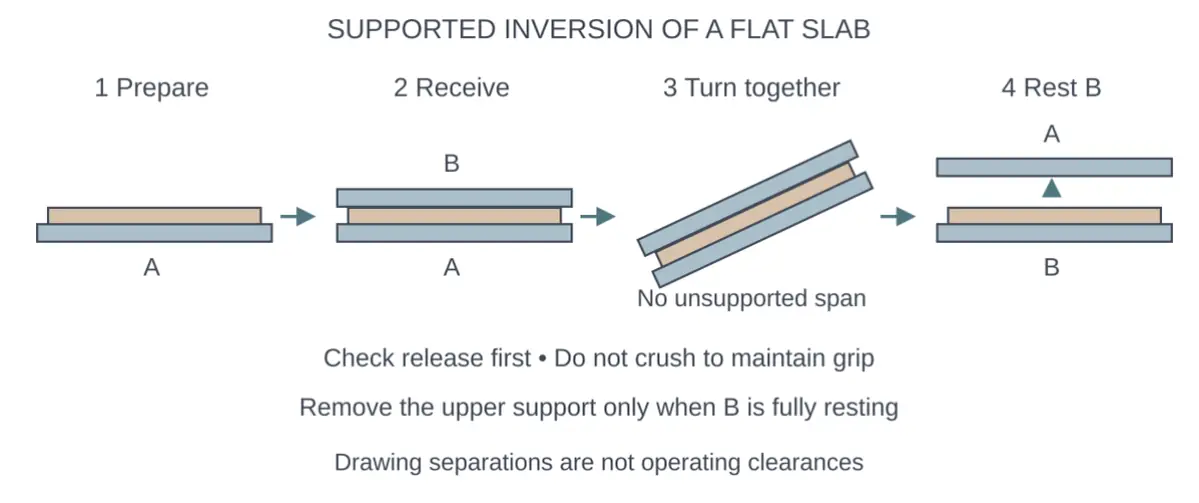
Supported inversion of a flat slab: the stack turns together and the top support comes off only once B is fully resting. Diagram from SenseCraft’s Ceramics by Hand (English edition).
To flip a flat slab, sandwich it between two boards: rehearse the move with empty boards, bring the top board down without squashing, turn the stack together, set the lower board down fully and only then lift off the top one. To change tables, carry the slab on the same board, holding it so it doesn’t flex. Never carry a slab hanging from its cloth or folded over your forearm. A slab too large for your supports calls for help, two smaller slabs or another technique.
After moving it, check the outline and distances; if it deformed, note where and at what step.
How long should a slab rest before cutting or assembling?
There is no fixed interval. Cover the slab without letting the plastic rest on it and decide by how an offcut kept in the same conditions responds. The clay can continue to firm up even when covered.
Why do clay slabs warp or crack?
For flat slabs, Marvin Bartel of Goshen College sums up the principle: let the water leave both faces at the same rate. Edges dry before the centre, which can crack larger slabs. Among other things, he suggests drying on racks with air underneath, covering overnight and protecting the edges. Weights alone do not ensure a flat slab: if the underside stays wet while the edge stiffens, rethink support and cover.
| Sign | What to check first |
|---|---|
| Centre and edges have different thicknesses | Concentrated passes, guides, pin flex, support |
| The slab stretches as it comes off the cloth | Sticking, pulling, flexible support |
| One side is thinner | Unequal guides or folded cloth under that side |
| The cut tears or clay builds up | State, tool, particles, cutting direction |
| A crack or layer appears | Clay preparation, a fold, cutting or drying |
| A corner or the centre bows | Uneven drying between faces, support, direction history |
| Final size is wrong despite the CAD | Tool, cutting, transfer or an unsuitable q |
SenseCraft table based on chapter 9 of the book. A smooth surface does not eliminate an internal discontinuity.
If the defect reaches the useful area, crosses a future join or keeps coming back, review the preparation before rolling another slab. Stretching the smaller panel to match the larger one only hides the problem.
What to note before using the slab
For practice, the book suggests a decorative 90 × 90 mm slab with a nominal wet thickness of 6 mm (teaching dimensions, not a tile standard). Before releasing any slab for use, note: clay body and batch, guides or setting, contact layer, faces and direction, measurements after rolling, cutting and transferring, and current support. “Panels cut and transferred, with no visible change at the references checked” says more than “perfect slabs”.
Safety
Pick up offcuts before they dry and clean with a damp cloth or mop. If you vacuum, the equipment must be designed for fine silica-containing dust, with suitable filtration, not an ordinary household vacuum. Dry sweeping, shaking out canvas or using compressed air raises respirable dust. Do not dry-sand an unfired clay slab. Keep the hand holding the ruler out of the blade’s path.
Where this content comes from
This article summarizes chapter 9 of Ceramics by Hand — Foundations and Techniques Without a Wheel, a literature-based guide compiled by SenseCraft. It combines practices documented in the sources cited below with teaching structure, tables, a diagram and worked examples developed by SenseCraft. The writing was assisted by AI tools and edited by SenseCraft. To see slabs alongside the other techniques, go back to the guide to pottery without a wheel.
Sources cited
- AMACO Brent. Barns and Silos: Textured Slab Building Lesson, lesson plan.
- Bailey Pottery. Bailey SRT-18 Table Top Slab Roller, equipment description.
- Marvin Bartel, Goshen College. How to Avoid Warped or Cracked Handmade Ceramic Tile.
- Nancy Gallagher. Custom Embossed Tiles, Pottery Making Illustrated, Mar./Apr. 2016.
- Tony Hansen, Digitalfire. Leather hard, Laminations and Particle orientation, technical glossary.
- North Star Equipment. Standard Slab Roller Setup & Operating Information, equipment manual.
Limits
- This article summarizes published sources; it is not the result of SenseCraft testing. The practices cited belong to the authors, manufacturers and institutions named.
- Thicknesses, dimensions and shrinkage percentages appear as worked examples for wet clay; they are not values for every clay body, nor manufacturing tolerances.
- Slab roller settings apply to the model described in the cited manual; they do not transfer to other equipment.
- A flat, smooth slab with no visible cracks does not prove strength, freedom from warping in the kiln or that a piece is safe for food contact.
Basis: literature review — original article based on the October 2026 Portuguese edition of the SenseCraft handbuilding book, chapter 9. The corresponding material is also available in English in Ceramics by Hand — Foundations and Techniques Without a Wheel (November 2026 edition), with primary sources listed at the end.