
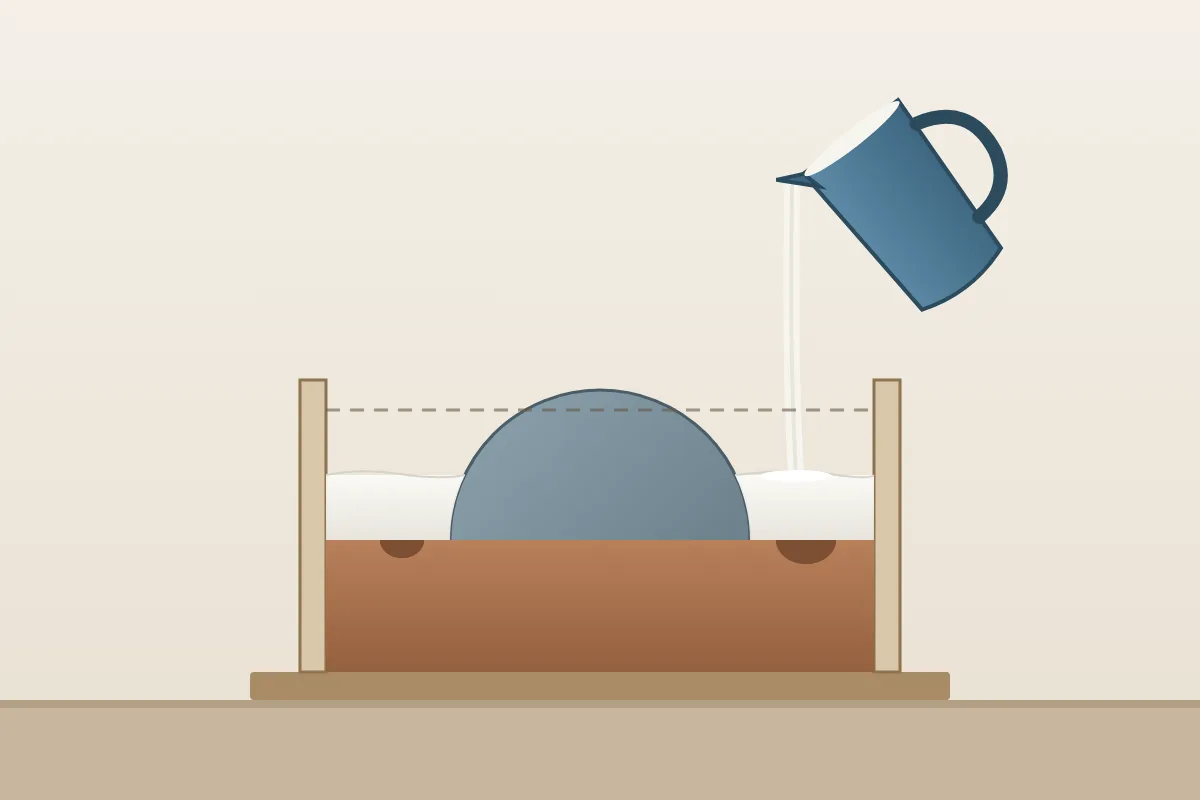
A plaster mold for pottery is planned before you open the bag: first you decide how the model will come out of the plaster and how the clay will come out of the mold; only then do you choose the product, work out the mix and pour. If the release path is wrong, a well-made mix produces a block that traps the model or breaks when you open it.
This article is part of the series built around the guide to pottery without a wheel. Using a ready-made mold to shape slabs is covered in hump and slump molds. Here the subject is making the mold: model, parting, mixing, pouring, drying and care. Slip casting and collapsible molds are covered separately.
Model, mold box, clay bed and mold: what each one is
- Model (original, master): the form to be copied.
- Mold box (cottle): the walls that hold the liquid plaster around the model.
- Clay bed (parting bed): a removable layer, usually clay, that covers half the model so the first block goes only up to the parting line.
- Mold: the hardened plaster, which records the surface of the model in negative. A raised detail on the model becomes a recess in the mold.
Model, mold and piece do not share the same dimensions. The plaster itself expands slightly as it sets: the data sheet for USG No. 1 Pottery Plaster gives a maximum expansion of 0.21% under laboratory conditions, and USG’s IG526 guide mentions about 0.17%. Then come wall thickness, drying and firing of the clay. For fits, measure the mold you actually made, not just the model.
Draw two release paths before you mix
First, work out how to remove the original model. Then plan how the formed clay piece will be released. Draw both. Choose a direction and follow the sections perpendicular to it: a cavity that widens towards its opening tends to release; an opening smaller than a bulge inside creates an undercut. Check reliefs, lettering, feet and handles as well, since they can lock even when the main profile looks open.
Draft helps separation, but the book does not set a minimum angle: depth, texture and model material change the answer. A release agent changes the interface; it does not widen a narrow opening.
Exercise without plaster. Draw the profile of three household objects (a jar lid, a wide-mouthed cup, a narrow-necked bottle), choose a release direction and mark where the section becomes larger than the opening. Turn the object 90° and repeat.
One-piece or two-piece plaster mold?
| Decision | What to check before mixing | What changes in the work |
|---|---|---|
| One piece | Model and piece come out through the opening | Fewer seams, one mix |
| Two pieces | Each half has a clear path | Two mixes and a plaster-to-plaster interface |
| More pieces | A release order you can demonstrate | More seams and risk of mixing up segments |
| Removable core | The core comes out without breaking piece or block | Its own sequence and support |
| Collapsible mold | Planned internal movement | A separate subject, covered in another chapter |
SenseCraft table based on chapter 17 of the book.
Start with one piece: a shallow cavity, no handles, no deep lettering. For a roughly symmetrical body without a handle, a parting line at the widest point may allow two side halves; that is a starting point, not proof. Splitting a mold into two pieces does not make it collapsible.
What plaster should you use for pottery molds?
Use a product the manufacturer specifies for ceramic molds. “Plaster” on its own says nothing about absorption, strength, expansion or working time.
Can you use ordinary plaster to make a pottery mold?
Not as an automatic substitute. Building plaster and patching compounds are made for other uses and can differ in absorption, strength, expansion and working time. High-strength gypsum cements vary too: some are formulated for ceramic tooling, such as pressing dies, but may not give the absorption a slip-casting mold needs. Check the manufacturer’s specifications for the intended use before risking the model.
Record the manufacturer, product name, batch, date and condition of the bag. Lumpy powder does not become a fresh batch just because you sieved out the lumps. Use clean water and note its temperature; set plaster left in the bucket and rinse water both affect the set.
What is the water-to-plaster ratio?
The one for your product. The USG No. 1 Pottery Plaster sheet gives a normal consistency of 70 parts water to 100 parts plaster by weight. USG’s IG526 guide gives ratios of 68 to 90 parts water per 100 parts plaster across ceramic mold applications. So the figure on one sheet does not carry over to another plaster or another use, and you do not average between products.
Times also vary between documents. USG’s IG503 mixing guide recommends allowing the plaster to soak for 2 to 4 minutes and mixing for approximately 2 to 5 minutes; the No. 1 Pottery Plaster product page gives 1 to 2 minutes for each step, depending on the product. Follow the instruction that applies to your product, scale and method, and record the actual times. IG503 also notes that hand mixing will not give the plaster its best properties.
Set up the workspace: dust, heat and waste
Keep plaster powder and fragments away from your clay body. Keep a scale, buckets and spatulas for molds only. Open and weigh the powder without dropping it from a height; wet cleaning and vacuuming suited to the dust are better than dry sweeping or blowing. Follow the product’s safety data sheet for ventilation and eye, skin and respiratory protection.
Setting plaster gets hot. USG’s safety data sheet warns that encasing or making molds of any body part can cause serious burns. Do not cast hands or feet with this procedure, keep children away from the mix and do not put your hand on the block to feel the temperature.
Can you pour plaster down the sink?
No. Plaster hardens in the pipes. The Harvard GSD FabLab procedure says plaster should never go down a drain, wet or dry: let the excess harden in a container and dispose of it as solid waste. Set up the waste container before opening the bag and follow local rules and the product sheet.
Work out the mix without confusing volume and weight
The volume of each pour is the usable space in the box minus what is already inside it: the model, the clay bed and, in later pours, the plaster parts that have already set. One cubic centimeter is one milliliter, but one milliliter of mix does not weigh one gram.
| Step | Example (one-piece mold, no clay bed) |
|---|---|
| Usable box 12 × 10 × 5 cm | 600 cm³ |
| Minus the model, which takes up 150 cm³ | 450 cm³ |
| Chosen 10% allowance | 495 cm³ |
| Total mass = volume × slurry density | 495 × 1.674 g/cm³ ≈ 829 g |
| Powder = total mass ÷ (1 + r), with r = 0.70 | ≈ 487 g of powder |
| Water = r × powder | ≈ 341 g of water |
SenseCraft table based on chapter 17 of the book. The dimensions and the 10% allowance are choices for the exercise, not a recommendation. The density is the theoretical value USG’s IG503 guide gives for a gypsum slurry at 70/100 consistency (about 1,674 grams per liter, with some variation from entrained air); it is not a guaranteed yield for any product.
For real batching, use your product’s yield or do what IG503 suggests: right after mixing a test batch, weigh a known volume of the slurry. Do this away from the real model. Weigh on a tared scale, not with kitchen measures. For two pieces, calculate and prepare each pour separately.
Build the mold box and prepare the model
- Flat, stable base; firm walls, taller than the planned level; sealed joints. Do not rely on the mix thickening to stop a leak.
- Fix the model against shifting and floating without creating an undercut.
- On a porous model, a sealer changes permeability; a release agent helps separation. One product may do both, but do not assume it. A thick coat fills in detail.
- New combination of model, release agent and plaster: test it first on a small area.
There is no universal minimum mold thickness: walls that are too thin may break, while excessively thick plaster blocks are heavier and take longer to dry. For casting molds, in a passage on tooling for mechanized forming, USG’s IG526 guide says a minimum wall of about 1 1/2 in (roughly 38 mm) is usually appropriate; that is a reference for that use, not a rule for every mold.
Mix and pour
Weigh the water first, unless the manufacturer says otherwise. Sift the powder onto the water slowly and evenly, as IG503 asks, and let it soak. Mix with the equipment, intensity and time the manufacturer recommends, avoiding vortex formation and excessive air entrainment. Pour within the working time, in a steady stream from one point so the plaster front advances over the model, rather than pouring directly onto delicate surface details. Stop at the planned level and do not move the box.
How do you avoid air bubbles in a plaster mold?
Bubbles come from air whipped into the mix or trapped under overhangs. Mix without a vortex, pour from one point and let the plaster front advance over the model; a detail facing downwards with no way out for the air may call for a different orientation or a different parting. Vibration does not fix a wrong mix or plaster that has already started to set.
Do not add water to a mix that has already thickened, and do not add partly set leftovers to a new batch: set it aside and let it harden. Discarding a small batch is better than producing a mold from an undocumented mix.
How to make a two-part plaster mold
- Mark the parting line on the model and build the clay bed up to it, smooth and sealed where it meets the model.
- Make shallow, rounded registration keys with draft, outside the area the clay will copy and away from the edges. An asymmetrical layout helps you recognize the position, but label each half.
- Pour the first half. When it is strong enough for the operation, following the manufacturer’s demolding and handling guidance where available, support the assembly, turn it over and remove the clay bed without shifting the model. The setting time on the data sheet does not, on its own, tell you when to open it, and this is not yet drying.
- Clean the seam face and apply the release agent to the whole plaster-to-plaster interface. A bridge without release agent glues the halves together.
- Reassemble and seal the box, prepare a new batch and pour the second half.
- Open it with distributed support, in the planned order. Do not use the keys as levers. Check that the halves meet without a step or rocking, and mark identification and orientation on the outside face.
Why does the plaster stick to the model?
Stop with the block supported and find the cause before applying more force: an undercut in the geometry, a missing or failed release agent, a forgotten fixing, or a set that is not yet sufficient. A metal tool forced between details breaks the plaster.
Setting is not drying
Setting turns the slurry into a solid, but the block still holds the water that was added to make it workable. Opening the box and putting the mold to work are different decisions.
How long does a plaster mold take to dry?
There is no universal time. The USG No. 1 Pottery Plaster sheet says to dry to a constant weight and gives 49 °C (120 °F) as the maximum temperature safe from calcination for that product; the limit does not automatically apply to other plasters and does not justify using a household oven. Without suitable equipment, air-dry the mold in a protected, ventilated place, with the parts separated and without stacking working faces.
Constant weight calls for repeated weighings on the same scale, with known interval and resolution; there is no universal tolerance: in the book’s fictitious example, 1,850 g, 1,770 g, 1,736 g and 1,734 g show the loss slowing down, but without interval, resolution and conditions they do not prove the mold is ready. A surface that looks pale or feels cool does not measure the moisture inside.
Inspect before the first trial
Look for cracks, chips, crumbling edges, open bubbles on the working face, and leftover clay bed or release agent. For two pieces, assemble without liquid in the seam and check contact, keys and seam line. Classify the mold: released for a controlled trial, under observation, or out of use. Released for a trial does not mean approved for production.
| Sign | Possible causes | Next step |
|---|---|---|
| Mix thickens before pouring | Time, temperature, contamination, product | Set the batch aside; do not add water |
| Open bubbles on the face | Trapped air, orientation, pouring method | Review the air path and the mixing |
| Halves stuck together | Missing release agent or a bridge across the interface | Do not force at the keys; consider remaking |
| A key breaks | Deep or undercut key, forced opening | Remove the fragments and revise the design |
| Surface crumbles | Ratio, drying, damage or unsuitable product | Take it out of use and review the record |
SenseCraft table based on chapter 17 of the book.
Care for the mold without contaminating the clay
Remove clay residue without scratching the working face: no blade against the plaster and no abrasive to “smooth” the cavity. Keep the parts of each set together, labeled, supported from the base and protected from knocks.
A piece of plaster in the clay is contamination. Dave Finkelnburg, in Ceramics Monthly, explains that pieces of hard plaster in wet clay cause pop-outs that appear after firing; he notes that plaster dust is not the cause. If a mold chips over clay, set the suspect portion aside and do not return it to clean reclaim.
The number of uses alone does not mark the end of a mold: wear, cracks, loss of detail or difficult closing call for reassessment.
Where this content comes from
This article summarizes chapter 17 of Ceramics by Hand — Foundations and Techniques Without a Wheel, a literature-based guide compiled by SenseCraft. It combines manufacturers’ guidance and technical practice cited in the sources below with teaching structure, decision tables, an illustration and studio routines developed by SenseCraft. The writing was assisted by AI tools and edited by SenseCraft. To see molds alongside the other techniques, go back to the guide to pottery without a wheel.
Sources cited
- USG. No. 1 Pottery Plaster: submittal sheet (IG1366), data sheet (PDF).
- USG. No. 1 Pottery Plasters: Safety Data Sheet 52000000003, safety data sheet (PDF).
- USG. Plaster Mixing Procedures (IG503), mixing guide (PDF).
- USG. No. 1 Pottery Plaster, product page and FAQ.
- USG. Plasters and Gypsum Cements for Ceramics: Application Guide (IG526), technical guide (PDF).
- Harvard GSD FabLab. Plaster, Hydrocal, Cement and Concrete, safety procedure.
- Dave Finkelnburg. Techno File: Plaster Pop-Outs, Ceramics Monthly, September 2020.
Limits
- This article summarizes published sources; it is not the result of SenseCraft testing. The mixing ratios, times and temperatures quoted belong to each manufacturer's products and documents.
- There is no universal water-to-plaster ratio, block thickness, draft angle or drying time. The numbers in the text are calculation examples, not a recipe.
- Making the mold does not show that it is suitable for slip casting or for slabs, or how many uses it will take: that is observed in controlled use.
Basis: literature review — original article based on the October 2026 Portuguese edition of the SenseCraft handbuilding book, chapter 17. The corresponding material is also available in English in Ceramics by Hand — Foundations and Techniques Without a Wheel (November 2026 edition), with primary sources listed at the end.