
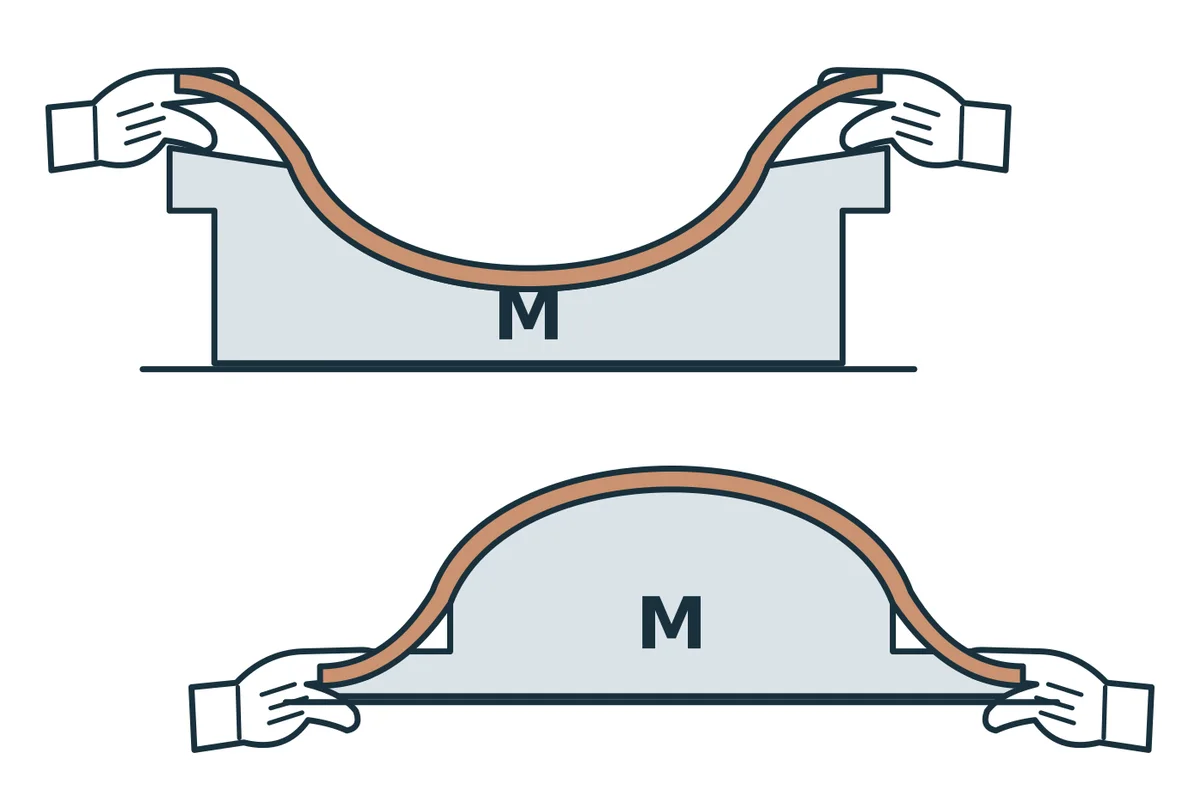
A hump or slump mold gives shape to a slab of plastic clay: in a slump mold the slab goes inside a cavity; in a hump mold it goes over a raised form. The choice decides which face of the piece the mold controls and which one stays free for you to work. Before you roll the slab, check how the piece will come off the mold: a mold is suitable only if the clay can take the intended shape and be removed without excessive force or distortion.
This article is part of the series built around the guide to pottery without a wheel, which introduces the types of mold. Rolling and moving the slab are covered in how to roll out a clay slab; here the subject is using a support mold you already have: choosing it, preparing the contact, fitting the slab, releasing it and flipping the piece. Making plaster molds and slip casting are separate subjects, covered in other chapters of the book.
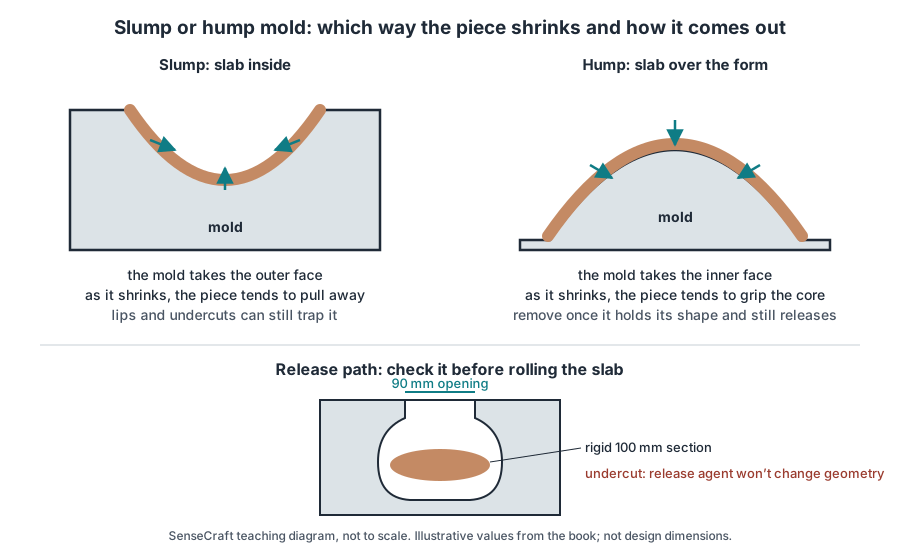
SenseCraft teaching diagram based on chapter 16 of Ceramics by Hand, not to scale. Illustrative values.
Hump or slump mold: which face do you need to control?
In a slump mold, the outer face of the piece rests against the mold and the inside stays accessible: you can refine the interior, but you cannot reach the outside. In a hump mold, the mold sits inside the piece and controls the inner face; the outside stays free, and you can plan a foot. The term drape mold is often used for the form the slab is draped over; catalog names are not a standard, so check the geometry.
| Question | Slump mold (concave) | Hump mold (convex) |
|---|---|---|
| Which face does the mold control? | The outer face | The inner face |
| Which surface can you work on? | The inside | The outside; it can take a foot |
| Where does the piece tend to go as it shrinks? | Inward, away from the wall | Inward, gripping the core |
| Main risk | A lip or undercut that traps it; flipping without a receiving support | Staying too long and cracking over the core |
| How it comes off | Place a receiving support over the opening, then turn the mold and support over together | Support for the outer face; if it has to be flipped, a fitted receiving support and the mold lifted out through the opening |
SenseCraft table based on chapter 16 of the book.
Choose by what the piece needs, not by how the container you had at hand looks: which face should be smooth or textured, where the foot goes and what support the piece will have once it is off.
Which mold should I use for plates and bowls?
Both work for shallow, open forms, and the answer depends on the face you want to control. If the inside needs to stay accessible, for example to refine or decorate it, a cavity helps; if you want to work the outside or add a foot, a raised form helps. The deeper and more closed the curve, the more the slab has to adjust and the more the release path matters. To start, the book suggests small, shallow forms without undercuts.
Can I use a kitchen bowl as a mold?
Yes, if it is intact, easy to handle and kept for the studio only. Do not use cracked glass, sharp edges or valuable pieces, and do not return a utensil used with clay to the kitchen. This applies to any support, including a 3D-printed one: the name of the material does not tell you whether the mold works. Check finish, cleanliness, stiffness under the weight of the slab and, above all, the release path.
Check the release path before you roll the slab
Choose the release direction and follow the whole path. A cavity that widens toward the opening can let the piece come out straight. A cavity with a belly wider than its opening traps a rigid piece. On a hump mold, a bulge covered by the clay can force the rim of the piece to pass over a wider section of the mold. That obstacle is an undercut. The taper that helps the piece release is called draft; its inclination is the draft angle. The book does not set a minimum angle: texture, depth, shrinkage and access change the problem.
An undercut is a geometric obstruction, not a sticking problem. In the book’s example, a 90 mm opening will not let a rigid 100 mm section through, and no separating film changes that; it may even take up the clearance there was. Never plan to open up or twist the unfired clay piece to get it past a narrow section.
A test without clay helps: lay a sheet of paper or a cloth over the mold and run your hand along the contour. Where the paper has to fold or pucker, the geometry requires the surface to adjust. The clay may respond by stretching, redistributing material or forming folds, depending on its plasticity, the thickness and the technique. The paper only points to the critical areas; it does not predict how the slab will behave.
Prepare the mold and the release layer
Plaster, unglazed ceramic, wood, metal, plastic or foam can all serve as a support, and two molds of the same material can behave differently because of wear, moisture or finish. With an absorbent mold, note its condition. The USG technical guide, written mainly for slip casting, shows that the moisture still held in the plaster changes how much it can absorb. In slab work, this means watching the mold’s moisture between uses, without assuming that the second use of the day will repeat the first or borrowing release times from another process.
Damaged plaster leaves the workbench. Dave Finkelnburg, in Ceramics Monthly, explains that plaster fragments that get into wet clay cause pop-outs that show up after firing. Do not cut or scrape clay with the blade touching the plaster, and do not reclaim scraps that may contain fragments as clean clay.
Do you need a release agent?
Not always. GR Pottery Forms recommends not using a release agent or sealer on its MDF forms, because they interfere with the forms’ natural drying; that advice belongs to that system, not to every kind of wood. Do not experiment with oil, soap, talc or unknown powders: follow what the maker of the support says. To choose an interface, test a sample first with the same clay and the same contact. Paper can soften or tear, cloth prints its weave and makes folds, plastic film leaves creases and reduces water exchange. No layer solves a geometry problem.
How to fit the slab to the mold without folds
Prepare the slab as in how to roll out a clay slab, with extra beyond the outline and an offcut of the same clay to test the curve. If the offcut cracks when bent, do not force the real piece. A surface curved in two directions, like a bowl, is not just a flat sheet bent: as you settle a disk into a cavity, the rim area tends to have excess and form folds while the center stretches.
- Inside a cavity: settle the center first and follow with the surrounding areas. Leave the rim free; do not press the whole edge onto the mold’s rim before the bottom is formed.
- Over a raised form: settle the top before the sides and do not pull the edges to gain depth. Watch the transition from bottom to wall, where a sharp change can thin a band.
Work in small areas, with your fingers or a rib and evenly spread pressure. AMACO, in a tutorial on a slab plate made over a hump mold, smooths and compresses the slab down onto the mold with a rubber rib before attaching a coil for the foot. Do not smooth over a closed fold to hide it: reduce the depth, change the size of the slab or switch to building in parts with planned joins, as in how to join clay.
Watch the rim too. A lip folded under the mold’s edge, a coil wrapped around the mold or a handle that encircles it can create an undercut where there used to be a clear path.
When to take the piece off the mold?
The decision combines three conditions: a clear path, a contact that lets go and a support ready at the destination. “It’s leather hard” does not answer all three on its own. On an absorbent mold, the face in contact with the mold can firm up before the exposed face, without the piece being evenly stiff. Compare the bottom, wall and rim without bending the piece to test it; the signs of each stage are in leather-hard clay.
How long should the piece stay on the mold?
There is no number that works for every mold. Manufacturers give guidance for their own systems: GR Pottery Forms says to remove some families of forms at stiff leather hard and others as soon as the clay has been compressed and trimmed; PhotoPottery says to release pieces from its plaster molds once they can support their shape. Follow your mold’s guidance and your piece’s signs, not another system’s timing.
Why does the piece crack on a hump mold?
Clay shrinks toward its own center. Over a rigid core, that squeezes it against the mold. PhotoPottery warns that on a hump mold the clay has nowhere to go as it shrinks, and that even a solid slab can develop cracks if left on too long; in a piece with joins, they can separate. In a slump mold, the clay tends to pull away from the wall as it shrinks, but lips, sticking and undercuts can still hold it.
The book uses a calculation to show the conflict: an inner diameter of 100 mm that shrank freely by 2% would become 98 mm; around a rigid 100 mm core, that leaves a 2 mm mismatch in diameter. The calculation does not predict cracking or give a release point: it shows why the core cannot be ignored. If the piece starts to grip the inner support, waiting longer does not solve it.
How to flip the piece without distorting the rim
Identify three parts: the mold (M), the clay piece (P) and the receiving support (R), which supports the piece during removal. In every position, know which surface carries the weight. The receiving support must carry areas that can take the load, without crushing the rim, relief or foot. Soft foam can sink; a flat board may touch only the rim.
- Rehearse the flip with the empty supports: weight, grip, height and space.
- Slump mold: bring R against the opening without pressing the piece, hold M and R together and turn the set over. Set R down before lifting M.
- Hump mold, direct release: prepare support for the outer face and check whether the piece can come off without flipping. A piece that is already firm enough may allow other well-supported handling, provided you account for the piece’s unsupported span, clay body and firmness.
- Hump mold, with flipping: when the geometry calls for flipping, a fitted receiving support takes the outside. Turn the set over with secure support, set R down and lift M out through the opening, without forcing the piece. If there is a foot, leave room for it.
- If the mold does not release along the planned path, stop. Do not rock it or use the piece as a lever.
Once the piece is off, the drying support may be a different one: a cradle that fitted well can trap the piece as it shrinks. Watch whether the wall opens, the rim lifts or the bottom sags, and follow the care in how to dry pottery without cracking. Before firing, remove paper, cloth, film, foam and any bench support.
Why won’t the piece come off the mold?
| Sign | Hypotheses to separate | Next decision |
|---|---|---|
| It won’t come off even with a release layer | Undercut, sticking, shrinkage over the core | Keep it supported and review the path, without adding force |
| The bottom sags after release | State, large span, unsuitable receiving support | Review the receiving support and the timing before repeating |
| The wall has a fold | Excess at the rim area, curve too deep | Do not hide it; remake or change the geometry |
| Crack over the mold | Restrained shrinkage, earlier defect | Stop and note the stage |
| The second cycle takes longer | Wetter mold, different clay or environment | Compare conditions before blaming the clay |
SenseCraft table based on chapter 16 of the book.
Measure at the right reference
State whether a measurement belongs to the mold, the freshly formed piece, the dry piece or the fired one. On a hump mold, the inner surface follows the mold; in a slump mold, the outer surface does. In the book’s simplified example, two parallel walls 100 mm apart on the inside, with a uniform thickness of 6 mm, measure 112 mm on the outside, because the outer width includes both wall thicknesses; the calculation does not apply directly to every curved rim. For dimensional calculations, account for shrinkage separately, by comparing clay measurements at defined stages, as in how to roll out a clay slab; a mold’s catalog diameter does not guarantee the final size of the piece.
When cleaning up, avoid raising dry clay dust. In its CR3 sheet on controlling exposure to respirable crystalline silica during dry fettling of ceramic ware, the HSE, the British health and safety regulator, recommends wet cleaning or vacuum equipment that meets at least dust Class M, and advises against brushes or compressed air for removing dust from surfaces and machinery. The sheet covers that activity, not mold maintenance, but the care with dust applies to the workbench. Do mold maintenance away from the clay.
Where this content comes from
This article summarizes chapter 16 of Ceramics by Hand — Foundations and Techniques Without a Wheel, a literature-based guide compiled by SenseCraft. It combines practices from potters and manufacturers and technical guidance cited in the sources below with teaching organization, decision tables, a diagram and studio routines developed by SenseCraft. The writing was assisted by AI tools and edited by SenseCraft. To see molds in the context of the other techniques, go back to the guide to pottery without a wheel.
Sources cited
- GR Pottery Forms. FAQ, questions on care, warping and release agents for the MDF forms.
- PhotoPottery. Hump and Slump Molds for Pottery, sections Quickly Slump Mold Pottery and Hump Mold Pottery.
- USG. Plasters and Gypsum Cements for Ceramics: Application Guide (IG526), technical guide (PDF).
- Dave Finkelnburg. Techno File: Plaster Pop-Outs, Ceramics Monthly, September 2020.
- AMACO Brent. Slab Plates with Reusable Stencils, section Building a Slab Plate using a Hump Mold.
- Health and Safety Executive. CR3: Dry fettling, dust control sheet (PDF).
Limits
- This article summarizes published sources; it is not the result of SenseCraft testing. The manufacturers' guidance quoted here applies to their own molds.
- There is no universal draft angle, waiting time, thickness or allowable shrinkage: the clay body, the mold, the interface and the environment change the answer. The numbers in the text are calculation examples.
- A piece that came out of the mold intact does not demonstrate strength or watertightness, nor that it is suitable for food; that also depends on the clay body, the glaze and the firing.
Basis: literature review — original article based on the October 2026 Portuguese edition of the SenseCraft handbuilding book, chapter 16. The corresponding material is also available in English in Ceramics by Hand — Foundations and Techniques Without a Wheel (November 2026 edition), with primary sources listed at the end.