
Glazing pottery means applying a coating that will form a glassy surface in the firing. For beginners, the safest route is a clearly identified commercial glaze that matches the clay body and the firing available, applied to bisqueware by brushing or dipping as the product sheet says — and tested first on a sample of the same clay. The first round is not for making a beautiful piece: it is for learning how what you applied relates to what came out of the kiln.
This article is part of the pottery without a wheel guide series. A colored clay coating, such as a slip or engobe, can sit beneath the glaze; we cover it in slip in pottery. Here the subject is the glassy coating. The route is for someone using ready-to-use liquid glaze and an electric kiln run by a competent operator; formulating glazes and spraying are out of scope.
Choose the whole system before the color
Clay body, decoration, glaze, amount applied and firing work as one system. The choice starts with how the piece will be used — a sculpture and the inside of a bowl ask different things — and with the clay and firing available. Color comes after.
Firing ranges that overlap on paper are only a starting point: two products labeled for cone 6 still need to be tested together. Don’t try to work out a “middle temperature” between ranges that don’t match: an underfired glaze can turn rough and unstable; an overfired one can run onto the shelf.
Is a matte glaze an underfired glaze?
No. A glaze can come out glossy, satin, matte, transparent or opaque. Matte does not mean the firing fell short, and gloss does not prove the layer reached the properties the use requires.
Why doesn’t the color match the color chart?
Because the chart shows the result under certain conditions. A dark clay body changes how the same color reads, and textures and recesses collect more glaze. AMACO names clay body and application thickness as variables and recommends test tiles.
Turn the label into a working record
Before opening the jar, write down the manufacturer, line, exact code, batch, whether the product is for brushing or dipping, and the date you checked. Keep the label, the technical sheet and the safety data sheet (SDS). Copy the bisque condition, firing range, atmosphere and use restrictions.
A useful record has four separate fields:
- what the manufacturer states;
- what the available kiln can do;
- what the test tile showed;
- what is still left to check.
Keeping the fields apart stops a nice result from turning into a performance claim. Missing or contradictory information: ask the manufacturer and set the material aside until it is resolved. Labels change: Mayco updated its dinnerware-suitability terms without changing the formula. Keep the version you used.
Does “non-toxic” mean the glaze is food safe?
No. ACMI’s AP seal means a toxicologist evaluated the art material for its intended use in the studio; the CL seal means the label carries the known hazards and instructions. Neither is a test of the bowl you fired. Mayco notes that dinnerware suitability depends on following the instructions, does not carry over automatically to mixes or layers, and that anyone selling ware is responsible for testing it.
AMACO states that it tests its glazes for lead and cadmium using ASTM methods (C927/C738). That is the manufacturer’s statement about its own program, not a report on your piece.
Glaze safety in the studio
Use tools only for glaze, a washable tray and wet cleaning; no food nearby and no brush in your mouth. Dry residue becomes dust: don’t dry-sweep or use compressed air. The British HSE sheet CR1 deals mainly with respirable crystalline silica when preparing glazes. Prefer ready-to-use liquid glaze and check the SDS for protection and disposal. Collect leftovers and cleaning water in a labeled container, never down the drain; where it goes depends on the composition and local rules.
Prepare the bisqueware and the glaze
Bisqueware is the piece after its first firing. Before glazing, look for cracks, sharp edges, loose dust, hand grease and wax residue: glaze does not glue a faulty joint or hide a crack. Clean without spreading dust; if you use moisture, let the piece dry again, because soaked bisque does not absorb like dry bisque. Drying before the bisque firing matters too: see how to dry pottery without cracking.
Plan how you will hold the piece and rehearse the movement with the clean piece over a tray before going near the glaze. Don’t hold a piece by a handle whose joint looks doubtful.
Do you have to bisque fire before glazing?
On this route, yes. Glazing raw greenware (single firing) changes absorption, handling strength and drying; it only makes sense with a clay body, glaze and process explicitly suited to it, and with someone who knows the kiln.
How do you prepare the glaze?
Mixing means bringing back what has settled at the bottom, not just stirring the surface. Follow the manufacturer’s mixing method without splashing. Don’t add water out of habit: “yogurt consistency” is a comparison, not a specification. AMACO distinguishes brushing and dipping glazes, which are formulated differently — thinning a brushing glaze does not turn it into a dipping glaze.
What is glaze specific gravity?
It is the mass of a volume of glaze divided by the mass of the same volume of water. In the book’s example: empty container 32.0 g; with water to the mark, 132.0 g; with glaze to the same mark, 181.0 g. Specific gravity is 149.0 ÷ 100.0 = 1.49. The measurement helps you repeat a documented process; it does not guarantee thickness or the fired result. For its Stoneware Dry line, Mayco recommends a specific gravity of 1.47 to 1.51 and a 1–2 second dip — numbers for that line, not a target for every glaze. Stoneware Dry is sold as a powder and mixed with water; it appears here only as an example of a manufacturer’s specification, not as an instruction for adjusting ready-to-use liquid glaze.
How to brush on glaze
- Mix, then do a trial on a sample of the same clay and the same bisque. Watch how the product leaves the brush and whether the surface absorbs evenly.
- With a soft, wide brush, lay down continuous, adjacent strokes with light pressure. Reload before dragging nearly dry bristles and don’t keep working a layer that has stopped flowing.
- Wait the drying time between coats that the product states. As a cue (not a specification): the film usually loses its wet shine before the next coat. If the brush drags or lifts the layer underneath, look at the drying interval, the amount deposited and how the glaze behaves.
- Check textures, corners, recesses and handle joints. If the film lifts or cracks, stop: covering the defect does not explain the cause.
How many coats of glaze?
The number comes from the documentation of the exact product, not from a general “three coats” rule. A coat is an application step, not a thickness: two brushes or two people deposit different amounts with the same count. Compare your stroke with a reference tile and note the method.
Does clear glaze change the decoration?
It can. A heavy layer of clear can cloud or blur the design, and some colors react differently under clear glazes with or without zinc: the color’s data sheet says which clear to use. To cover slip decoration, use on the piece the same clear and the same order as the test tile that worked.
How to glaze pottery by dipping (dip glazing)
Use only glaze specified for dipping, in a stable container with enough volume and room for the movement. Use tongs or a holding tool defined by the studio; don’t plunge your hands in.
- Mix the glaze before starting and whenever it settles between pieces.
- Go in with a controlled movement, letting air escape from hollows — a trapped bubble leaves a bare spot.
- Time the dip as the procedure for that product defines.
- Lift out with a controlled movement and remove the excess as the manufacturer indicates, letting it drip back into the container; avoid sudden moves that spoil the coating.
- Set the piece down on the planned area and let it dry before handling.
For the inside of a bowl, pour in a portion, rotate the piece in a controlled way until the wall is covered and pour out the excess along the planned route. The pour-out point gets extra glaze; watch it.
Can you double dip or layer glazes?
A second dip is not the same as the first: the piece has already taken up water and material. AMACO does not recommend layering its Potter’s Choice dipping glazes, while it presents the Dipping & Layering family for dipping and combining layers — that applies to those lines, not to every glaze. And A over B is not the same as B over A.
Keep the foot and a clear band unglazed
The part that touches the shelf must stay free of glaze, with a clear safety band above it. There is no single width: runny glazes, thick layers and overlaps need more clearance. Agree on the band with the kiln operator. Lids, fittings and channels must not get coated by accident either — molten glaze can jam or fuse the parts together.
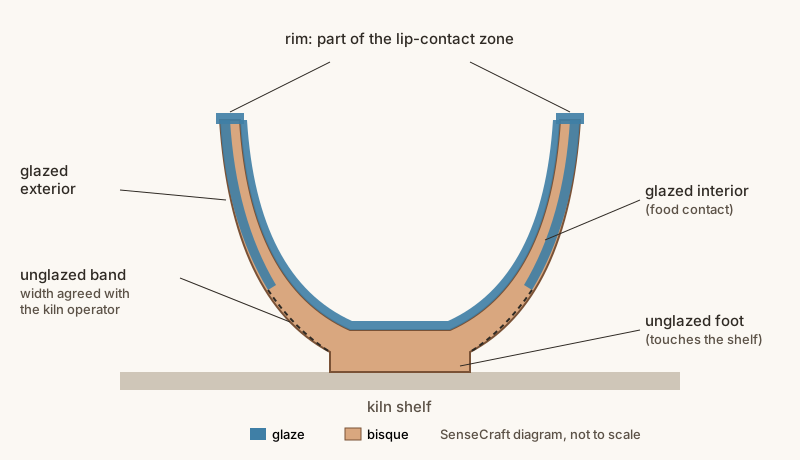
SenseCraft teaching diagram based on chapter 23 of Ceramics by Hand, not to scale. The width of the unglazed band is not a measurement: it is agreed with the kiln operator.
Wax resist, where the studio allows it, helps keep wet glaze off the foot during dipping, but it cannot stop molten glaze from running during firing. Wipe off drops that stay on it and check all the way around in good light: a small drop can glue the piece to the shelf.
Glaze test tiles that answer a question
A useful test tile repeats the clay, bisque, texture, orientation and method of the piece. A flat tile shows color, not how glaze runs on a standing wall. AMACO recommends test tiles in the same clay and texture, fired on the same schedule as the pieces.
Ask a narrow question — “which of the two permitted applications keeps the texture readable?” — instead of “which one looks nice?”. In the book’s example, two clay bodies, two application conditions and three replicates make 2 × 2 × 3 = 12 tiles. Agree on kiln positions with the operator: if all tiles of one clay sit on the top shelf, the effect of the clay gets mixed up with the effect of position.
When you open the kiln, confirm each tile’s identity, look at color and gloss in diffuse light and look for islands, pinholes and lines in raking light. Compare the application conditions and their replicates (and a control tile, if you defined one); only then write a hypothesis and change just one thing in the next round.
Glaze defects: what to look for
| Sign | Hypotheses to check | Immediate decision |
|---|---|---|
| Rounded islands with bare clay (crawling) | Layer shrinkage or poor adhesion, contamination, thick application | Set aside and compare preparation and drying |
| Pinholes or open blisters | Body–glaze interaction, gas release, thick application, firing | Don’t use the functional surface; investigate |
| Network of cracks in the glaze (crazing) | Thermal fit between clay and glaze | Don’t release as tableware based on looks |
| Flakes at the rim (shivering) | Glaze fit and flaking off | Isolate: risk of sharp fragments |
| Glaze run onto the foot | Thick application, overlap, glaze fluidity, firing | Redefine application and band before repeating |
| Different color or gloss | Clay, thickness, position, firing, batch | Compare records before changing anything |
SenseCraft table based on chapter 23 of the book. The hypotheses are starting points; one photo does not point to the cause on its own.
Crawling is not crazing: Digitalfire links the first to a layer that shrinks too much or bonds poorly, often already cracked in drying; crazing can show up some time after the firing. More glaze or more heat does not fix everything, and sanding a defect does not make the piece fit for food again.
Cones and firing: what to hand the kiln operator
Pyrometric cones show heatwork — the combined effect of time and temperature — where they sit. Orton explains that the temperature at which a cone bends depends on the heating rate, so copying a number from a chart does not reproduce a process. Cone 06 and cone 6 are very different: keep the zero in your records and requests.
Give the kiln operator: clay body, glazes and batches, an application map, unglazed bands and the purpose of the piece.
Glaze and food: looks are not a lab report
Visual inspection can reject a surface, but it cannot show that nothing leaches, and a home test with lemon or vinegar does not replace a lab. The FDA has guidance on lead release from ceramic ware (CPG Sec. 545.450), a U.S. reference. In Brazil, questions 76 and 77 of Anvisa’s document on food-contact materials (6th edition, 2024) point to Ordinance SVS/MS No. 27/1996 as the reference for glass, porcelain and ceramics and refer to its item 5.2.4 for lead and cadmium limits — the document explains the rules but is not a report on a piece. Before selling, check the rules in force in your market with a competent laboratory.
Microwave, dishwasher and thermal shock are separate claims. Without enough evidence, keep the piece out of food use, even if it looks good.
Where this content comes from
This article summarizes chapter 23 of Ceramics by Hand — Foundations and Techniques Without a Wheel, a literature-based guide compiled by SenseCraft. It combines manufacturer guidance and technical references cited in the sources below with teaching organization, a defect table, a diagram and studio routines developed by SenseCraft. The writing was supported by AI tools and edited by SenseCraft. To see glazing in the context of all the techniques, go back to the pottery without a wheel guide.
Sources cited
- Mayco. Dinnerware Suitability and ACMI Information (dinnerware-suitability terms and responsibility for testing) and How to Use Stoneware Dry (specific gravity and dipping time for that line).
- ACMI. Materials Safety, scope of the AP and CL seals.
- AMACO. AMACO Brent Updates (labels and lead and cadmium testing), Potter’s Choice Dipping Glazes: Mixing & Application (brushing and dipping glazes) and Dipping & Layering Glazes: Tips & Tricks (dipping family for layering).
- Health and Safety Executive. CR1 — Glaze and colour preparation, silica control when preparing glazes, March 2019 (PDF).
- Orton Ceramic Foundation. Pyrometric Cones FAQ, heatwork and heating rate.
- Digitalfire. Crawling, Glaze Shivering and Crazing in Stoneware Glazes, diagnostic references.
- FDA. CPG Sec. 545.450 — Pottery (Ceramics); Import and Domestic — Lead Contamination, U.S. reference.
- Anvisa. Materiais em contato com alimentos — perguntas e respostas (Brazilian food-contact Q&A, in Portuguese), 6th edition, 2024 (PDF).
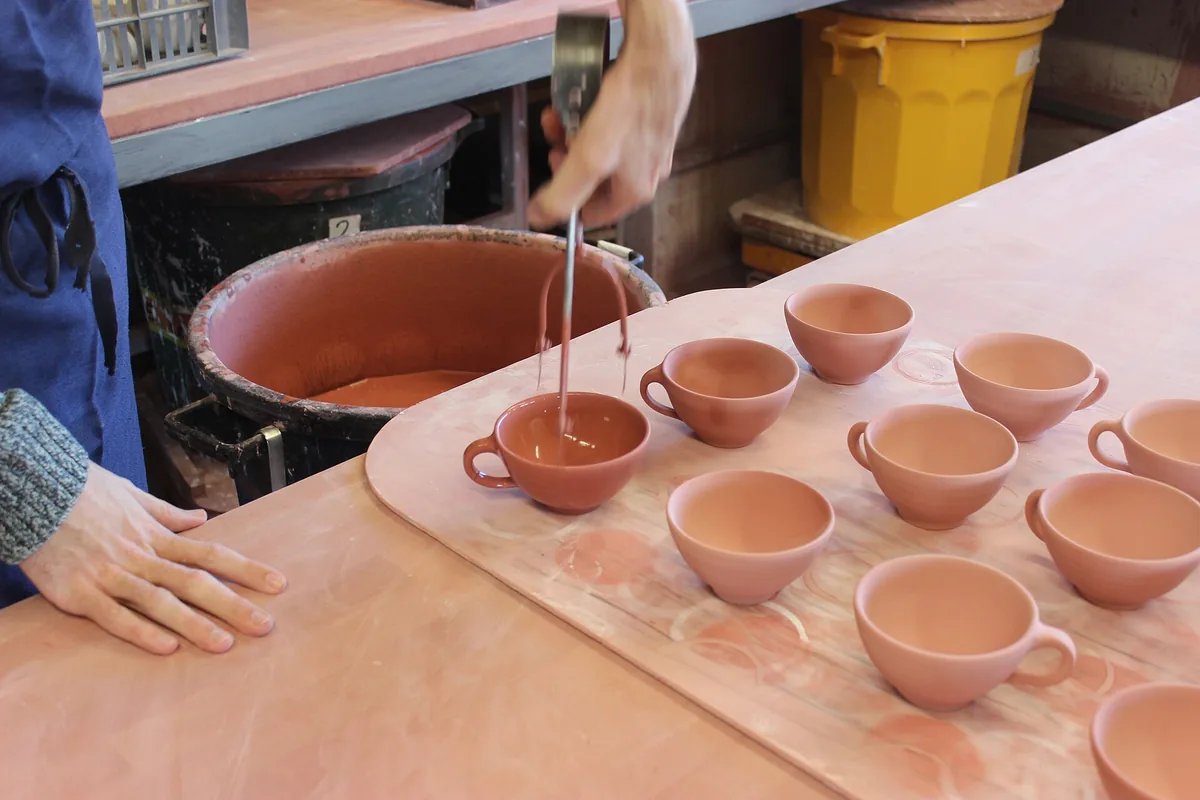
Cover image: Glazing with mineral-based, hand-mixed glazes, Taizé pottery workshop, photo by Chriewue on Wikimedia Commons, CC BY 4.0 license. Resized by SenseCraft.

Limits
- This article is a synthesis of published sources, not the result of SenseCraft testing. Calculations and numbers in the text are worked examples or data for one specific product line, not rules.
- No number of coats, dipping time, specific gravity or unglazed band width applies to every glaze: the documentation of the exact product, the clay body and the firing decide.
- A glossy glaze with no visible defects does not prove that the piece is food safe, microwave safe or dishwasher safe.
Basis: literature review — original article based on the October 2026 Portuguese edition of the SenseCraft handbuilding book, chapter 23. The corresponding material is also available in English in Ceramics by Hand — Foundations and Techniques Without a Wheel (November 2026 edition), with primary sources listed at the end.