
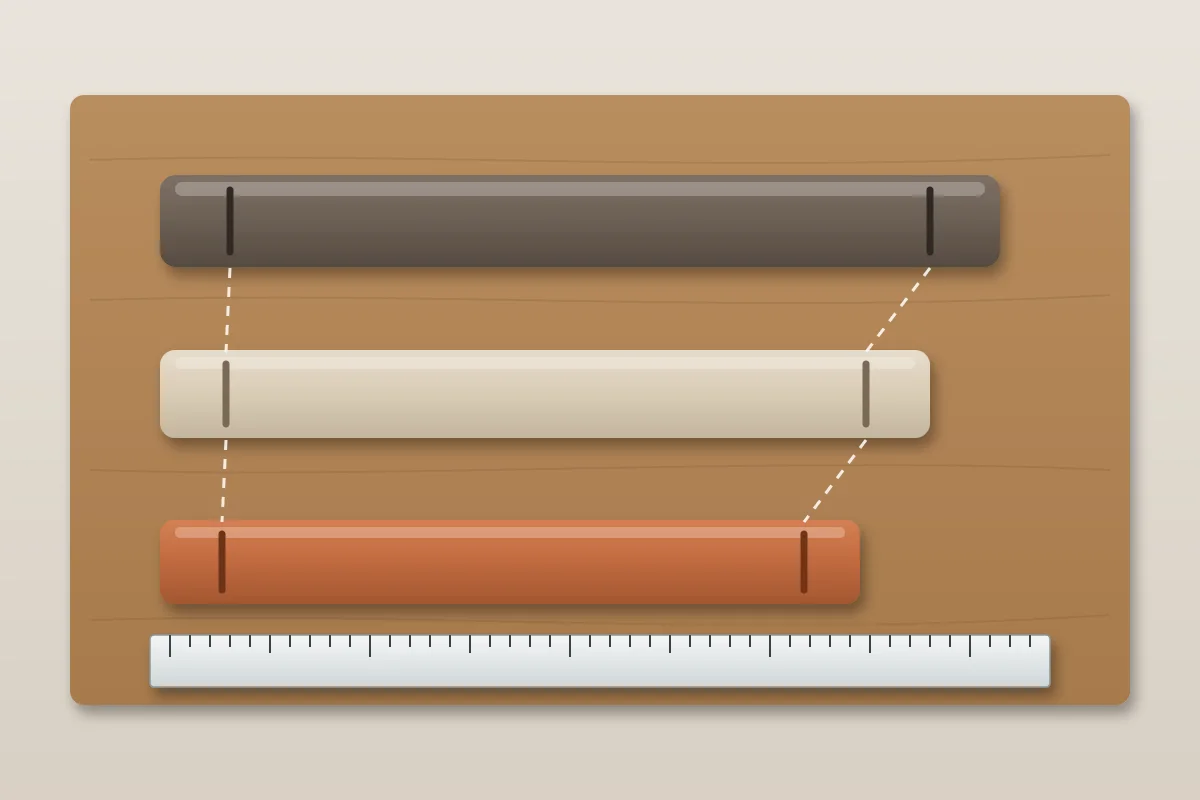
Clay shrinkage is how much a dimension decreases between two stated conditions: from wet clay (WET) to dry (DRY), from dry to fired (FIRED), or from wet straight to fired. To calculate it, you measure the same distance, in the same direction, in both states and divide the difference by the starting length. To compensate for it, you divide the final size you want by the fraction that remains (1 - shrinkage) - you do not add the percentage.
This article is part of the pottery without a wheel guide series. The guide compares the techniques; here the subject is the arithmetic: how to get the shrinkage of your clay, how to combine drying and firing, and how to carry that into a mold, a template or a capacity in mL.
Drying, firing and total shrinkage
During drying, the water that separates the particles leaves, the particles move closer together and the piece shrinks. During firing, densification of the clay body usually adds further shrinkage, but the behavior depends on composition and firing cycle: under some conditions the dimension stays stable or even increases. Each stage has its own reference, and that is where most calculations go wrong. Call L₀ the distance between two marks on the wet clay, Ld the same distance dry and Lf after a recorded firing cycle:
- drying shrinkage: rd = (L₀ − Ld) ÷ L₀
- firing shrinkage: rf = (Ld − Lf) ÷ Ld
- total shrinkage: rt = (L₀ − Lf) ÷ L₀
Multiply by 100 to get a percentage. Note the denominators: firing shrinkage is calculated on the dry length, not the wet one.
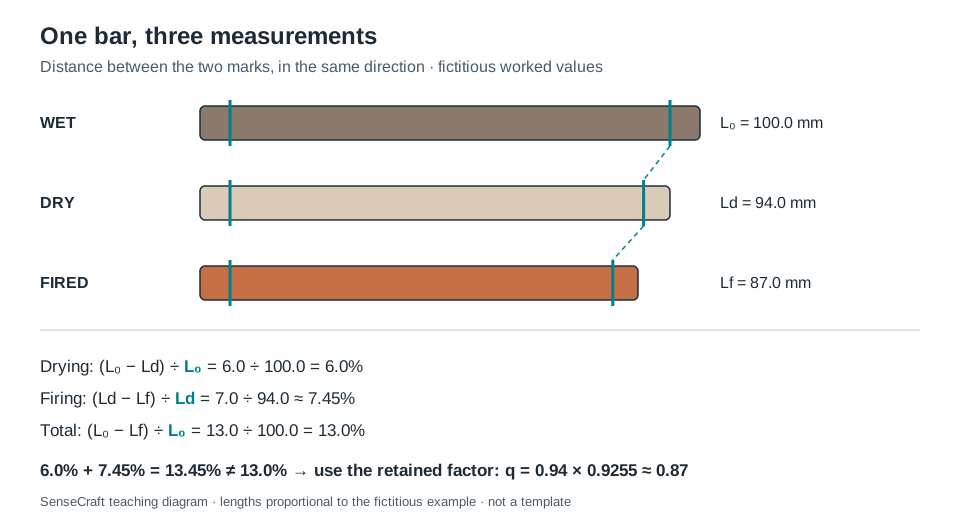
SenseCraft teaching diagram based on chapters 3 and 4 of the book Ceramics by Hand. Lengths are proportional to the example; it is not a template. Fictitious worked values, not data from a tested clay body.
Why don’t the percentages add up?
Because each one is a fraction of a different length. In the book’s example, the bar measures 100.0 mm wet, 94.0 mm dry and 87.0 mm fired. Drying gives 6.0%; firing gives 7.0 ÷ 94.0 ≈ 7.45%; the total is 13.0%. Adding 6.0% and 7.45% would give 13.45%, a number that matches no measurement.
The safe way is to work with the retained factor q, the fraction of the length that remains: qd = 1 - rd for drying, qf = 1 - rf for firing and q = qd × qf for the total. Digitalfire, in its SHAB test procedure, makes the same point: the two shrinkages do not add up to the total, because firing shrinkage starts from the dry length.
How much does clay shrink?
There is no universal percentage. Shrinkage depends on the clay body, preparation, forming, direction and firing. One number can only be compared with another when the states and the measuring method are known; so the way forward is to measure your own clay or to use a data sheet that says where its number comes from.
How to measure the shrinkage of your clay
The manufacturer’s data sheet helps when it says which state the number runs from and to, under which forming and firing conditions. If it does not, or if you have changed the preparation, run a local comparison with test bars. There is no universal bar, number of samples or length; the procedure below is what the book proposes so that the calculation means something.
- Identify the clay. Manufacturer, product, batch, preparation and any additions. Do not group different clay bodies under the same label.
- Make comparable samples with the clay prepared as it will be for the piece, and record the direction in which the slab was rolled or the bar extruded.
- Make two light reference marks, without deep grooves, and decide whether you will read from the center or the edge of the marks. Keep that convention to the end.
- Support the bar so that it can shrink without sticking or bending. If it warps, note it: the straight distance between the marks on a curved bar may not represent linear shrinkage.
- Measure wet without squeezing. Calipers closed on soft clay change the very dimension you are measuring; prefer a ruler resting in the plane of the marks. Read more than once and keep the individual readings.
- Measure in the dry state you defined (air-dry is not the same as oven-dry), at the same marks and in the same direction, and record the criterion.
- Measure after firing, once cool, noting whether it was the bisque or the final firing and the cone or condition reported for the kiln. Shrinkage measured after bisque firing is not necessarily the total shrinkage after the final firing; record which firing stage each measurement represents.
- Calculate each component with its own denominator, per sample and per direction.
How precise is a ruler?
Not very, on short bars. Reading about 100 mm on a ruler with 1 mm divisions, each division is about 1% of the length - the same order of magnitude as the difference you want to see. More decimal places on the calculator do not recover what the ruler did not measure. Longer bars, several readings and more than one sample make the result more useful; even so, it describes that particular clay body under those processing conditions.
Is shrinkage the same in every direction?
Not necessarily. When a slab is rolled or clay is extruded, the particles can become oriented, and shrinkage changes with direction. A study using optical measurement on pressed kaolin (Oummadi and colleagues) measured different shrinkages in two directions during drying. Mark the rolling direction and measure each direction that matters for the piece; a single lengthwise bar does not become a property of every direction.
What if the measurement increases?
The calculation gives negative shrinkage. Keep the sign and investigate before concluding that the clay expanded: a shifted mark, a curved bar, a reading taken at a different point or a mixed-up sample explain many cases.
Does the data sheet use another reference?
Sometimes. Some sources calculate shrinkage on the dry length. If the published ratio is a = (L₀ − Ld) ÷ Ld, the shrinkage based on the wet length is rd = a ÷ (1 + a). Check the convention before comparing numbers from different sources.
How to calculate the size before you build
For the piece to end up at a given fired dimension, divide that dimension by the total factor: wet L = fired L ÷ q. Adding the percentage to the target leaves the piece short.
With the 13% total example (q = 0.87): for 100.0 mm fired, the wet dimension is 100.0 ÷ 0.87 ≈ 114.94 mm. Adding 13% would give 113.0 mm, and 113.0 × 0.87 = 98.31 mm after firing.
When you have the two stages separately, multiply the factors. With 4% drying and 8% firing shrinkage, q = 0.96 × 0.92 = 0.8832 (total shrinkage of 11.68%) and the scale-up factor is 1 ÷ 0.8832 ≈ 1.1322. The step-by-step calculation for a slab with this factor is in how to roll out a clay slab; below it is applied to a whole piece.
| Situation | Correct calculation | Common mistake |
|---|---|---|
| Combining drying and firing | q = (1 - rd) × (1 - rf) | Adding the two percentages |
| Finding the wet dimension | wet L = fired L ÷ q | fired L × (1 + shrinkage) |
| Using a “total wet → fired” figure | Apply it once | Applying the total and then firing shrinkage again |
| Converting area | q² | Using q |
| Converting volume or capacity | q³ | Using q |
| Directions with different shrinkage | One factor per axis, with the direction recorded | One factor for everything |
SenseCraft table based on chapters 3 and 4 of the book. The q² and q³ relationships assume shrinkage that is uniform and equal in every direction; with different factors per axis, area and volume are calculated from each axis’s factor.
Example: a vessel of about 300 mL
The book works through a fictitious project: a vessel that is cylindrical inside, a flat bottom under the wall, a fired inner radius of 40 mm, a usable fill level 60 mm above the inside bottom, an inside depth of 70 mm to the rim, and a 5 mm wall and bottom (an assumption for the calculation, not a thickness recommendation). The ideal usable capacity is π × 40² × 60 ÷ 1,000 ≈ 301.6 mL; to the brim, ≈ 351.9 mL.
With q = 0.8832, each wet dimension is the fired one divided by q:
| Dimension | Fired (FIRED) | Calculated wet (WET) |
|---|---|---|
| Inside diameter | 80 mm | 90.580 mm |
| Outside diameter | 90 mm | 101.902 mm |
| Inside depth to rim | 70 mm | 79.257 mm |
| Outside height | 75 mm | 84.918 mm |
| Wall and bottom | 5 mm | 5.661 mm |
| Usable fill level | 60 mm | 67.935 mm |
Calculated values from the book’s example. The decimal places are there to check the arithmetic; they are not building precision.
To check without redoing everything: the ratio between the columns is the same on every row; outside minus inside diameter gives two walls (101.902 − 90.580 = 11.322 = 2 × 5.661); and multiplying each wet value by 0.8832 gives back the fired one. If a row does not close, a state or a factor has been swapped.
How much does capacity change with shrinkage?
Much more than length. Under shrinkage that is uniform and equal in all three directions, volume is multiplied by q³. With q = 0.8832, q³ ≈ 0.689: volume drops by about 31%, not 11.68%. By the same ideal calculation, a vessel built wet to the dimensions that were meant to be the fired ones would end up holding about 301.6 × 0.689 ≈ 208 mL of usable volume instead of the intended 300 mL. So when shrinkage changes, recalculate the capacity, and check the finished piece: rounded interior corners, glaze and distortion change the real number.
This is the reasoning used in the molds of the Barista Line: the mold surface that shapes the clay is scaled up from the target fired-cup dimensions by dividing them by the reference retained factor, and the post shows how capacity changes when the clay shrinks differently.
When a uniform scale-up is not enough
Dividing by q assumes the piece shrinks evenly. It does not rebuild the form when there is warping, when one region shrinks more than another or when the profile changes a lot between bottom and rim. In those cases, the answer is to revisit process and geometry with data from your own clay, not to add an arbitrary “safety margin”. Uneven shrinkage is also a cause of drying cracks; see how to dry pottery without cracking.
Before committing clay to the piece, check the following:
- every critical dimension has a unit, a state (WET, DRY or FIRED), a direction and a measuring point;
- the shrinkage figure says which state it runs from and to, in which firing and on which reference;
- no shrinkage has been applied twice;
- area was converted with q² and volume with q³;
- any seam or trimming allowance is drawn separately, not mixed into the compensation;
- the reverse check (wet × q) gives back the fired target.
Where this content comes from
This article summarizes chapter 4 and the shrinkage section of chapter 3 of Ceramics by Hand - Foundations and Techniques Without a Wheel, a literature-based guide compiled by SenseCraft. It combines the shrinkage definitions and measuring procedure described in the sources below with worked examples, tables and a diagram developed by SenseCraft. The numerical examples are fictitious and calculated, not measurements of a clay body. The writing was supported by AI tools and edited by SenseCraft. To see where shrinkage comes into each technique, go back to the pottery without a wheel guide.
Sources cited
- Tony Hansen, Digitalfire. SHAB - Shrinkage/Absorption Test, drying, firing and total shrinkage on different reference lengths.
- Tony Hansen, Digitalfire. Drying Shrinkage and Water Content, water, drying shrinkage and the basis of calculation.
- S. Oummadi and colleagues. Optical method for evaluation of shrinkage in two dimensions during drying of ceramic green bodies, Open Ceramics 2, 2020, shrinkage that differs by direction.
- Dave Finkelnburg, Ceramics Monthly. Techno File: Drying 101, irregular shrinkage and stress during drying.
- Margaret Kinkeade, Ceramics Monthly. Tips and Tools: Tar-paper Templates, templates and planning for fired size.
- Andrew Avakian, Ceramic Arts Network. Generating New Ceramic Forms with Slab Pottery Templates, paper templates before clay.
Limits
- This article is a synthesis of published sources, not the result of SenseCraft testing. All numbers are worked examples, not shrinkage percentages of any clay body.
- There is no universal shrinkage: clay body, batch, preparation, forming, direction, support and firing all change the result. Use the figure for your own clay, with known states and method.
- A uniform scale-up does not correct warping or uneven shrinkage between regions; the real capacity of a vessel has to be checked on the finished piece.
Basis: literature review - original article based on the October 2026 Portuguese edition of the SenseCraft handbuilding book, chapter 4 and the shrinkage section of chapter 3. The corresponding material is also available in English in Ceramics by Hand - Foundations and Techniques Without a Wheel (November 2026 edition), with primary sources listed at the end.