
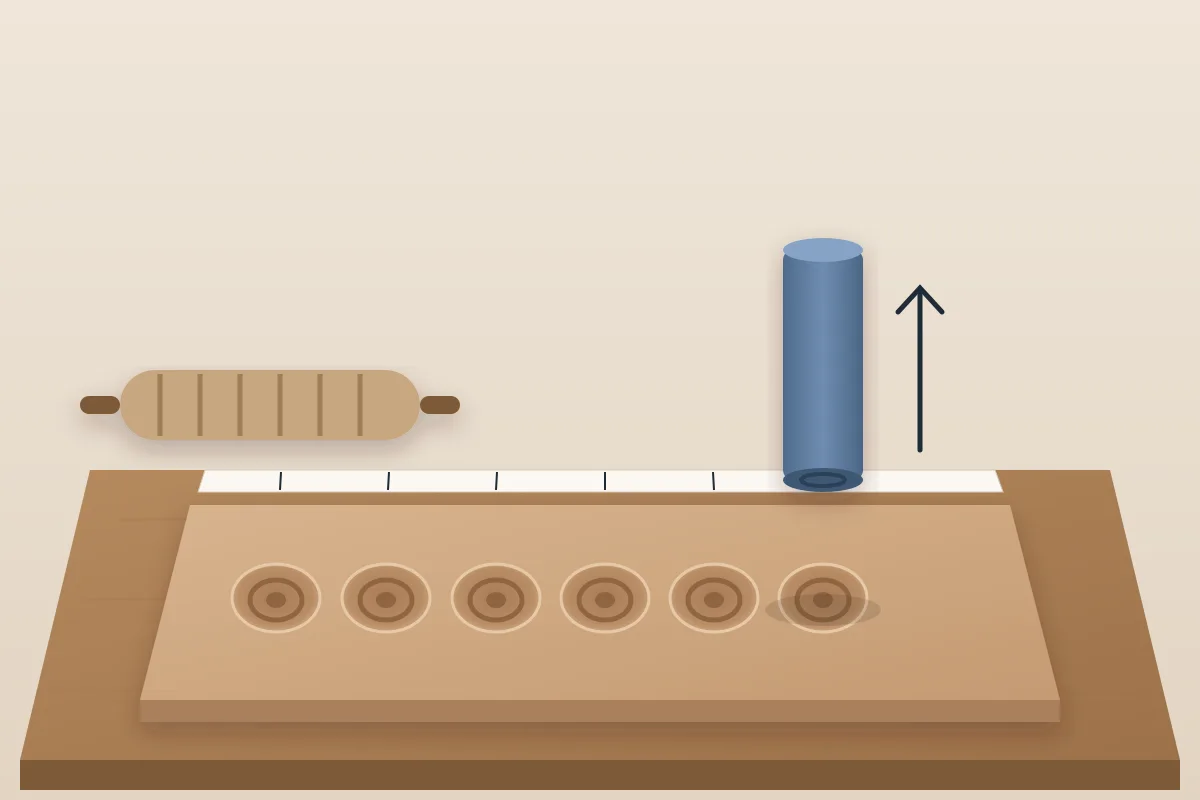
To stamp clay without distorting the piece, work on a slab firm enough to hold its outline and still soft enough to take the mark, support the clay directly behind the area being stamped, and lift the tool out in the same direction it went in. Before the first mark on the piece, make a test on an offcut of the same clay and thickness: that test tells you whether that clay state suits that stamp.
This article is part of the guide to pottery without a wheel. Rolling a slab of even thickness is covered in how to roll out a clay slab, and recognizing the clay states in leather-hard clay. Here the subject is the surface: stamps, texture rollers, carving and applied decoration. Decorative slips (engobes) and glazes are covered in later articles.
Stamps, texture, carving and sprigs: what each does to the clay
Every surface decoration changes the material in one of three ways:
- Displace — stamps, rollers and texture mats push the clay aside. The impression can come with a raised rim around it, a widened outline or a bulge on the back.
- Remove — carving takes material away and reduces the local thickness. An incision, a cut or grooved line, can displace material, remove it or do both, depending on the tool and the clay state.
- Add — applied decoration is a piece made separately and joined to the body. A decorative relief element made separately, usually in a mold, and then applied is called a sprig.
Texture names the result, not the method: a texture can be impressed, carved or added. Relief is the difference in height between parts of the design.
That decides the order: when stamping, leave extra material around the edges before final trimming, because the displaced clay can make the slab spread; if you carve, keep thickness in reserve; if you add, keep contact area free. Each step has to leave the next one possible.
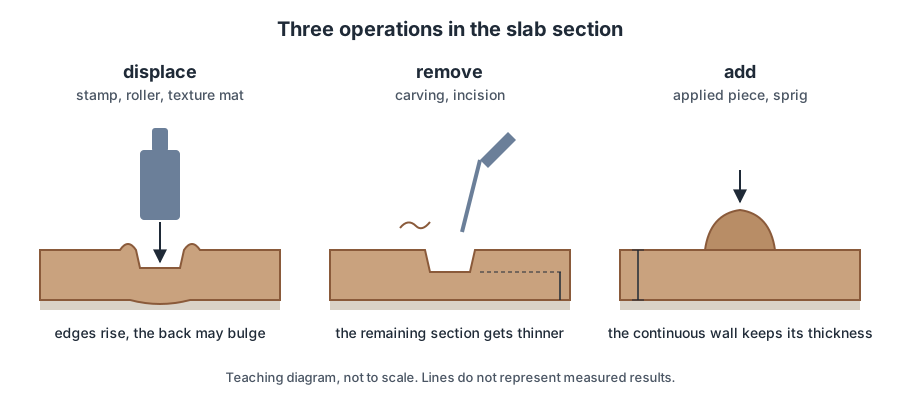
SenseCraft teaching diagram based on chapter 21 of the book Ceramics by Hand, not to scale. The applied piece does not thin the base slab, but it increases the total thickness where it is added.
What clay state is best for stamping?
There is no single state for every operation. Vince Pitelka, in teaching material on the stages of clay, separates shaping in plastic clay from assembling and removing material at firmer stages. In practice:
- A plastic slab takes the mark with little force, but it can stick to the stamp, stretch or lose its outline as the tool comes out.
- A firmer slab holds its shape better, but it can need too much force to impress, and too much force distorts the rest of the piece. If the mark needs more and more force, stop instead of pushing on: forcing clay that has lost its plasticity can crumble the surface or open cracks. Wetting only the clay surface does not restore plasticity throughout the slab.
- For carving, the clay has to hold a clean cut without smearing or crumbling.
Clay-state labels are useful, but the test is what matters. On an offcut of the same clay, thickness and exposure, make the mark and look: did the outline change? Is the mark complete? Did the tool come out without pulling? Did the back bulge? Did the cut leave dust? An offcut that has already dried out does not represent a freshly rolled slab.
Can you stamp leather-hard clay?
It depends on the mark and the tool. A shallow mark and a small stamp can work on a slab that is already firm; a deep texture usually needs more plastic clay. The offcut test decides, without adding force. What changes at each stage is covered in leather-hard clay.
No-kiln exercise. Roll three identical offcuts and press the same stamp into each one, changing only the firmness: one more plastic, one in between, one firmer. Measure the width of each offcut before and after, and note whether the rim rose and whether the back bulged. The order you find holds for that clay and that tool, not for all of them.
Why does my stamp stick to the clay?
The most common causes, in a practical checking order: dried residue on the tool, a cavity with an undercut (an opening narrower than the inside), clay that is too plastic, and lifting the stamp at an angle. Clean, retry on an offcut and, if it continues, change the clay state or the tool. Do not adopt talc, flour, oil or any other powder as a universal recipe: powders spread particles, and other products can interfere with joins, slips and glazes. If the tool maker recommends a release aid, test it on a sample first.
Support the clay behind the stamp
Support underneath carries the weight; backing support takes the tool’s pressure on the face opposite the impression, directly behind the area being worked. A slab on a smooth board has broad backing, as long as there is no grit or clay debris underneath. A curved wall that is already assembled needs a hand or a support that follows the curve. Without it, the wall sinks around the mark. If there is no safe access from inside, decorate the slab before assembly.
For carving the rule is different: fingers out of the path and exit of the blade. Never use your own hand as a stop behind a cut.
How to stamp clay: step by step
- Put the slab on a clean support and check the underside. Leave an outer margin for trimming and an untouched strip to compare thickness later.
- Clean the stamp and test it on the offcut. Start with a clean tool and no release aid.
- Line it up with outside references. Touch down without dragging and press gradually, without striking. Stop when the design reads clearly: a deeper mark is not a better mark.
- Lift out in the direction you went in. Do not twist a stamp with a directional design or use it as a lever. If the slab comes up with it, stop and review clay state, undercuts and contact.
- Check the design, the margins and the back. Clean off clay stuck to the tool before the next mark. Only trim to final size once you have seen how much the slab has moved.
Incomplete detail without distortion points to too little contact or a clogged cavity; a double mark with a shifted edge points to sliding or rocking. Stamping over the same spot rarely restores registration.
Letter stamps and name stamps: watch the mirror image
A stamp pressed face to face produces a reversed image. Letters and asymmetric motifs have to be cut mirrored on the tool. Test before the piece and mark the top and direction on the back of the stamp, away from the face that touches the clay.
How to space stamps along a band
Repetition is planned before the first mark. For a straight band with n motifs of width w, clear gaps g between the motif edges and equal margins m:
L = 2m + nw + (n − 1)g, so g = (L − 2m − nw) / (n − 1), for n ≥ 2.
In the book’s example, L = 180 mm, m = 15 mm, n = 6 and w = 20 mm. That leaves 180 − 30 − 120 = 30 mm for five gaps: g = 6 mm. The pitch between centers is w + g = 26 mm, and the centers sit at 25, 51, 77, 103, 129 and 155 mm from the same edge. Do not confuse the 26 mm between centers with the 6 mm clear gap.
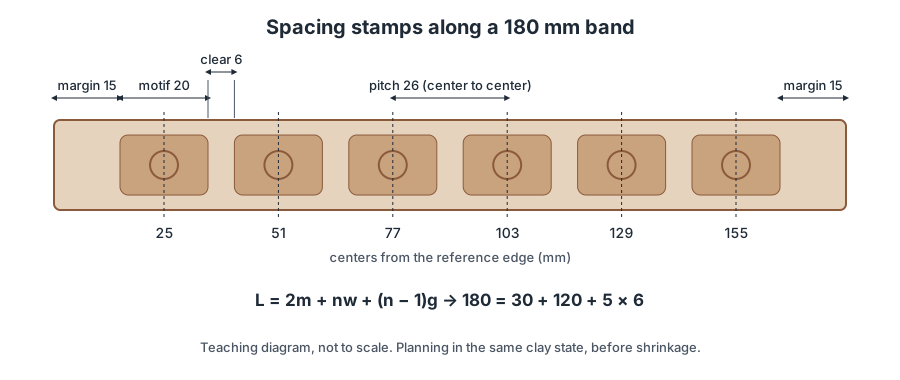
SenseCraft teaching diagram based on chapter 21 of the book, not to scale. Planning values in the same clay state, before shrinkage and before any distortion from impressing.
Three checks help you catch spacing errors:
- A negative g means the motifs do not fit: reduce the number of motifs, their width or the margin.
- A gap that is too small can make one mark push clay into the next. In the book, with five 28 mm stamps on the same band, the gap drops to 2.5 mm; the suggested fix is to go down to four motifs and recalculate.
- Add it back up: last center + half a motif + margin must equal L. Using n gaps instead of n − 1 makes the sum close misleadingly.
Mark the positions on a paper strip beside the piece and place each mark from the origin, not from the previous mark: that way one wrong step does not carry into all the others. On a ring, such as a mug wall, divide the circumference into a whole number of steps or plan a transition zone: the circumference changes when the slab is curved.
Texture rollers and mats: how to keep your reference
A texture roller impresses with a continuous movement; a flat texture mat prints a whole field at once. Both can stretch the slab, especially if it is too plastic or the tool drags. Decide beforehand whether the texture goes on before trimming, before curving or after assembly.
With a roller, leave a run-in and run-out strip outside the useful area, make one continuous pass and do not go back over the same track. The nominal circumference does not tell you the repeat length: on an ideal 40 mm cylinder, one turn is π × 40 ≈ 125.7 mm, but penetration and slip change the actual advance. Measure the repeat on a sample. Peel a flexible mat away gradually with the slab supported; never use the slab as a handle to release it.
How do you avoid a seam with a texture roller?
One continuous pass with a side reference helps reduce misalignment and overlap marks. The join between parallel bands and the seam in the roller’s own pattern need checking separately, on an offcut: if the design does not close around the roller’s circumference, a continuous pass will not remove that seam. The physical edge of the roller can also leave a line that is not part of the pattern: keep it outside the useful area.
AMACO, in a lesson on slab-built pitchers, shows the whole sequence: texture pressed into the slab with a roller, stamps or a texture mold, assembly, and feet and handle made in sprig molds.
Carving clay without thinning the wall too much
Carving is done in clay firm enough to hold the cut and moist enough to cut without making dust. Alana Cuellar, in Pottery Making Illustrated, describes carving a relief in leather-hard clay with a craft knife and a design planned on a grid. Start with shallow passes over a small area, lift out the shavings without tearing off material that is still attached, and check the floor before going deeper. The edge of the motif is not a pivot point.
The remaining thickness is a running total. In the book’s example, an 8.0 mm slab that has already lost 0.5 mm in finishing and then gets a 1.2 mm carving ends up at 8.0 − 0.5 − 1.2 = 6.3 mm, not 6.8 mm. With variations of ±0.3 mm in thickness, ±0.1 mm in finishing and ±0.2 mm in carving, the worst case drops to 5.7 mm. This is arithmetic, not a strength value, and it only applies to removal: an impression can bulge the back. When you can, measure the final section or cut a sacrificial sample.
How should you clean up carving dust?
Collect the shavings while they are still damp and prefer wet cleaning. Do not blow, brush or use compressed air. The HSE’s CR3 sheet, written for dry fettling of unfired ware in an industrial setting, advises vacuuming dry dust or using wet cleaning, avoiding brushes and compressed air and, where a vacuum is used, using one of at least class M. This is UK occupational safety guidance for industrial dry fettling, not a rule specifically written for damp carving. Applicable workplace requirements vary by jurisdiction.
Applied decoration and sprigs: how to attach decoration to clay
Use the same clay body for the piece and the applied decoration. Even so, a thin applied piece or one with more exposed surface can dry faster than the body, depending on its geometry, starting moisture and exposure: a very wet sprig on a firm body is not a compatible join just because both came out of the same bag.
- Shape the base of the applied piece to follow the surface that will receive it. A flat piece on a curved wall touches only in the middle or only at the ends. Slip does not fill a large gap.
- Dry-fit it (without joining, only to test the fit) and mark only what you need.
- Prepare the surfaces according to their state, with controlled scoring and compatible slip where appropriate, without scoring right through a thin piece. The step-by-step join is in how to join clay.
- Bring the parts together, take the pressure with backing support and blend from the center toward the edges, without flattening the relief.
- Remove the excess slip and inspect the edge without pulling on the piece to “test” it.
In a sprig mold, press the clay into the detail, level the back without hollowing the base and release it while keeping its shape. A sprig that slides points to an interface that is too wet or a poor fit; an edge that lifts, to a problem with contact, state or drying. Do not cover a crack with another motif.
Stamp, roller, carving or sprig: which to use?
| Effect you want | Technique | Starting state | What to check |
|---|---|---|---|
| Single mark, name, signature | Stamp | Test between plastic and firm on an offcut | Mirror image, straight lift, back |
| Repeated band | Stamp + paper guide | The same as the test, for every mark | Pitch, margins, closing the ring |
| Continuous field | Roller or texture mat | Firm enough not to stretch | Slab elongation, line from the roller edge |
| Recessed design | Carving | Firm and damp, no dust | Accumulated remaining thickness |
| Raised volume | Applied piece / sprig | Similar in both parts | Fitted base, backing support, drying of the relief |
SenseCraft table based on chapter 21 of the book. The states are starting points for the offcut test, not fixed windows.
Drying textured and relief pieces
Applied pieces, recessed grounds and tall ribs can dry at different rates, depending on geometry, local thickness and exposure. Protect the piece from drafts and local heat, cover it without marking the relief and do not put weight on it to “prevent warping”. What to watch for is in how to dry pottery without cracking.
Before firing, tell whoever runs the kiln the clay body, the maximum thickness and the applied pieces. A slab that stayed flat while drying can still warp in the kiln: Tony Hansen, on Digitalfire, records the development of a ceramic tile in which body, drying and firing are considered together. Glaze can pool in the recesses; make a sample with the same relief before glazing the whole piece.
Texture tools: what to check
- No burrs, splinters or brittle points, and no cavities with undercuts.
- Kept apart from kitchen tools. A stamp used with clay does not go back to food.
- Right to use the design. Owning a commercial texture or an image does not automatically give you rights over the design.
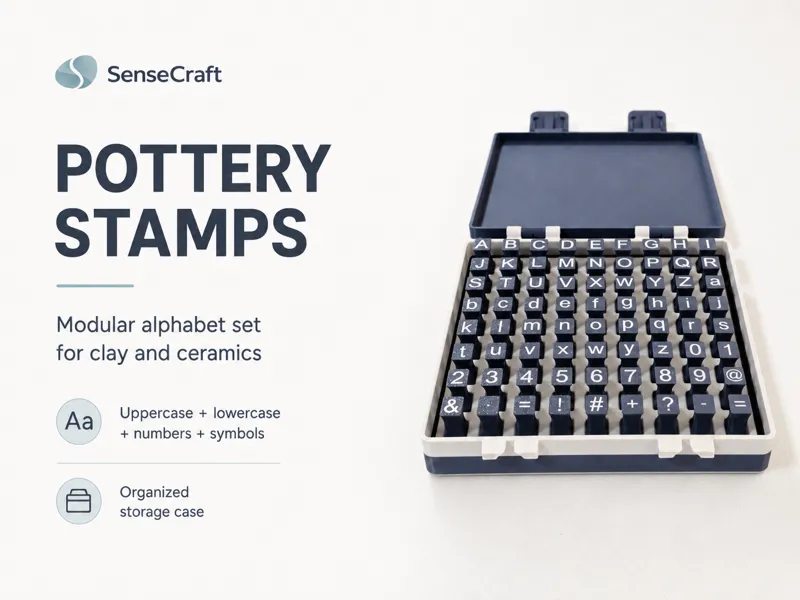
3D-printed stamps, such as SenseCraft’s pottery stamps, follow the same rules: test on an offcut, lift straight out and clean before the residue dries.
Where this content comes from
This article summarizes chapter 21 of Ceramics by Hand — Foundations and Techniques Without a Wheel, a literature-based guide compiled by SenseCraft. It combines manufacturers’ guidance and technical practice cited in the sources below with teaching structure, a decision table, diagrams and studio routines developed by SenseCraft. The writing was assisted by AI tools and edited by SenseCraft. To see surface decoration alongside the other techniques, go back to the guide to pottery without a wheel.
Sources cited
- Vince Pitelka. The Stages of Clay: From Dry Raw Materials to Glaze-Fired Wares, teaching material, 2016 (PDF).
- Health and Safety Executive. CR3 — Dry fettling, silica control sheet for ceramics, March 2019 (PDF).
- Alana Cuellar. Relief Carving Two Ways, Pottery Making Illustrated, November/December 2024.
- AMACO Brent. Clay Pitchers, lesson with textured slabs and sprig molds.
- Tony Hansen, Digitalfire. Making a high quality ceramic tile, project write-up.
Limits
- This article summarizes published sources; it is not the result of SenseCraft testing. Depths, forces and measurements in the text are calculation examples or teaching starting points, not rules.
- There is no universal minimum thickness, carving depth or drying time: it all depends on the clay body, the piece, the support and the environment.
- A good-looking textured surface does not show that the piece is food-safe, can stand outdoor use or can be installed on a wall.
Where to download
Files, print profile and manual are on MakerWorld.
Linked project
 Pottery
 stamps
80 letter, number and symbol stamps for marking soft clay.
Basis: literature review — original article based on the October 2026 Portuguese edition of the SenseCraft handbuilding book, chapter 21. The corresponding material is also available in English in Ceramics by Hand — Foundations and Techniques Without a Wheel (November 2026 edition), with primary sources listed at the end.