
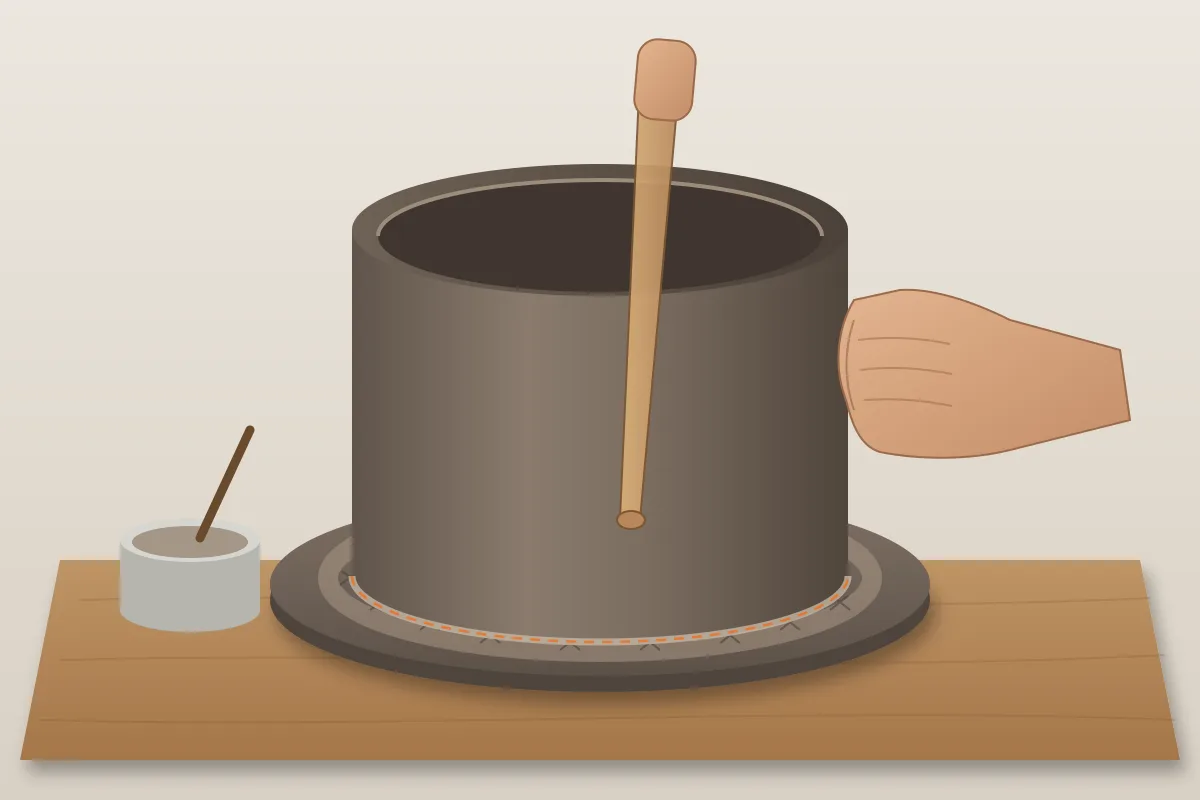
The bottom of a ceramic piece is the lower region that closes the form. When it is a separate slab, it is joined to the wall at a seam; in a continuous bottom, base and wall come from the same slab. To build it, first choose the configuration that suits the piece. When the bottom is a separate slab, decide which outline it must follow, size and cut the disc without distorting it, and join it with pressure close to the seam and backing support on the other side. With a continuous bottom, the attention goes to the transition between wall and base. Mistakes in sizing, joining and drying can cause cracks that only become visible after firing.
This article is part of the pottery without a wheel guide series. A complete mug, step by step, is in how to make a slab mug; here the subject is only the lower region: which configuration to choose, how to size it, how to move it and how to tell whether the seam has closed.
Bottom, joint and support: three different things
It helps to separate the terms before cutting. The bottom is the region that closes the piece underneath; the wall is the side; the joint is the worked volume where the two meet. The line you see on the outside only shows where the joint reaches the surface — a smoothly finished inside floor can coexist with an open joint underneath.
The work support (board, sheet, spacer) is temporary and comes out of the piece. The support surface in use is the part of the finished ceramic piece that rests on the table. Feet and foot rings are a separate topic, covered in the next chapter of the book. Closing, sitting level and being strong are different questions, and answering one does not settle the others.
Four ways to make the bottom of a ceramic piece
The book describes four configurations. They are not a ranking of strength: each one calls for a different outline, access and backing support.
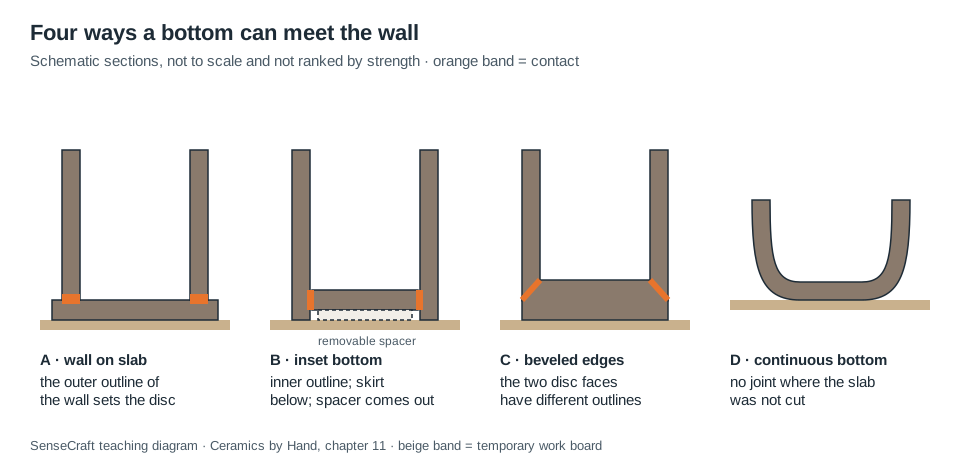
SenseCraft teaching diagram based on chapter 11 of Ceramics by Hand. Sections not to scale and not ranked by strength; in configurations A to C, the orange band marks the contact area.
| The piece | Candidate route | What decides it |
|---|---|---|
| Open form, lower edge accessible | Wall on slab (A) | Continuous coverage and access inside and outside |
| Wall must continue below the floor (skirt) | Inset bottom (B) | Controlled height, clear passage and a spacer that comes out |
| Narrow opening, bottom closure reachable from below | Fitted edges, assembled upside down (C) | Backing support and inspection before closing |
| Shallow vessel, transition the slab can bend into | Continuous bottom (D) | A curve without thinning or cracking at the fold |
SenseCraft table based on chapter 11 of the book.
To start, the book points to the wall-on-slab route on a small, open form. Vince Pitelka describes an assembly of this kind: he uses the cylinder itself to mark the slab, scores and applies slip inside the line, sets the wall down without force, removes the rough excess slab and leaves the flush trim against the wall until leather hard. Margaret Kinkeade shows another route, with a triangular-section coil joined inside the wall and a fitted disc set on it. These are examples of routes, not a comparison that picks a winner.
How to size the bottom
What diameter should the disc be?
It depends on the route. With the wall on the slab, the outer outline of the wall sets the size; with an inset bottom, the inner outline does. For a vertical circular wall of uniform thickness t, Di = Do − 2t. With Do = 92 mm and t = 6 mm, Di = 80 mm.
- On the slab, with a trimming allowance: with a radial allowance a = 1.5 mm, the disc at assembly is 92 + 2 × 1.5 = 95 mm. The extra 3 mm comes off in trimming; it is not a clearance and does not make the piece bigger.
- Inset, with clearance: with a radial clearance c = 0.2 mm, the disc is 80 − 2 × 0.2 = 79.6 mm. The arithmetic shows the difference between radius and diameter; it does not approve 0.2 mm as a real clearance. A negative clearance means interference, and forcing the wall open does not solve it.
What if the wall is slanted?
For a straight wall slanted at β from vertical, with parallel faces and thickness t measured perpendicular to them, the horizontal distance between the faces is t ÷ cos β, not t. With Do = 80 mm, t = 5 mm and β = 20°, Di ≈ 69.36 mm, not 70 mm. For a horizontal disc 5 mm thick set into that wall, the inside diameter changes by 2 × 5 × tan β ≈ 3.64 mm between the two faces, as long as the slant is constant: check both faces and the path the disc takes to get in.
Is a rectangular or oval bottom just the outline plus an allowance?
Not quite. For a box measuring 100 × 80 mm outside, a slab with a 2 mm allowance on each side is 104 × 84 mm, but the corners of the cut still have to be defined. For a 140 × 95 mm ellipse, offsetting the outline by 1.5 mm gives a 143 × 98 mm curve that is not an ellipse with those axes. Keep the whole outline on paper, with orientation marks, as in Veronica Watkins’s templates; width and length alone do not guarantee a fit.
Where does shrinkage come in?
Separately, and without mixing it with trimming. If you have data on how much the disc changes between cutting and assembly, divide: with a hypothetical factor of 0.99, the cut would be 95 ÷ 0.99 ≈ 95.96 mm. Without data for your clay, treat the size as a candidate and adjust it during the dry fit. After trimming to 92 mm, the drying and firing factors apply to 92 mm, not to the 95 mm of the cut disc. The full arithmetic of retained factors is in clay shrinkage.
Cutting and moving the bottom without distorting it
Prepare the slab as described in how to roll out a clay slab, with a usable area larger than the outline, and check the thickness at the center and along the joint band. There is no universal ratio between bottom and wall thickness: matching them can make the transition easier, but it is not a strength rule, and a thicker bottom may dry more slowly than the wall.
Before joining, compare how the two parts respond on a scrap of each: a short cut, a light mark and a little pressure with the joining tool. If the wall barely takes a mark and the disc spreads, their conditions are too far apart. Do not soak the firmer part to even them out.
For cutting and lifting:
- Cut with continuous support under the whole area and your supporting hand out of the blade’s path. A blade that needs force calls for replacement or another method.
- Mark the reference face and the orientation; on a beveled edge, note which face has the larger outline.
- Release the disc from the table with a wire held flush, a spatula kept almost parallel or by gradually pulling out the separating sheet, with the clay supported. Do not lever it up by the edge.
- Whenever possible, assemble on the same board you cut on; if you must transfer, carry the whole board with your hands underneath.
- Measure the outline before and after each move: a disc cut round that arrives oval points to the lifting, not to the template.
For dry clay dust, prefer wet cleaning or a vacuum cleaner rated for dust Class M or higher; HSE advises against brushes and compressed air for removing dust. Avoid dry sweeping and vacuums not rated for this dust, which can put fine particles back in the air.
How to attach the bottom to the wall
Wall on slab
- Dry fit first. Set the wall on the supported slab and check continuous coverage, orientation and access. Lift it off without dragging the mark.
- Prepare only the contact bands — the lower edge of the wall and the corresponding contact band on the bottom slab. Score moderately and apply compatible slip if the clay and its condition call for it; do not cover the whole floor or leave puddles. The general joining technique is in how to join clay with score and slip.
- Set it down without sliding. Lower the wall onto the marks; with an oval or rectangular form, do not twist it to make it fit.
- Work opposite sections, with the board taking the downward force and a hand outside taking the sideways force. Heavy pressure on the rim distorts the form without improving the joint.
- Blend from the inside with a rounded tool, moving clay across the joint without gouging a channel. A thin coil only goes in if it can be blended into both surfaces.
- Trim the outside later, once the edge takes a cut without distorting, keeping the section under the joint intact.
Inset bottom
Decide the height of the disc’s underside and prepare a wide, removable spacer with its top at that height (intermediate sheets count). Dry fit, check height and contact all the way around, prepare the edge and the inner band of the wall, and work opposite sections, checking that the disc does not tilt. A clay coil used as a seat is a permanent part of the joint; the spacer is temporary and has to come out before shrinkage grips it, without twisting the joint. If the disc drops below its level or sticks above it, check its size, edge profile and support — do not fill the gap with paste.
Do you need to compress the bottom?
You need to work the joint, which is different from smoothing the surface. Smoothing removes marks; working the joint moves clay into the meeting point with resistance on the other side. Pressing the center of an unsupported bottom pushes the disc and does not close the edge. To check a new method, join a sample with the same section and cut it open while still workable: the cut shows gaps that smoothing hides. This applies to the sample; it does not certify the whole piece.
Drying, flipping and inspection
While the piece dries, watch four regions: the center of the bottom, the joint band, the adjacent wall and the underside against the board. They dry at different rates because of thickness, local water and exposure. Tony Hansen, at Digitalfire, stresses that the problem is uneven drying, not speed as such. If the wall firms up long before the bottom, rethink covering, airflow and contact with the board instead of heating the center. More detail in how to dry pottery without cracking.
Flipping the piece is an option, not a step set by the clock. Rehearse the turn with empty supports, use a wide cradle under firm regions, with clearance at the rim, and never lift by a freshly joined bottom. Remove temporary supports and materials before firing.
The piece rocks: now what?
Clean the reference surface, set the piece down without pressing and note where the gap appears; then rotate it. If the gap moves with the piece, look at its resting band; if it stays in the same place on the bench, the reference surface is not flat. Rocking can come from stuck grit, an uneven edge or a warped bottom.
Why does the bottom crack?
There is no single cause. The table below sets out what to check before correcting.
| Sign | Hypotheses to check | Next step |
|---|---|---|
| Seam opens around the wall | Incomplete contact, mismatched conditions, uneven drying | Compare with the initial fit; do not cover it with paste |
| Disc cut round arrives oval | Lifting, sticking or transport | Measure at each stage and rethink the transfer |
| Center sinks during joining | Pressure over the span, narrow support, soft clay | Restore wide support and rethink thickness |
| Crack starts at a corner | Notch, thickening, handling or drying | Examine the section and the sequence |
| Line returns after smoothing | Joint not rebuilt | Stop cosmetic finishing and consider remaking |
| Defect appears after firing | Earlier unseen origin or firing | Compare records with the kiln operator |
SenseCraft table based on chapter 11 of the book.
An S-crack in the center does not, on its own, prove a lack of compression. Simon Levin attributes it to uneven shrinkage stress during drying and reports a small, exploratory comparison without statistical significance, made with thrown pieces; it is a reminder that appearance alone is not a diagnosis.
Can you fix a cracked bottom before firing?
Only while the clay is still workable and you can reach and rebuild the affected volume.
A separation that runs through a dry piece is not resolved with water or a film of clay: when the volume cannot be rebuilt, remaking is the sound technical decision. Other defects are covered in pottery defects.
Before firing, follow the guidance of whoever runs the kiln: appearance and touch do not guarantee that the inside is dry. A piece that feels cool to the touch may still hold moisture, but that observation is not conclusive; the absence of that feeling does not guarantee that the piece is dry either. Do not fill unfired clay with water to “test” the bottom; and a fired piece that does not leak still needs its own assessment for food, heat and loads.
Where this content comes from
This article summarizes chapter 11 of Ceramics by Hand — Foundations and Techniques Without a Wheel, a literature-based guide compiled by SenseCraft. It combines the assembly methods and precautions described in the sources below with worked examples, tables and diagrams developed by SenseCraft. The dimensions are calculated teaching examples, not recommendations for a clay body. The writing was supported by AI tools and edited by SenseCraft. To see where the bottom comes into each technique, go back to the pottery without a wheel guide.
Sources cited
- Vince Pitelka. Making Soft-Slab Cups and Boxes, 2021, wall set on the slab and delayed trimming.
- Margaret Kinkeade, Pottery Making Illustrated. How to Make a Lovely Handbuilt Pitcher, triangular seat coil and fitted disc.
- Veronica Watkins, Pottery Making Illustrated. Covered Tray, outline templates with registration marks.
- Tony Hansen, Digitalfire. Drying Ceramics Without Cracks and Cracking of Clays During Drying, uneven drying, section and joints.
- Simon Levin, Pottery Making Illustrated. Crack Pots, S-cracks and uneven shrinkage.
- Health and Safety Executive. How to reduce hand knife injuries, PPIS12 rev1, 2015, the right knife, support and blade storage.
- Health and Safety Executive. CR3 Dry fettling, COSHH essentials in ceramics, wet cleaning and vacuuming of silica dust.
- Skutt. FAQs – Potters, drying ware before firing and residual moisture in the kiln.
Limits
- This article is a synthesis of published sources, not the result of SenseCraft testing. The dimensions are worked examples, not recommended thicknesses, clearances or shrinkage values.
- There is no universal bottom thickness, fit clearance or drying time: clay body, clay condition, span, support and environment all change the answer.
- A bottom that closes, sits level and does not leak is not thereby qualified for food, hot liquids, oven use or loads; those uses need their own assessment.
Basis: literature review — original article based on the October 2026 Portuguese edition of the SenseCraft handbuilding book, chapter 11. The corresponding material is also available in English in Ceramics by Hand — Foundations and Techniques Without a Wheel (November 2026 edition), with primary sources listed at the end.